1.LangGraph概述 1.1 什么是LangGraph LangGraph 是一个低级编排框架(可以直接掌控系统行为的原子级组件)和运行时环境,用于构建、管理和部署长期运行的有状态智能体(agents)。核心理念是将 Agent 工作流建模为图(Graph),其中:
节点(Nodes):代表计算单元,可以是 LLM 调用、工具执行或任何自定义逻辑
边(Edges):定义节点之间的转换逻辑,决定执行流程
状态(State):在整个图执行过程中共享和传递的数据
LangGraph提供了构建生产级智能体应用的核心能力:
持久化执行:构建能够从故障中恢复并长时间运行的智能体
人机协作:在任何时刻检查和修改智能体状态
记忆管理:支持短期工作记忆和跨会话的长期记忆
流式处理:专为流式工作流设计
生产级部署:为有状态、长期运行的工作流提供可扩展的基础设施
LangGraph 可独立使用,也可与 LangChain、LangSmith 无缝集成。
LangGraph与LangChain的高级抽象不同,它提供了更细粒度的控制,让开发者能够精确控制智能体的执行流程,适合需要定制化编排的复杂应用场景。
1.2 为什么需要LangGraph 随着应用复杂度的提升,传统的 Agent 框架往往面临着状态管理混乱、执行流程不可控、错误恢复困难等挑战。大语言模型的使用不仅仅是作为执行工具,而更多作为推理引擎的需求在日益增长。这种转变带来的是更多的重复(循环) 和复杂条件 的交互需求,这就导致基于LCEL(LangChain Expression Language)的线性序列构建方式在构建更复杂、更智能的系统时显示出了明显的局限性。
LangGraph 作为 LangChain 团队推出的新一代 Agent 框架,通过引入图计算模型和状态机理念,为构建生产级 AI Agent 提供了全新的解决方案。
复杂的多智能体系统
需要长期记忆的应用
需要人工审核的工作流
后台处理任务和实时交互
需要精细控制的定制化智能体编排与LangChain区别
特性
LangGraph
LangChain
抽象级别
低级,提供细粒度控制
高级,提供开箱即用的链
持久化
原生支持
需要额外实现
状态管理
内置状态机和检查点
需要自行管理状态
执行模型
基于图的并行执行
线性链式执行
适用场景
复杂、有状态的工作流
简单的链式调用
langgraph:工作流workflow为主角,更细的粒度
2 LangGraph架构设计 2.1 Pregel 架构 LangGraph 的运行时基于 Google 的 Pregel 算法,这是一种用于大规模并行图计算的模型。执行过程分为三个阶段:
Plan(规划):确定本轮要执行的节点
Execution(执行):并行执行所有选中的节点
Update(更新):将节点输出更新到通道(channels)
每个执行轮次称为一个”超步(super-step)”,系统会持续迭代直到没有节点需要执行。
Actors (PregelNode) 订阅通道、读取和写入数据的节点,实现LangChain的Runnable接口。
Channels(通道) 用于actors之间通信,包括:
LastValue:存储最后发送的值
Topic:可配置的发布-订阅主题
BinaryOperatorAggregate:用于聚合操作
2.2 简单示例 langgraph示例代码 1 2 3 4 5 6 7 8 9 10 11 12 13 14 15 16 17 18 19 20 21 22 23 24 25 26 27 28 29 30 31 32 33 34 conda create -n langgraph python==3.12 conda activate langgraph pip install -U langgraph 1. 确认成功pip show langgraph from langgraph.graph import StateGraph, MessagesState, START, ENDdef this_is_a_method (params1:int ,param2:int ): print ("this is a print" ) 1 、定义节点函数def mock_llm (state: MessagesState ):""" 模拟调用LLM """ `return {"messages" : [{"ole" : "ai" , "content" : "hello world" }]}` 2 、定义图graph = StateGraph(MessagesState) graph.add_node(mock_llm) graph.add_edge(START, "mock_llm" ) graph.add_edge("mock_llm" , END) graph = graph.compile () response = graph.invoke({"messages" : [{"role" : "user" , "content" : "hi!" }]}) print (response)
3. Graph API 从核心来看,LangGraph 将智能体工作流建模为图。你可以使用三个关键组件来定义智能体的行为:
State:一种共享数据结构,用于表示应用程序的当前快照。它可以是任何数据类型,但通常使用共享状态模式来定义。
Nodes:对智能体逻辑进行编码的函数。它们接收当前状态作为输入,执行一些计算或副作用,并返回更新后的状态。
Edges:根据当前状态确定下一个要执行的Node的函数。它们可以是条件分支或固定转换。
节点执行工作,边指示下一步该做什么 。通过组合Nodes和Edges,可以创建复杂的、循环的工作流,这些工作流会随着时间推移不断演化状态。不过,真正的强大之处在于LangGraph对该状态的管理方式。Nodes和Edges只不过是函数——它们可以包含大语言模型,或者仅仅是一些传统代码。
StateGraph类是要使用的主要图类。它由用户定义的State对象进行参数化。
要构建图,首先需要定义状态,然后添加节点和边,接着进行编译。
3.1 State 定义图时,首先要做的是定义图的State。State由图的schema以及reducer函数组成,其中reducer函数指定了如何对状态进行更新。State的schema将作为图中所有Nodes和Edges的输入模式,它可以是TypedDict或Pydantic模型。所有Nodes都会发出对State的更新,然后使用指定的reducer函数应用这些更新。
3.1.1 Schema 指定图的架构的主要方式是使用TypedDict。如果想在状态中提供默认值,请使用dataclass。
LangGraph 中 state_schema、input_schema 和 output_schema 这三个概念是用于管理图状态的不同方面:
state_schema 这是图的完整内部状态,包含了所有节点可能读写的字段,必须指定,不能为空。
是图的”全局状态空间”
所有节点都可以访问和写入这个 schema 中的任何字段
定义图接受什么输入,是 state_schema 的子集
特点:
可选参数,如果不指定,默认等于 state_schema
限制图的输入接口,只能传入这些字段
是 state_schema 的子集或相等
output_schema 定义图返回什么输出,是 state_schema 的子集
可选参数,如果不指定,默认等于 state_schema
限制图的输出接口,只返回这些字段
是 state_schema 的子集或相等
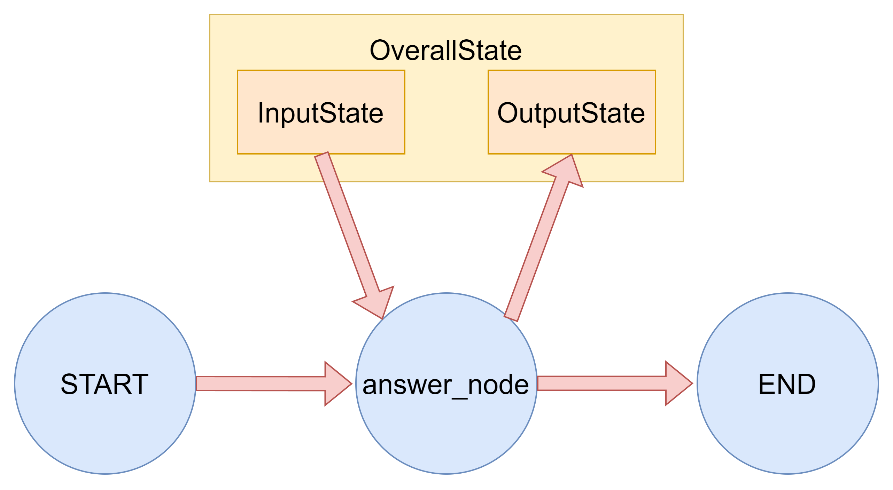
下图中展示了一个输入输出状态分离 的图结构示例,其中OverallState为该图的主状态,其中包含了InputState和OutputState作为子输入和输出状态,用于被读取和被写入。OverallState继承了InputState和OutputState中所有的状态信息。
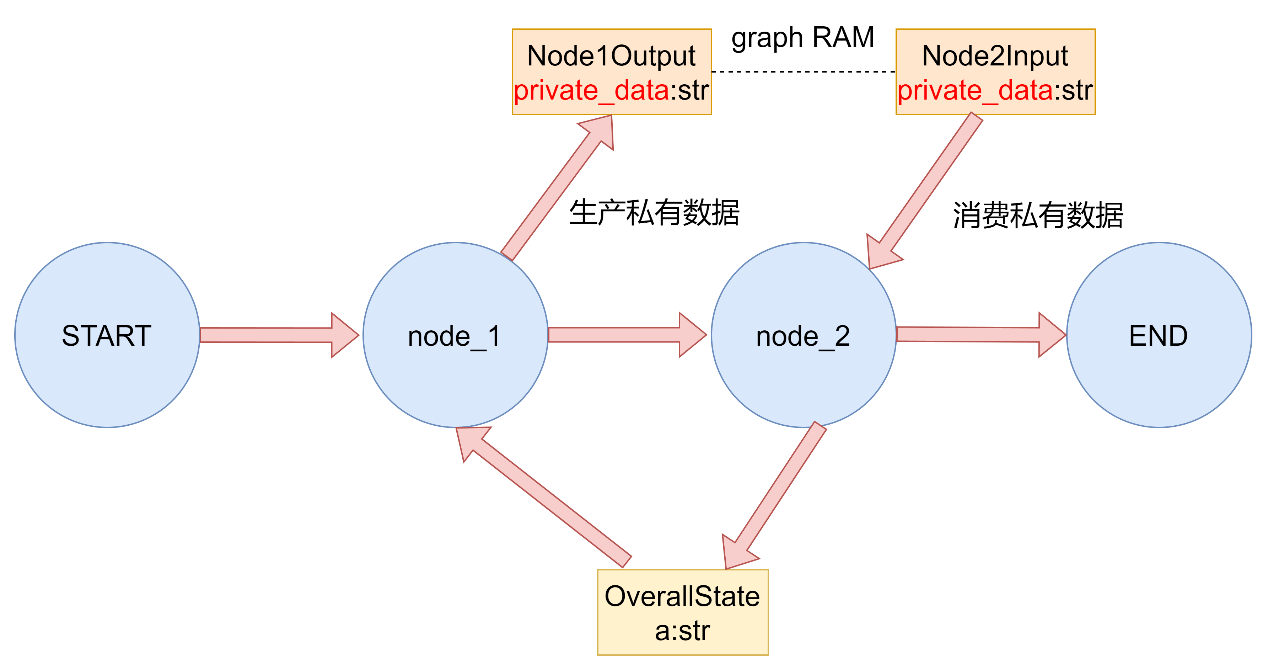
下图中展示了一个私有状态传递 的图结构,OverallState为图中的主状态,其中node_1接收OverallState,将输出写入到私有状态Node1Output中的private_data字段中。但此时图中的主状态并没有该字段,于是将private_data字段与对应的数据构成的kv对暂存到RAM中。在进入下一个节点node_2的时候,接收参数为Node2Input中的同名字段private_data。图的管理行为会提取出该字段,并在暂存区寻找有无对应的字段,发现存在,对private_data进行消费,并将node_1赋的值传递到node_2中,在进行了消费之后销毁内存中的该字段,实现私有字段的传递。
LangGraph 图输入输出模式和私有状态传递演示
本质就是通过节点方法的传入参数和返回值中的type-hint进行表明
该演示展示了:
如何定义图的输入和输出模式
如何在节点间传递私有状态
langgraph中的状态消费 1 2 3 4 5 6 7 8 9 10 11 12 13 14 15 16 17 18 19 20 21 22 23 24 25 26 27 28 29 30 31 32 33 34 35 36 37 38 39 40 41 42 43 44 45 46 47 48 49 50 51 52 53 54 55 56 57 58 59 60 61 62 63 64 65 66 67 68 69 70 71 72 73 74 75 76 77 78 79 80 81 82 83 84 85 86 87 88 89 90 91 92 93 94 95 96 97 98 99 100 101 102 103 104 105 106 107 108 109 110 111 112 113 114 115 116 117 118 119 from langgraph.graph import StateGraph, START, ENDfrom typing_extensions import TypedDict定义输入状态模式 class InputState (TypedDict ): question: str 定义输出状态模式 class OutputState (TypedDict ): answer: str 定义整体状态模式,结合输入和输出 class OverallState (InputState, OutputState): pass 定义处理节点 def answer_node (state: InputState ): """ 处理输入并生成答案的节点 Args: state: 输入状态 Returns: dict: 包含答案的字典 """ print (f"执行 answer_node 节点:" ) print (f" 输入: {state} " ) answer = "再见" if "bye" in state["question" ].lower() else "你好" result = {"answer" : answer, "question" : state["question" ]} print (f" 输出: {result} " ) return result 定义整体状态(这是在节点间共享的公共状态) class OverallStatePrivate (TypedDict ): a: str node_1 的输出包含不属于整体状态的私有数据 class Node1Output (TypedDict ): private_data: str 私有数据仅在 node_1 和 node_2 之间共享 def node_1 (state: OverallStatePrivate ) -> Node1Output: """ 第一个节点,生成私有数据 Args: state: 整体状态 Returns: dict: 包含私有数据的字典 """ output = {"private_data" : "由 node_1 设置" } print (f"进入 node_1 节点:" ) print (f" 输入: {state} " ) print (f" 返回: {output} " ) return output 节点2 的输入只请求node_1之后可用的私有数据 class Node2Input (TypedDict ): private_data: str def node_2 (state: Node2Input ) -> OverallStatePrivate: """ 第二个节点,可以访问node_1的私有数据 Args: state: 包含私有数据的输入状态 Returns: dict: 更新的整体状态 """ output = {"a" : "由 node_2 设置" } print (f"进入 node_2 节点:" ) print (f" 输入: {state} " ) print (f" 返回: {output} " ) return output 节点3 只能访问整体状态(无法访问node_1的私有数据) def node_3 (state: OverallStatePrivate ) -> OverallStatePrivate: """ 第三个节点,只能访问整体状态 Args: state: 整体状态 Returns: dict: 更新的整体状态 """ output = {"a" : "由 node_3 设置" } print (f"进入 node_3 节点:" ) print (f" 输入: {state} " ) print (f" 返回: {output} " ) return output def demo_input_output_schema (): """演示输入输出模式""" print ("= 演示输入输出模式 =" ) builder = StateGraph(OverallState, input_schema=InputState, output_schema=OutputState) builder.add_node("answer_node" , answer_node) builder.add_edge(START, "answer_node" ) builder.add_edge("answer_node" , END) graph = builder.compile () result = graph.invoke({"question" : "你好" }) print (f"图调用结果: {result} " ) print () def demo_private_state (): """演示私有状态传递""" print ("= 演示私有状态传递 =" ) builder = StateGraph(OverallStatePrivate).add_sequence([node_1, node_2, node_3]) builder.add_edge(START, "node_1" ) graph = builder.compile () response = graph.invoke({ "a" : "在开始时设置" , }) print () print (f"图调用的输出: {response} " ) print () def main (): """主函数""" print ("= LangGraph 图输入输出模式和私有状态传递演示 =\n" ) demo_input_output_schema() demo_private_state() print ("= 演示完成 =" ) if name == "main" : main()
^ab255f
3.1.2 Reducer reducer是理解节点更新如何应用于State的关键,State中的每个键都有其独立的reducer函数。每个node的返回值中的每个key与全局state_schema中对应的key进行合并更新,具体更新逻辑取决于每个key指定的reducer函数。
Reducer常用函数有以下几种:
默认行为:未指定Reducer时使用覆盖更新
add_messages:用于消息列表追加
operator.add:用于列表追加或数值累加
operator.mul:用于数值相乘
自定义Reducer:支持用户自定义合并逻辑
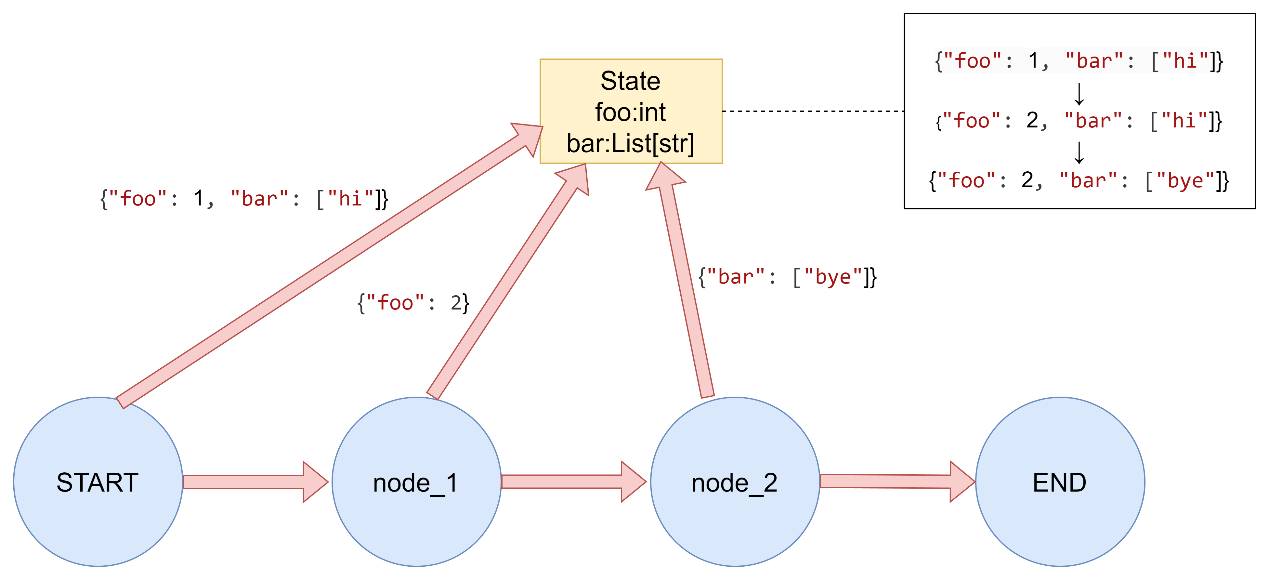
1. 默认覆盖 如果未明确指定reducer函数,则默认对该键的更新是覆盖行为。
reducer默认行为演示 1 2 3 4 5 6 7 8 9 10 11 12 13 14 15 16 17 18 19 20 21 22 23 24 25 26 27 28 29 30 “”“
LangGraph Reducer函数演示 - 默认Reducer(覆盖更新) “”“ from typing import List
from typing_extensions import TypedDictfrom langgraph.graph import StateGraph, START, END1. 默认Reducer(覆盖更新)class DefaultReducerState (TypedDict ): foo: int bar: List [str ] def node_default_1 (state: DefaultReducerState ) -> dict : return {"foo" : 2 } def node_default_2 (state: DefaultReducerState ) -> dict : return {"bar" : ["bye" ]} def run_demo ():
print ("1. 默认Reducer(覆盖更新)演示:" )
builder = StateGraph(DefaultReducerState)
builder.add_node("node1" , node_default_1) builder.add_node("node2" , node_default_2) builder.add_edge(START, "node1" ) builder.add_edge("node1" , "node2" ) builder.add_edge("node2" , END) graph = builder.compile () result = graph.invoke({"foo" : 1 , "bar" : ["hi" ]})
print (f"初始状态: {{'foo': 1, 'bar': ['hi']}}" )
print (f"执行结果: {result} \n" ) if name == "main" : run_demo()
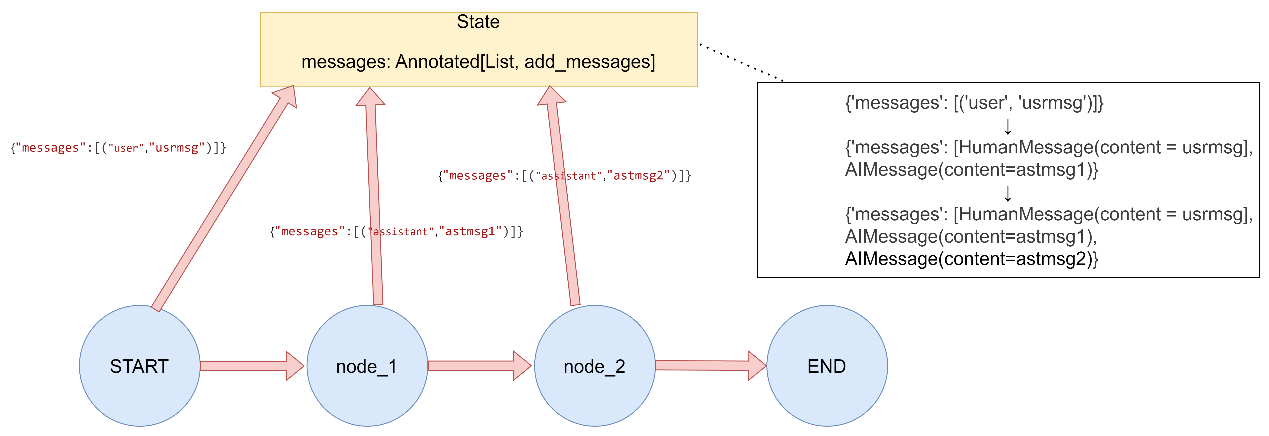
2. add_messages 专门用于处理消息列表,当使用 add_messages时,消息会被转换为 LangChain 的消息对象(如 HumanMessage、AIMessage 等)。
消息列表的自动追加 1 2 3 4 5 6 7 8 9 10 11 12 13 14 15 16 17 18 19 20 21 22 23 24 25 26 27 28 29 30 31 32 33 34 35 36 37 38 39 """ LangGraph Reducer函数演示 - add_messages Reducer(消息列表专用) """ from typing import Annotated, List from typing_extensions import TypedDictfrom langgraph.graph import StateGraph, START, ENDfrom langgraph.graph.message import add_messages2. add_messages Reducer(消息列表专用) class AddMessagesState (TypedDict ): messages: Annotated[List , add_messages] def chat_node_1 (state: AddMessagesState ) -> dict : return {"messages" : [("assistant" , "Hello from node 1" )]} def chat_node_2 (state: AddMessagesState ) -> dict : return {"messages" : [("assistant" , "Hello from node 2" )]} def run_demo (): print ("2. add_messages Reducer(消息列表专用)演示:" ) builder = StateGraph(AddMessagesState) builder.add_node("chat1" , chat_node_1) builder.add_node("chat2" , chat_node_2) builder.add_edge(START, "chat1" )
builder.add_edge(START, "chat2" ) builder.add_edge("chat1" , END) builder.add_edge("chat2" , END) graph = builder.compile () result = graph.invoke({"messages" : [("user" , "Hi there!" )]}) print (f"初始状态: {{'messages': [('user', 'Hi there!')]}}" ) print (f"执行结果: {result} \n" ) if name == "main" : run_demo()
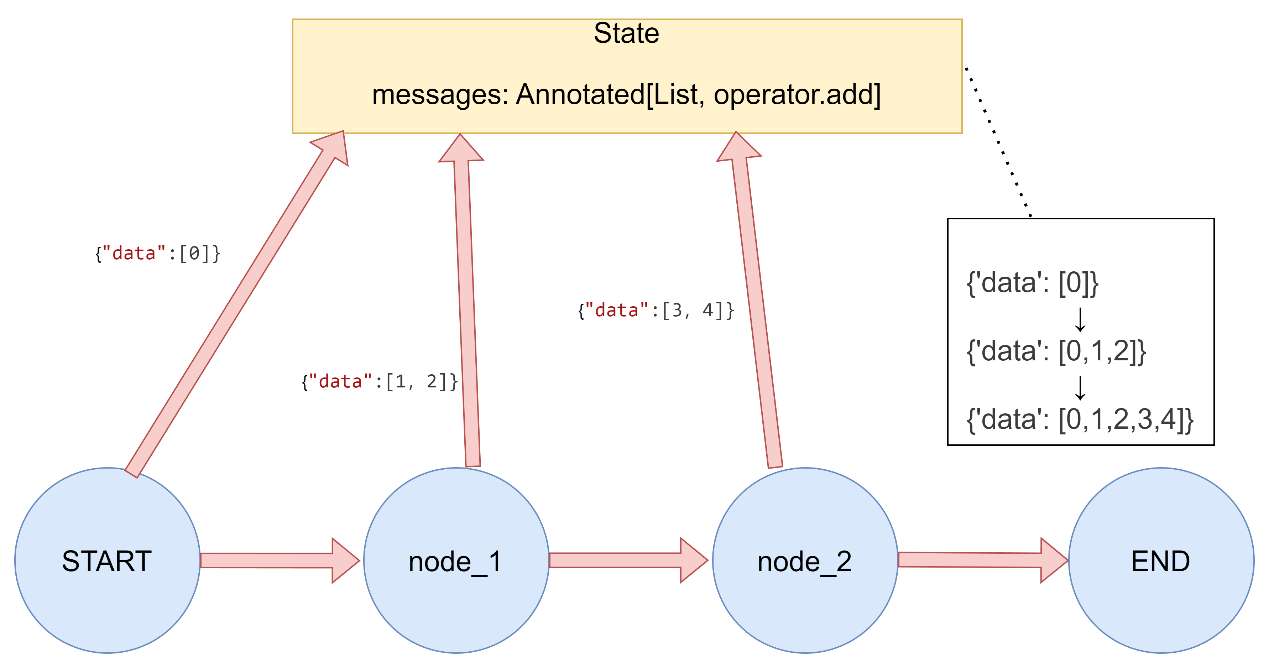
3. operator.add 将元素追加到现有元素中,支持列表、字符串、数值类型的追加。
列表追加 列表追加 1 2 3 4 5 6 7 8 9 10 11 12 13 14 15 16 17 18 19 20 21 22 23 24 25 26 27 28 29 30 31 32 """ LangGraph Reducer函数演示 - operator.add Reducer(列表追加) """ import operatorfrom typing import Annotated, List from typing_extensions import TypedDictfrom langgraph.graph import StateGraph, START, END3. operator.add Reducer(列表追加)class ListAddState (TypedDict ): data: Annotated[List [int ], operator.add] def producer_1 (state: ListAddState ) -> dict : return {"data" : [1 , 2 ]} def producer_2 (state: ListAddState ) -> dict : return {"data" : [3 , 4 ]} def run_demo (): print ("3.1 operator.add Reducer(列表追加)演示:" ) builder = StateGraph(ListAddState) builder.add_node("producer1" , producer_1) builder.add_node("producer2" , producer_2) builder.add_edge(START, "producer1" ) builder.add_edge(START, "producer2" ) builder.add_edge("producer1" , END) builder.add_edge("producer2" , END) graph = builder.compile () result = graph.invoke({"data" : [0 ]}) print (f"初始状态: {{'data': [0]}}" ) print (f"执行结果: {result} \n" ) if name == "main" : run_demo()
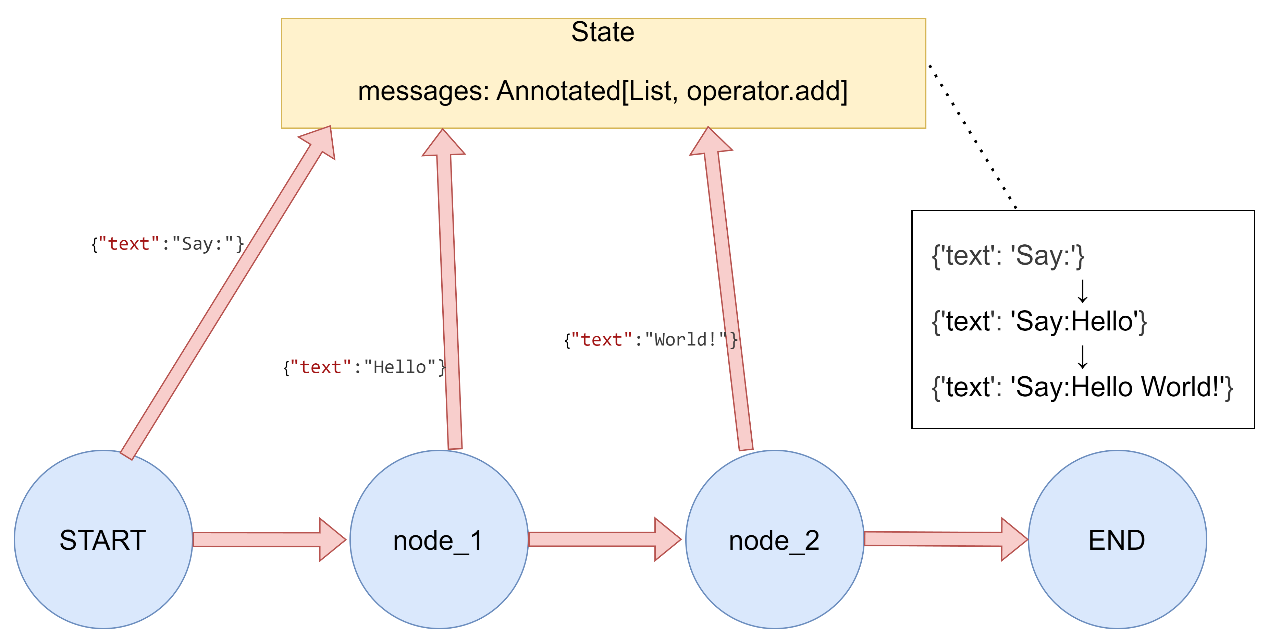
字符串连接
字符串自动拼接 1 2 3 4 5 6 7 8 9 10 11 12 13 14 15 16 17 18 19 20 21 22 23 24 25 26 27 28 29 30 31 32 33 34 35 36 37 """ LangGraph Reducer函数演示 - 字符串连接Reducer """ import operatorfrom typing import Annotatedfrom typing_extensions import TypedDictfrom langgraph.graph import StateGraph, START, END6. 字符串连接Reducer class StringConcatState (TypedDict ): text: Annotated[str , operator.add] def add_text_1 (state: StringConcatState ) -> dict : return {"text" : "Hello " } def add_text_2 (state: StringConcatState ) -> dict : return {"text" : "World!" } def run_demo (): print ("3.2 字符串连接Reducer演示:" ) builder = StateGraph(StringConcatState) builder.add_node("add_text_1" , add_text_1) builder.add_node("add_text_2" , add_text_2) builder.add_edge(START, "add_text_1" ) builder.add_edge(START, "add_text_2" ) builder.add_edge("add_text_1" , END) builder.add_edge("add_text_2" , END) graph = builder.compile () result = graph.invoke({"text" : "Say: " }) print (f"初始状态: {{'text': 'Say: '}}" ) print (f"执行结果: {result} \n" ) if name == "main" : run_demo()
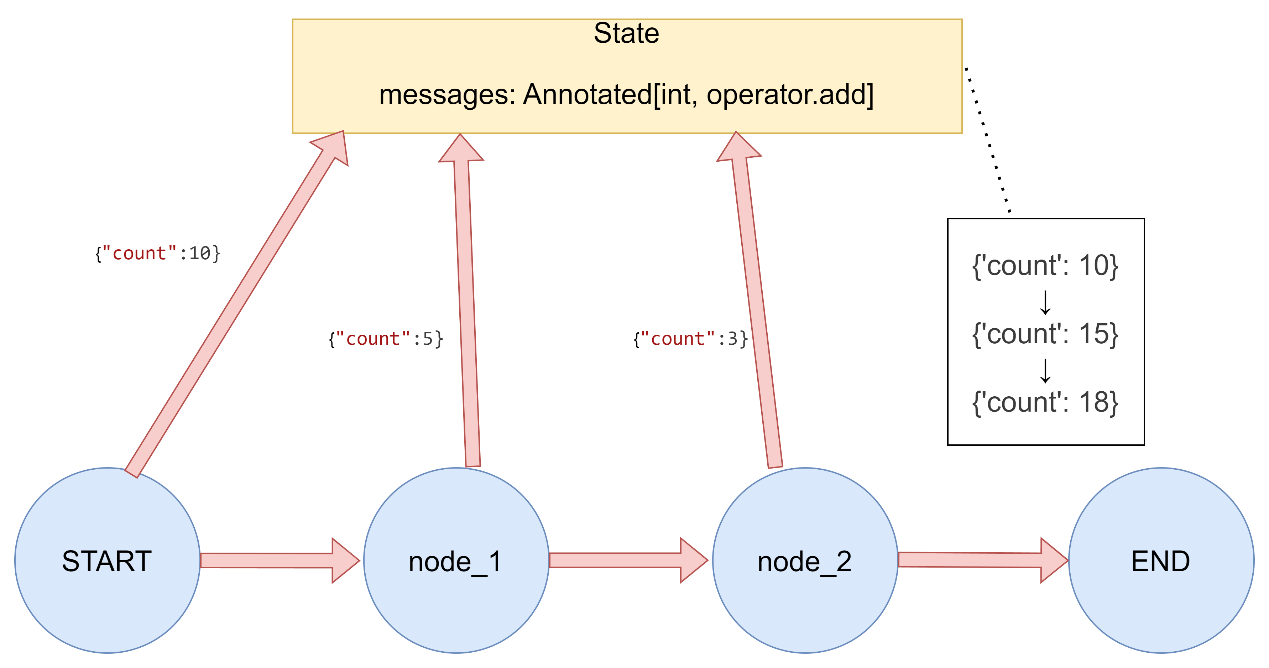
数值累加
数值累加 1 2 3 4 5 6 7 8 9 10 11 12 13 14 15 16 17 18 19 20 21 22 23 24 25 26 27 28 29 30 31 32 33 34 35 36 37 38 39 40 41 42 43 44 45 46 47 48 49 50 51 52 53 54 55 56 57 58 59 """ LangGraph Reducer函数演示 - 数值累加Reducer """ import operatorfrom typing import Annotatedfrom typing_extensions import TypedDictfrom langgraph.graph import StateGraph, START, ENDclass NumberAddState (TypedDict ): count: Annotated[int , operator.add] def increment_1 (state: NumberAddState ) -> dict : return {"count" : 5 } def increment_2 (state: NumberAddState ) -> dict : return {"count" : 3 } def run_demo (): print ("3.3 数值累加Reducer演示:" ) builder = StateGraph(NumberAddState) builder.add_node("increment_1" , increment_1) builder.add_node("increment_2" , increment_2) builder.add_edge(START, "increment_1" ) builder.add_edge(START, "increment_2" ) builder.add_edge("increment_1" , END) builder.add_edge("increment_2" , END) graph = builder.compile () result = graph.invoke({"count" : 10 }) print (f"初始状态: {{'count': 10}}" ) print (f"执行结果: {result} \n" ) if __name__ == "__main__" : run_demo()
4. operator.mul 用于数值字段的相乘操作,官方设计上存在缺陷。
1 2 3 4 5 6 7 8 9 10 11 12 13 14 15 16 17 18 19 20 21 22 23 24 25 26 27 """ LangGraph Reducer函数演示 - operator.mul Reducer(数值相乘) """ import operatorfrom typing import Annotatedfrom typing_extensions import TypedDictfrom langgraph.graph import StateGraph, START, ENDclass MultiplyState (TypedDict ): factor: Annotated[float , operator.mul] def multiplier (state: MultiplyState ) -> dict : return {"factor" : 2.0 } def run_demo (): """
在执行初始阶段(我们定义的第一个node前),会默认调用一次reducer(后面自定义reducer案例中进行了打印验证),用默认值与invoke传递的值进行计算:
此案例中,invoke中传递了一个默认值5.0,由于会默认调用一reducer,执行的计算是: 0.0(float默认值) * 5.0(invoke传递的初始值) = 0.0导致后续乘法结果一直都是0
1 2 3 4 5 6 7 8 9 10 11 12 13 14 15 16 17 18 19 20 21 22 23 """ print("4. operator.mul Reducer(数值相乘)演示:") builder = StateGraph(MultiplyState) builder.add_node("multiplier", multiplier) builder.add_edge(START, "multiplier") builder.add_edge("multiplier", END) graph = builder.compile() result = graph.invoke({"factor": 5.0}) print(f"初始状态: {{'factor': 5.0}}") print(f"执行结果: {result}\n") if __name__ == "__main__": run_demo()
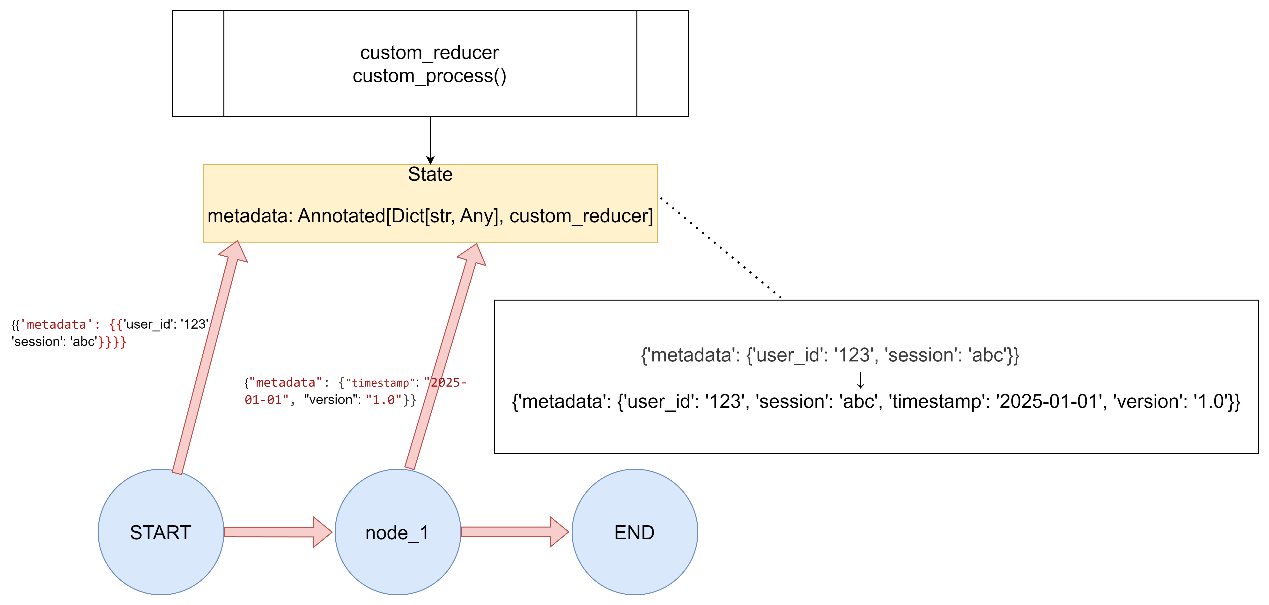
5.自定义Reducer函数
案例一 1 2 3 4 5 6 7 8 9 10 11 12 13 14 15 16 17 18 19 20 21 22 23 24 25 26 27 28 29 30 31 32 33 34 35 36 37 38 39 40 41 42 43 44 45 46 47 48 49 50 51 52 53 54 55 56 57 58 """ LangGraph Reducer函数演示 - 自定义Reducer函数 """ from typing import Annotated, Dict , Any from typing_extensions import TypedDictfrom langgraph.graph import StateGraph, START, ENDdef custom_reducer (current_value: Dict [str , Any ], new_value: Dict [str , Any ] ) -> Dict [str , Any ]: """合并两个字典,新值会覆盖旧值,但保留旧值中不存在的键""" result = current_value.copy() result.update(new_value) return result class CustomReducerState (TypedDict ): metadata: Annotated[Dict [str , Any ], custom_reducer] def update_metadata (state: CustomReducerState ) -> dict : return {"metadata" : {"timestamp" : "2025-01-01" , "version" : "1.0" }} def run_demo (): print ("5. 自定义Reducer演示:" ) builder = StateGraph(CustomReducerState) builder.add_node("update_metadata" , update_metadata) builder.add_edge(START, "update_metadata" ) builder.add_edge("update_metadata" , END) graph = builder.compile () result = graph.invoke({"metadata" : {"user_id" : "123" , "session" : "abc" }}) print (f"初始状态: {{'metadata': {{'user_id': '123', 'session': 'abc'}}}}" ) print (f"执行结果: {result} \n" ) if __name__ == "__main__" :run_demo()
自定义数值乘法 1 2 3 4 5 6 7 8 9 10 11 12 13 14 15 16 17 18 19 20 21 22 23 24 25 26 27 28 29 30 31 32 33 34 35 36 37 38 39 40 41 42 43 44 45 46 47 48 49 50 51 52 53 54 55 56 57 58 59 60 61 62 63 64 65 66 67 68 69 70 71 72 73 74 75 76 77 78 79 80 81 82 83 84 85 86 87 88 89 90 91 92 93 94 95 96 97 98 99 100 101 102 103 104 105 106 107 108 109 110 111 112 113 114 115 116 117 118 119 120 121 122 123 124 125 126 127 128 129 130 131 132 133 134 135 136 137 138 139 140 141 142 143 144 145 146 147 148 149 150 151 152 153 154 155 156 157 158 159 160 161 162 163 164 165 166 167 168 169 170 """ LangGraph Reducer函数演示 - 自定义 mul reducer 实现数值相乘 使用全局变量区分初始化调用和正常调用 """ from typing import Annotatedfrom typing_extensions import TypedDictfrom langgraph.graph import StateGraph, START, END_is_initial_call = True def my_mul_reducer (current_value: float , new_value: float ) -> float : """ 自定义乘法reducer,使用全局变量区分初始化调用和正常调用 Args: current_value: 当前状态值 new_value: 新值 Returns: 计算后的结果 """ global _is_initial_call print (f"Reducer被调用: current_value={current_value} , new_value={new_value} , is_initial_call={_is_initial_call} " ) if _is_initial_call: _is_initial_call = False return new_value else : return current_value * new_value class MultiplyState (TypedDict ): factor: Annotated[float , my_mul_reducer] def multiplier_by_two (state: MultiplyState ) -> dict : """将factor乘以2""" return {"factor" : 2.0 } def multiplier_by_zero (state: MultiplyState ) -> dict : """将factor乘以0""" return {"factor" : 0.0 } def run_demo (): """ 演示增强版乘法reducer的使用 """ global _is_initial_call print ("=== operator.mul 增强版解决方案演示 ===\n" ) print ("1. 正常乘法操作演示:" ) _is_initial_call = True builder = StateGraph(MultiplyState) builder.add_node("multiplier_by_two" , multiplier_by_two) builder.add_edge(START, "multiplier_by_two" ) builder.add_edge("multiplier_by_two" , END) graph = builder.compile () result = graph.invoke({"factor" : 5.0 }) print (f"初始状态: {{'factor': 5.0}}" ) print (f"执行结果: {result} " ) print (f"预期结果: 10.0 (5.0 * 2.0)\n" ) print ("2. 乘以0的操作演示:" ) _is_initial_call = True builder2 = StateGraph(MultiplyState) builder2.add_node("multiplier_by_zero" , multiplier_by_zero) builder2.add_edge(START, "multiplier_by_zero" ) builder2.add_edge("multiplier_by_zero" , END) graph2 = builder2.compile () result2 = graph2.invoke({"factor" : 5.0 }) print (f"初始状态: {{'factor': 5.0}}" ) print (f"执行结果: {result2} " ) print (f"预期结果: 0.0 (5.0 * 0.0)\n" ) print ("3. 连续乘法操作演示:" ) _is_initial_call = True builder3 = StateGraph(MultiplyState) builder3.add_node("multiplier_by_two_1" , multiplier_by_two) builder3.add_node("multiplier_by_zero" , multiplier_by_zero) builder3.add_node("multiplier_by_two_2" , multiplier_by_two) builder3.add_edge(START, "multiplier_by_two_1" ) builder3.add_edge("multiplier_by_two_1" , "multiplier_by_zero" ) builder3.add_edge("multiplier_by_zero" , "multiplier_by_two_2" ) builder3.add_edge("multiplier_by_two_2" , END) graph3 = builder3.compile () result3 = graph3.invoke({"factor" : 3.0 }) print (f"初始状态: {{'factor': 3.0}}" ) print (f"执行结果: {result3} " ) print (f"预期过程: 3.0 -> 6.0 -> 0.0 -> 0.0" ) print (f"预期结果: 0.0\n" ) if __name__ == "__main__" : run_demo()
实际应用示例:一个完整的聊天机器人示例。 示例 1 2 3 4 5 6 7 8 9 10 11 12 13 14 15 16 17 18 19 20 21 22 23 24 25 26 27 28 29 30 31 32 33 34 35 36 37 38 39 40 41 42 43 44 45 46 47 48 49 50 51 52 53 54 55 56 57 58 59 60 61 62 63 64 65 66 67 68 69 70 71 72 73 74 75 from typing import Annotated, List from typing_extensions import TypedDictfrom langgraph.graph import StateGraph, START, ENDfrom langgraph.graph.message import add_messagesimport operatorclass ChatState (TypedDict ): messages: Annotated[list , add_messages] tags: Annotated[List [str ], operator.add] score: Annotated[float , operator.add] def process_user_message (state: ChatState ) -> dict : user_message = state["messages" ][-1 ] return { "messages" : [("assistant" , f"Echo: {user_message.content} " )], "tags" : ["processed" ], "score" : 1.0 } def add_sentiment_tag (state: ChatState ) -> dict : return { "tags" : ["positive" ], "score" : 0.5 } builder = StateGraph(ChatState) builder.add_node("process" , process_user_message) builder.add_node("sentiment" , add_sentiment_tag) builder.add_edge(START, "process" ) builder.add_edge(START, "sentiment" ) builder.add_edge("process" , END) builder.add_edge("sentiment" , END) graph = builder.compile () result = graph.invoke({ "messages" : [{"role" : "user" , "content" : "Hello, how are you?" }], "tags" : ["greeting" ], "score" : 0.0 }) print (result)
总结 Reducer函数在LangGraph中的作用:
控制状态更新方式:决定新值如何与现有值合并。
处理并行更新:当多个节点同时更新同一字段时,确保数据一致性。
提供灵活性:支持不同的合并策略,如覆盖、追加、相加等。
增强表达力:允许开发者根据业务需求自定义合并逻辑。
通过合理使用Reducer函数,可以构建更强大和灵活的状态管理机制,特别是在处理复杂工作流和并行执行场景时。
3.2Nodes 在LangGraph中,节点是Python函数(可以是同步的,也可以是异步的),它们接受以下参数:
state:图的状态
config:一个RunnableConfig对象,包含诸如thread_id之类的配置信息以及诸如tags之类的跟踪信息
runtime:一个Runtime泛型对象,其中使用自定义的Context_Schema TypedDict或者其他数据类型,包含运行时context以及其他信息,如store和stream_writer
定义好node函数后,使用add_node方法将这些节点添加到图中。如果在向图中添加节点时未指定名称,系统会为其分配一个与函数名相同的默认名称。
invoke传入的参数,如长期存储中store=store ,在节点函数中可以通过,注意和invoke中传入参数的形参明对应关系
1 def node (state:State, config:RunnableConfig,*,store )
START Node START节点是一个特殊节点,它代表着将用户输入发送到图中的节点。引用此节点的主要目的是确定应首先调用哪些节点。
END Node END节点是一个特殊节点,代表终端节点。当你想表示哪些边在完成后没有动作时,会引用这个节点。
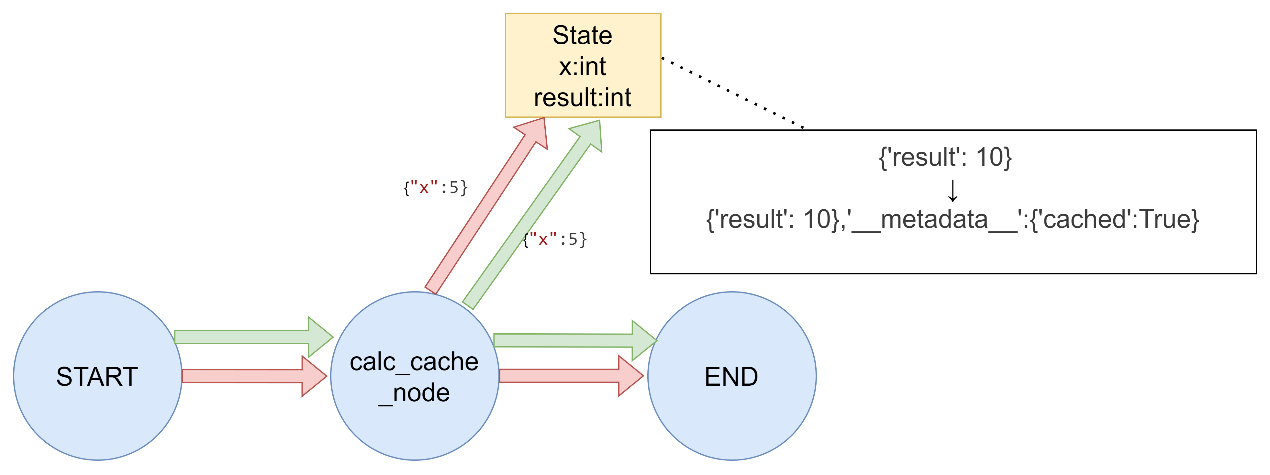
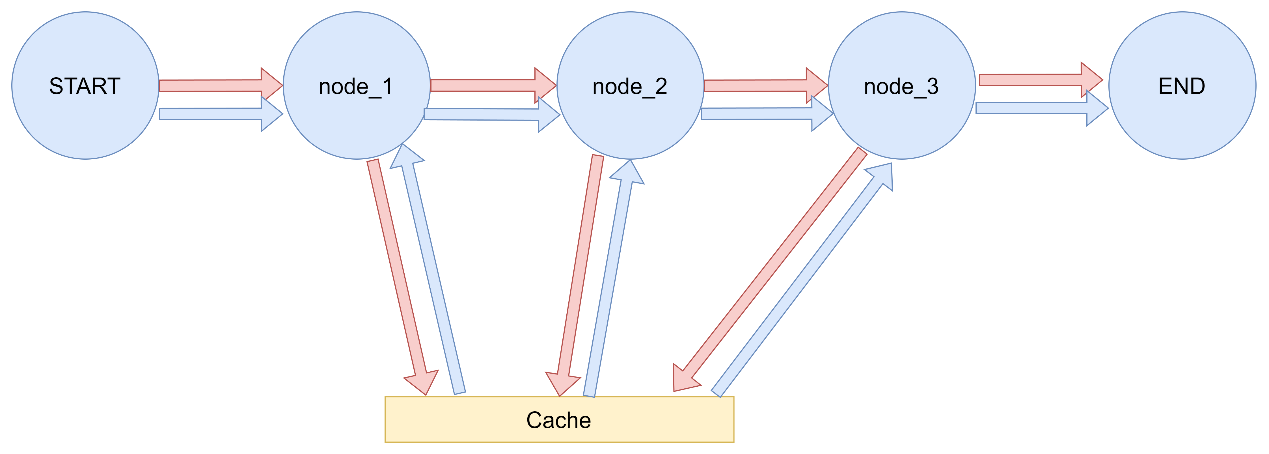
Node Caching LangGraph支持基于节点输入对任务/节点进行缓存。使用缓存的方法如下:
编译图(或指定入口点)时指定缓存。
为节点指定缓存策略。每个缓存策略支持:
key_func用于根据节点的输入生成缓存键,默认情况下是使用pickle对输入进行hash运算的结果。
ttl,即缓存的生存时间(以秒为单位)。如果未指定,缓存将永不过期。
使用带有缓存机制的langgraph 1 2 3 4 5 6 7 8 9 10 11 12 13 14 15 16 17 18 19 20 21 22 23 24 25 26 27 28 29 30 31 32 33 34 35 36 37 38 39 40 41 42 43 44 45 46 47 48 49 50 51 52 53 54 55 56 57 import timefrom typing_extensions import TypedDictfrom langgraph.graph import StateGraphfrom langgraph.cache.memory import InMemoryCachefrom langgraph.types import CachePolicyclass State (TypedDict ): x: int result: int builder = StateGraph(State) def expensive_node (state: State ) -> dict [str , int ]: time.sleep(2 ) return {"result" : state["x" ] * 2 } builder.add_node("expensive_node" , expensive_node, cache_policy=CachePolicy(ttl=3 )) builder.set_entry_point("expensive_node" ) builder.set_finish_point("expensive_node" ) graph = builder.compile (cache=InMemoryCache()) print (graph.invoke({"x" : 5 }, stream_mode='updates' ))print (graph.invoke({"x" : 5 }, stream_mode='updates' ))
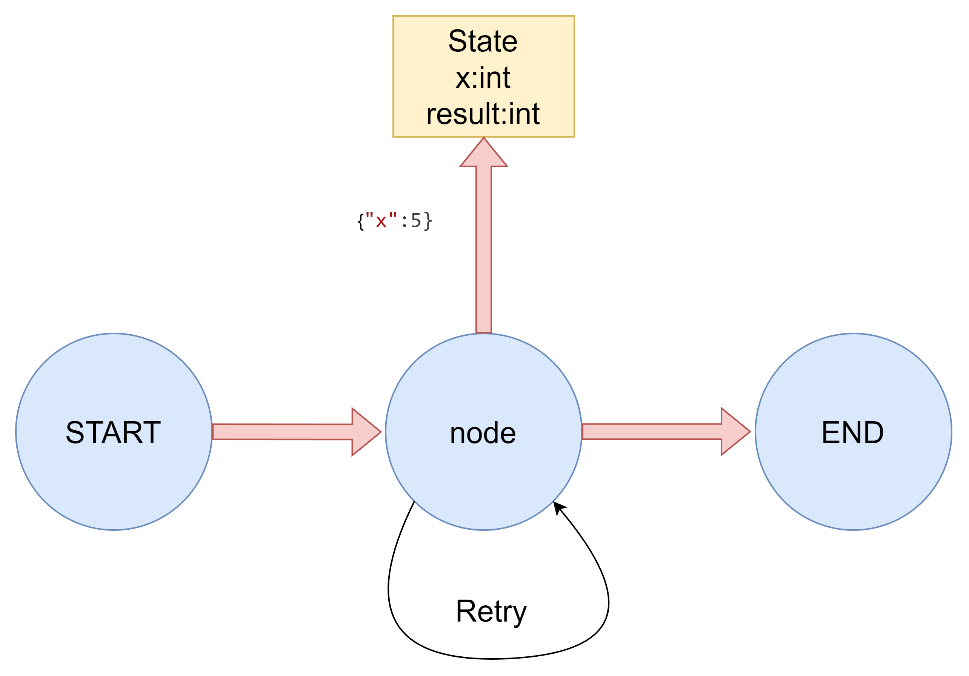
添加重试策略 在很多使用场景中,你可能希望节点拥有自定义的重试策略,例如在调用API、查询数据库或调用大语言模型(LLM)等情况下。
为节点添加重试策略,需要在add_node中设置retry_policy参数。retry_policy参数接受一个RetryPolicy命名元组对象。默认情况下,retry_on参数使用default_retry_on函数,该函数会在遇到任何异常时重试,除了以下情况:
1 2 3 RetryPolicy(NameTuple): max_attempts:int retry_on:callable | Function
相关重试错误
ValueError(值错误)
TypeError(类型错误)
ArithmeticError(算术错误)
ImportError(导入错误)
LookupError(查找错误)
NameError(名称错误)
SyntaxError(语法错误)
RuntimeError(运行时错误)
ReferenceError(引用错误)
StopIteration(停止迭代)
StopAsyncIteration(停止迭代)
OSError(操作系统错误)
重试策略 1 2 3 4 5 6 7 8 9 10 11 12 13 14 15 16 17 18 19 20 21 22 23 24 25 26 27 28 29 30 31 32 33 34 35 36 37 38 39 40 41 42 43 44 45 46 47 48 49 50 51 52 53 54 55 56 57 58 59 60 61 62 63 64 65 66 67 68 69 70 71 72 73 74 75 76 77 78 79 80 81 82 83 84 85 86 87 88 89 90 91 92 93 94 95 96 97 98 99 100 101 102 103 104 105 106 107 108 109 110 111 112 113 114 115 116 117 118 119 120 121 122 123 124 125 126 127 128 129 130 131 132 133 134 135 136 137 138 139 140 141 142 143 144 145 146 147 148 149 150 151 152 153 154 155 156 157 158 159 160 161 162 163 164 165 166 167 168 169 170 171 172 173 174 175 176 177 178 179 180 181 182 183 184 185 186 187 188 189 190 191 192 193 194 195 196 197 198 199 200 201 202 203 204 205 206 207 208 209 210 211 212 213 214 215 216 217 218 219 220 221 222 223 224 225 226 227 228 229 """ LangGraph 节点重试策略演示 """ import randomfrom typing import Dict , Any from typing_extensions import TypedDictfrom langgraph.graph import StateGraph, START, ENDfrom langgraph.types import RetryPolicyclass State (TypedDict ): result: str attempt_counter = 0 def unstable_api_call (state: State ) -> Dict [str , Any ]: """ 模拟一个不稳定的API调用,有一定概率失败 """ global attempt_counter attempt_counter += 1 print (f"尝试调用API,这是第 {attempt_counter} 次尝试" ) if attempt_counter < 3 : raise Exception(f"模拟API调用失败 (尝试 {attempt_counter} )" ) else : return { "result" : f"API调用成功,经过 {attempt_counter} 次尝试" } def custom_retry_on (exception: Exception ) -> bool : """ 自定义重试条件:只对特定错误进行重试 """ if "模拟API调用失败" in str (exception): print (f"捕获到可重试异常: {exception} " ) return True print (f"捕获到不可重试异常: {exception} " ) return False def value_error_call (state: State ) -> Dict [str , Any ]: """ 模拟抛出 ValueError 的节点(不会被默认重试策略重试) """ print ("调用会抛出 ValueError 的节点" ) raise ValueError("模拟 ValueError 异常" ) def run_demo (): print ("=== LangGraph 节点重试策略演示 ===\n" ) global attempt_counter attempt_counter = 0 print ("1. 使用默认重试策略:" ) print (" 默认策略会对除特定异常外的所有异常进行重试" ) print (" 不会重试的异常包括: ValueError, TypeError, ArithmeticError, ImportError," ) print (" LookupError, NameError, SyntaxError, RuntimeError," ) print (" ReferenceError, StopIteration, StopAsyncIteration, OSError\n" ) builder1 = StateGraph(State) builder1.add_node( "unstable_call" , unstable_api_call, retry_policy=RetryPolicy(max_attempts=5 ) ) builder1.add_edge(START, "unstable_call" ) builder1.add_edge("unstable_call" , END) graph1 = builder1.compile () print ("测试默认重试策略:" ) try : result = graph1.invoke({"result" : "" }) print (f"最终结果: {result} \n" ) except Exception as e: print (f"最终失败: {type (e).__name__} : {e} \n" ) print ("2. 使用自定义重试策略:" ) print (" 自定义策略只对特定错误进行重试\n" ) attempt_counter = 0 builder2 = StateGraph(State) builder2.add_node( "custom_retry_call" , unstable_api_call, retry_policy=RetryPolicy(max_attempts=5 , retry_on=custom_retry_on) ) builder2.add_edge(START, "custom_retry_call" ) builder2.add_edge("custom_retry_call" , END) graph2 = builder2.compile () print ("测试自定义重试策略:" ) try : result = graph2.invoke({"result" : "" }) print (f"最终结果: {result} \n" ) except Exception as e: print (f"最终失败: {type (e).__name__} : {e} \n" ) print ("3. 测试不会重试的异常类型:" ) builder3 = StateGraph(State) builder3.add_node( "value_error_call" , value_error_call, retry_policy=RetryPolicy(max_attempts=3 ) ) builder3.add_edge(START, "value_error_call" ) builder3.add_edge("value_error_call" , END) graph3 = builder3.compile () print ("测试 ValueError(默认策略不会重试):" ) try : result = graph3.invoke({"result" : "" }) print (f"最终结果: {result} \n" ) except Exception as e: print (f"最终失败: {type (e).__name__} : {e} \n" ) if __name__ == "__main__" : run_demo()
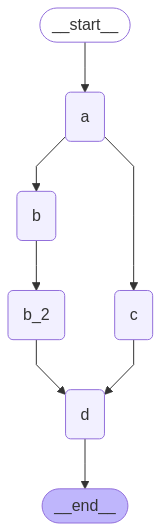
延迟节点执行 延迟节点执行就是将某个节点的执行推迟到所有其他待处理任务完成后,这在分支长度不同的情况下尤其适用。
节点运行顺序 1 2 3 4 5 6 7 8 9 10 11 12 13 14 15 16 17 18 19 20 21 22 23 24 25 26 27 28 29 30 31 32 33 34 35 36 37 38 39 40 41 42 43 44 45 46 47 48 49 50 51 52 53 54 55 56 57 58 59 60 61 62 63 64 65 66 67 68 69 70 71 72 73 74 75 76 77 78 79 80 81 82 83 84 85 86 87 88 89 90 91 92 93 94 95 96 97 98 99 100 101 102 103 104 105 106 107 108 109 110 111 112 113 114 115 116 117 118 119 120 121 122 123 124 125 126 127 128 129 130 131 132 133 134 135 136 137 138 139 140 141 142 143 144 145 146 147 148 149 150 151 152 153 154 155 156 157 158 159 160 161 162 163 164 165 166 167 168 169 170 171 172 173 174 175 176 177 178 179 180 181 182 183 184 185 186 187 188 189 """ LangGraph 延迟节点执行演示 本示例展示了如何使用defer=True来实现节点延迟执行,确保该节点等待所有其他并行分支任务完成后才执行。 """ import operatorfrom typing import Annotated, Any from typing_extensions import TypedDictfrom langgraph.graph import StateGraph, START, END class State (TypedDict ): """ 状态类型定义 aggregate: 使用operator.add reducer使这个列表为追加模式,确保每个节点的结果都能被正确合并 """ aggregate: Annotated[list , operator.add] def a (state: State ): """ 节点a:启动分支 此节点是工作流的起点,负责初始化流程并分发到不同的分支。 Args: state: 当前状态 Returns: dict: 包含新结果的状态更新 """ print (f'Adding "A" to {state["aggregate" ]} ' ) return {"aggregate" : ["A" ]} def b (state: State ): """ 节点b:第一个分支 此节点处理第一个分支的任务,与节点c并行执行。 Args: state: 当前状态 Returns: dict: 包含新结果的状态更新 """ print (f'Adding "B" to {state["aggregate" ]} ' ) return {"aggregate" : ["B" ]} def b_2 (state: State ): """ 节点b2:第二个分支 此节点处理第二个分支的任务,在节点b完成后执行。 Args: state: 当前状态 Returns: dict: 包含新结果的状态更新 """ print (f'Adding "B_2" to {state["aggregate" ]} ' ) return {"aggregate" : ["B_2" ]} def c (state: State ): """ 节点c:另一个分支 此节点处理另一个分支的任务,与节点b并行执行。 Args: state: 当前状态 Returns: dict: 包含新结果的状态更新 """ print (f'Adding "C" to {state["aggregate" ]} ' ) return {"aggregate" : ["C" ]} def d (state: State ): """ 节点d:延迟执行的汇总节点 此节点设置了defer=True,因此会等待所有其他任务完成后才执行。 它负责汇总所有分支的结果。 Args: state: 当前状态 Returns: dict: 包含新结果的状态更新 """ print (f'Adding "D" to {state["aggregate" ]} ' ) return {"aggregate" : ["D" ]} builder = StateGraph(State) builder.add_node("a" , a) builder.add_node("b" , b) builder.add_node("b_2" , b_2) builder.add_node("c" , c) builder.add_node("d" , d, defer=True ) builder.add_edge(START, "a" ) builder.add_edge("a" , "b" ) builder.add_edge("a" , "c" ) builder.add_edge("b" , "b_2" ) builder.add_edge("b_2" , "d" ) builder.add_edge("c" , "d" ) builder.add_edge("d" , END) graph = builder.compile () print ("=== 开始执行工作流 ===" )result = graph.invoke({}) print ("=== 执行结果 ===" )print (result)
3.3 Edges 边定义了逻辑的路由方式以及图如何决定停止。这是智能体工作方式以及不同节点之间通信方式的重要组成部分。边有几种关键类型:
Normal Edges: 普通边。直接从一个节点连接到下一个节点。
Conditional Edges: 条件边。调用函数以确定接下来要前往哪个(哪些)节点。
Entry Point: 入口点。用户输入到达时首先调用哪个节点。
Conditional Entry Point: 条件入口点。调用一个函数来确定当用户输入到达时,首先调用哪个(些)节点。
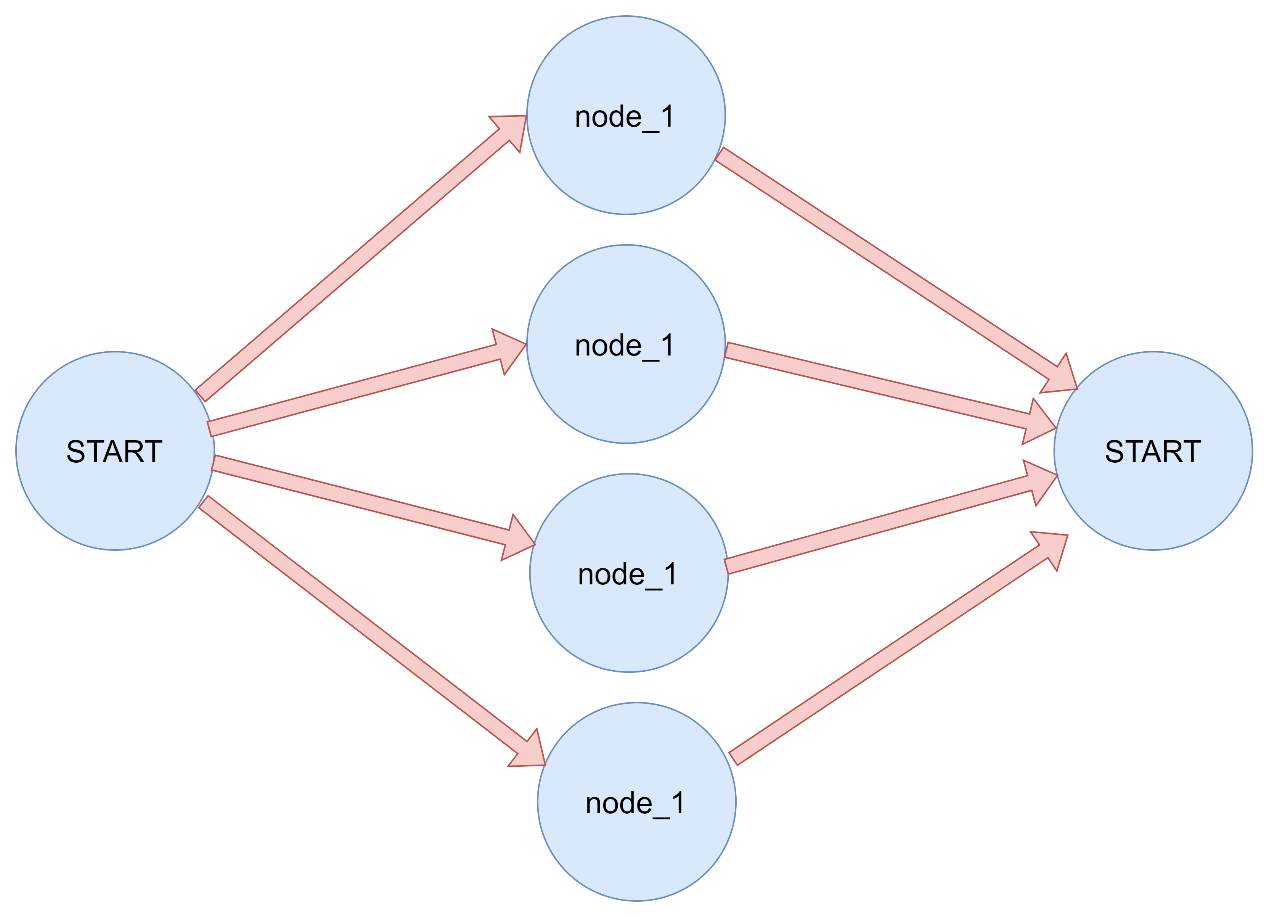
一个节点可以有多个出边。如果一个节点有多个出边,那么所有这些目标节点都将作为下一个超级步骤的一部分并行执行。
本质为超步的不同步导致的下游节点多次运行
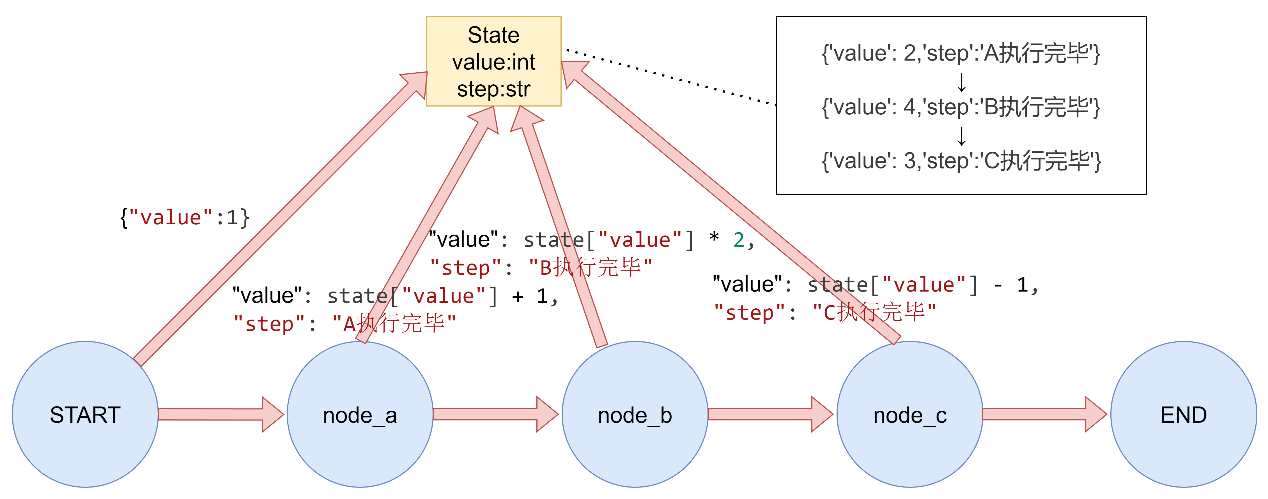
3.3.1 Normal Edges
1 2 3 4 5 6 7 8 9 10 11 12 13 14 15 16 17 18 19 20 21 22 23 24 25 26 27 28 29 30 31 32 33 34 35 36 37 38 39 40 41 42 43 44 45 46 """ LangGraph普通边演示 普通边是直接连接两个节点的边,表示无条件地从一个节点跳转到另一个节点。 """ from typing_extensions import TypedDictfrom langgraph.graph import StateGraph, START, END定义状态 class GraphState (TypedDict ): value: int step: str 定义节点函数 def node_a (state: GraphState ) -> dict : """节点A""" print ("执行节点A" ) return {"value" : state["value" ] + 1 , "step" : "A执行完毕" } def node_b (state: GraphState ) -> dict : """节点B""" print ("执行节点B" ) return {"value" : state["value" ] * 2 , "step" : "B执行完毕" } def node_c (state: GraphState ) -> dict : """节点C""" print ("执行节点C" ) return {"value" : state["value" ] - 1 , "step" : "C执行完毕" } def main (): """演示普通边""" print ("= 普通边演示 =" ) builder = StateGraph(GraphState) builder.add_node("node_a" , node_a) builder.add_node("node_b" , node_b) builder.add_node("node_c" , node_c) builder.add_edge(START, "node_a" ) builder.add_edge("node_a" , "node_b" ) builder.add_edge("node_b" , "node_c" ) builder.add_edge("node_c" , END) graph = builder.compile () result = graph.invoke({"value" : 1 }) print (f"执行结果: {result} \n" ) if name == "main" : main()
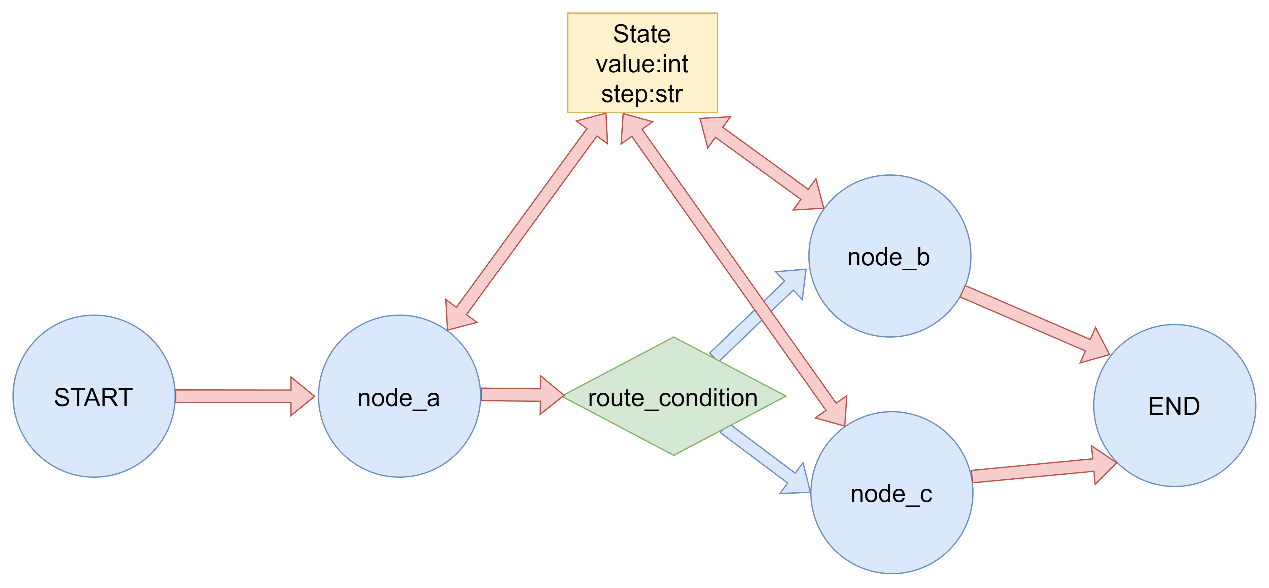
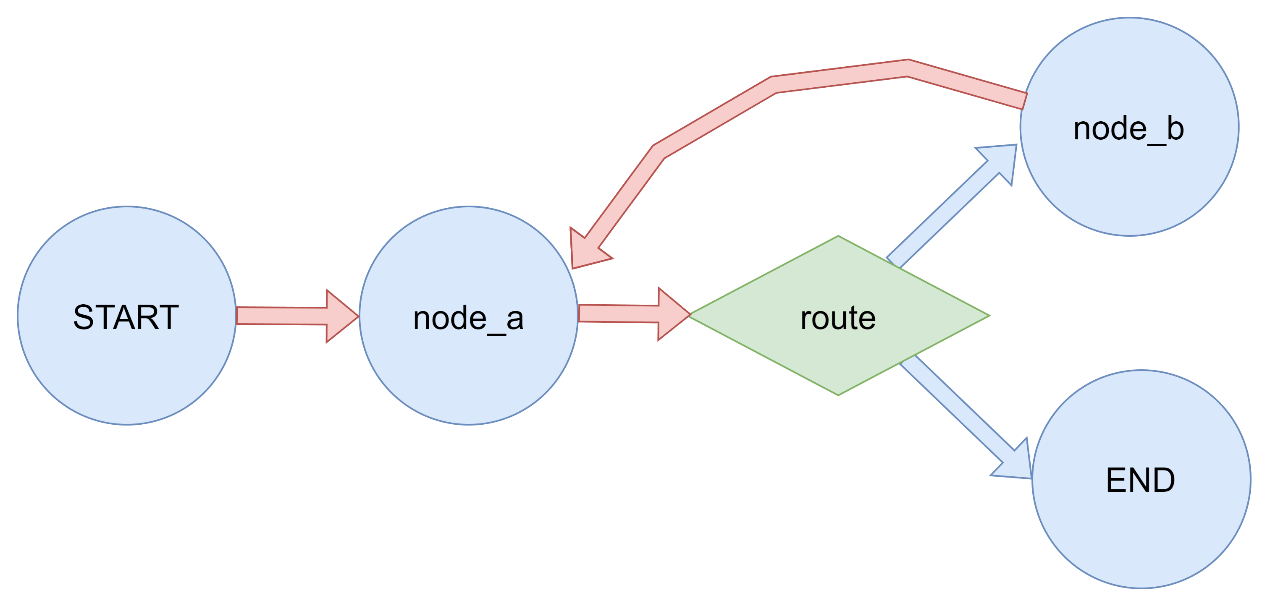
3.3.2 Conditional Edges
title 1 2 3 4 5 6 7 8 9 10 11 12 13 14 15 16 17 18 19 20 21 22 23 24 25 26 27 28 29 30 31 32 33 34 35 36 37 38 39 40 41 42 43 44 45 46 47 48 49 50 51 52 53 54 55 56 57 58 59 60 61 62 63 64 65 66 67 68 69 70 71 72 73 """ LangGraph条件边演示 条件边根据当前状态动态决定下一个要执行的节点。 """ from typing import Literal from typing_extensions import TypedDictfrom langgraph.graph import StateGraph, START, END定义状态 class GraphState (TypedDict ): value: int step: str 定义节点函数 def node_a (state: GraphState ) -> dict : """节点A""" print ("执行节点A" ) return {"value" : state["value" ] + 1 , "step" : "A执行完毕" } def node_b (state: GraphState ) -> dict : """节点B""" print ("执行节点B" ) return {"value" : state["value" ] * 2 , "step" : "B执行完毕" } def node_c (state: GraphState ) -> dict : """节点C""" print ("执行节点C" ) return {"value" : state["value" ] - 1 , "step" : "C执行完毕" } 条件边的路由函数 def route_condition (state: GraphState ) -> Literal ["node_b" , "node_c" ]: """根据value值决定路由到哪个节点""" if state["value" ] % 2 == 0 : return "node_b_alias" else : return "node_c_alias" def main (): """演示条件边""" print ("= 条件边演示 =" ) builder = StateGraph(GraphState) builder.add_node("node_a" , node_a) builder.add_node("node_b" , node_b) builder.add_node("node_c" , node_c) builder.add_edge(START, "node_a" ) builder.add_conditional_edges( "node_a" , route_condition, { "node_b_alias" : "node_b" , "node_c_alias" : "node_c" } ) builder.add_edge("node_b" , END) builder.add_edge("node_c" , END) graph = builder.compile () print ("输入值为偶数:" ) result = graph.invoke({"value" : 2 }) print (f"执行结果: {result} " ) print ("\n输入值为奇数:" ) result = graph.invoke({"value" : 1 }) print (f"执行结果: {result} \n" ) if name == "main" : main()
3.3.4 Entry Point
入口点点使用 1 2 3 4 5 6 7 8 9 10 11 12 13 14 15 16 17 18 19 20 21 22 23 24 25 26 27 28 29 30 31 32 33 34 35 36 37 38 39 """ LangGraph入口点演示 入口点定义了图开始执行的第一个节点。 """ from typing_extensions import TypedDictfrom langgraph.graph import StateGraph, START, END定义状态 class GraphState (TypedDict ): value: int step: str 定义节点函数 def node_a (state: GraphState ) -> dict : """节点A""" print ("执行节点A" ) return {"value" : state["value" ] + 1 , "step" : "A执行完毕" } def node_b (state: GraphState ) -> dict : """节点B""" print ("执行节点B" ) return {"value" : state["value" ] * 2 , "step" : "B执行完毕" } def main (): """演示入口点""" print ("= 入口点演示 =" ) builder = StateGraph(GraphState) builder.add_node("node_a" , node_a) builder.add_node("node_b" , node_b) builder.add_edge(START, "node_a" ) builder.add_edge("node_a" , "node_b" ) builder.add_edge("node_b" , END) graph = builder.compile () result = graph.invoke({"value" : 0 }) print (f"执行结果: {result} \n" ) if name == "main" : main()
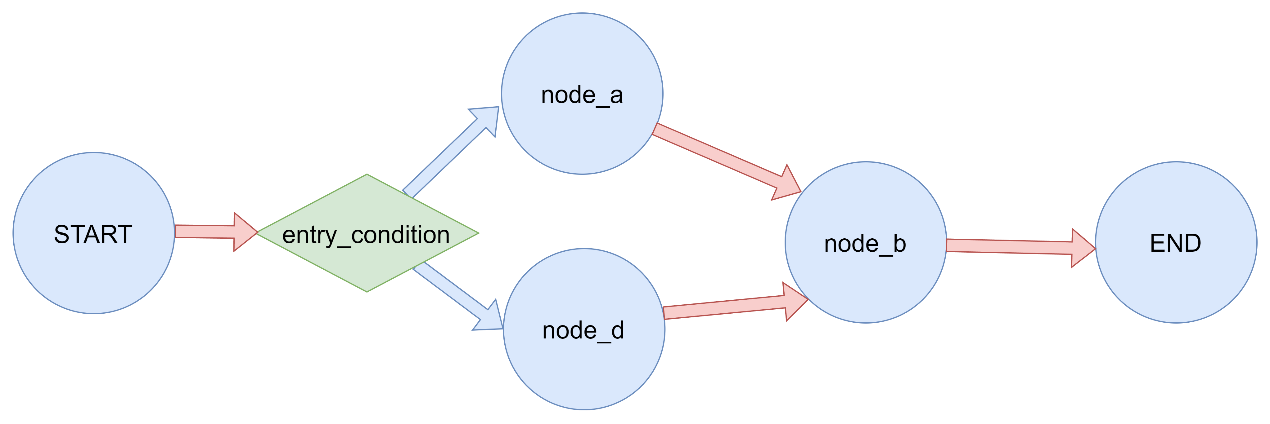
3.3.5 Conditional Entry Point
条件入口点点使用 1 2 3 4 5 6 7 8 9 10 11 12 13 14 15 16 17 18 19 20 21 22 23 24 25 26 27 28 29 30 31 32 33 34 35 36 37 38 39 40 41 42 43 44 45 46 47 48 49 50 51 52 53 54 55 56 57 58 59 60 61 62 63 64 65 66 """ LangGraph条件入口点演示 条件入口点允许根据输入状态动态决定从哪个节点开始执行。 """ from typing import Literal from typing_extensions import TypedDictfrom langgraph.graph import StateGraph, START, END定义状态 class GraphState (TypedDict ): value: int step: str 定义节点函数 def node_a (state: GraphState ) -> dict : """节点A""" print ("执行节点A" ) return {"value" : state["value" ] + 1 , "step" : "A执行完毕" } def node_b (state: GraphState ) -> dict : """节点B""" print ("执行节点B" ) return {"value" : state["value" ] * 2 , "step" : "B执行完毕" } def node_d (state: GraphState ) -> dict : """节点D""" print ("执行节点D" ) return {"value" : state["value" ] + 10 , "step" : "D执行完毕" } 条件入口点的路由函数 def entry_condition (state: GraphState ) -> Literal ["node_a" , "node_d" ]: """根据输入值决定从哪个节点开始""" if state.get("value" , 0 ) > 5 : return "node_d" else : return "node_a" def main (): """演示条件入口点""" print ("= 条件入口点演示 =" ) builder = StateGraph(GraphState) builder.add_node("node_a" , node_a) builder.add_node("node_d" , node_d) builder.add_node("node_b" , node_b) builder.add_conditional_edges( START, entry_condition, { "node_a" : "node_a" , "node_d" : "node_d" } ) builder.add_edge("node_a" , "node_b" ) builder.add_edge("node_d" , "node_b" ) builder.add_edge("node_b" , END) graph = builder.compile () print ("输入值小于等于5:" ) result = graph.invoke({"value" : 3 }) print (f"执行结果: {result} " ) print ("\n输入值大于5:" ) result = graph.invoke({"value" : 10 }) print (f"执行结果: {result} \n" ) if name == "main" : main()
3.3.6 创建和控制循环 在创建带有循环的图时,需要一种终止执行的机制。最常见的做法是添加一条条件边,当达到某个终止条件时,该边会路由到END节点。
递归限制设定了图在抛出错误之前允许执行的超级步骤数量,默认值25,在graph.invoke的config参数中指定。在某些应用中,我们无法保证会达到给定的终止条件。在这种情况下,我们可以设置图的递归限制。这将在经过指定数量的超级步骤后引发GraphRecursionError。然后我们可以捕获并处理这个异常。
1 2 3 4 5 6 7 8 9 10 11 12 13 14 15 16 17 18 19 20 21 22 23 24 25 26 27 28 29 30 31 32 33 34 35 36 37 38 39 40 41 42 43 44 45 46 47 48 49 50 51 52 53 54 55 56 57 from typing import Annotated, Dict , Literal from typing_extensions import TypedDictfrom langgraph.graph import StateGraph, START, ENDfrom langgraph.errors import GraphRecursionErrorclass LoopState (TypedDict ): count: int result: str max_count: int def node_a (state: LoopState ) -> dict : """节点a:处理逻辑并更新计数""" print (f"执行节点a,当前计数: {state['count' ]} " ) return { 'count' : state['count' ] + 1 , 'result' : f"已处理{state['count' ]} 次" } def node_b (state: LoopState ) -> dict : """节点b:辅助处理""" print (f"执行节点b,当前计数: {state['count' ]} " ) return { 'result' : f"已处理{state['count' ]} 次 - 辅助处理" } def route (state: LoopState ) -> Literal ["b" , END]: """条件路由函数:决定是继续循环还是终止""" if state['count' ] >= state['max_count' ]: print (f"满足终止条件,计数 {state['count' ]} >= {state['max_count' ]} ,返回END" ) return END else : print (f"未满足终止条件,计数 {state['count' ]} < {state['max_count' ]} ,返回b" ) return "b" 创建图 builder = StateGraph(LoopState) 添加节点 builder.add_node("a" , node_a) builder.add_node("b" , node_b) 添加边 builder.add_edge(START, "a" ) builder.add_conditional_edges("a" , route) builder.add_edge("b" , "a" ) 编译图 graph = builder.compile () 执行图 print ("= 开始执行工作流 =" )try : result = graph.invoke(input ={ 'count' : 0 , 'result' : '' , 'max_count' : 3 }, config={ 'recursion_limit' : 6 }) print ("= 执行结果 =" ) print (result) except GraphRecursionError as e: print (f"递归错误: {e} " )
3.4 Send 在传统的图结构中,节点和边都是预先定义好的,但在某些场景下,我们需要动态地根据运行时状态来决定执行哪些节点。Map-Reduce 模式就是这样一个典型场景:
一个节点生成一个动态数量的对象列表。
另一个节点需要对列表中的每个对象进行处理。
最终将所有处理结果合并。
为了支持这种设计模式,LangGraph 支持从条件边返回 Send 对象。Send 接受两个参数:
第一个是节点的名称。
第二个是要传递给该节点的状态。
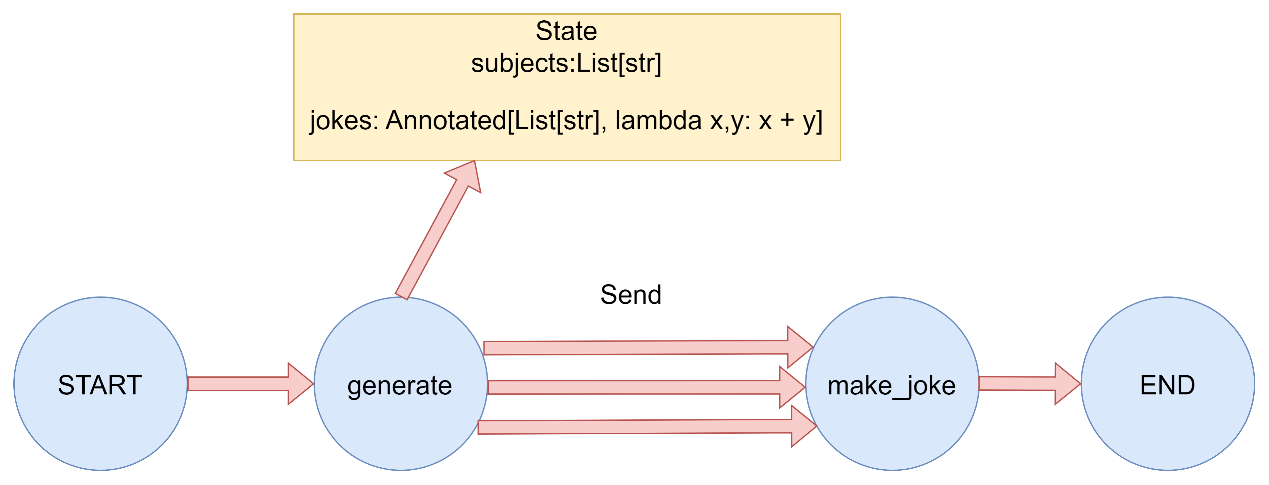
演示如何使用 Send 对象实现 map-reduce 设计模式。在这种模式中,第一个节点生成一个对象列表,然后将其他节点应用于所有这些对象
Map-Reduce 1 2 3 4 5 6 7 8 9 10 11 12 13 14 15 16 17 18 19 20 21 22 23 24 25 26 27 28 29 30 31 32 33 34 35 36 37 38 39 40 41 42 43 44 45 46 47 48 49 50 51 52 53 54 55 56 57 58 59 60 61 62 63 64 65 66 67 68 69 70 71 72 73 """ """ from typing import Annotated, List , Sequence from typing_extensions import TypedDictfrom langgraph.graph import StateGraph, START, ENDfrom langgraph.types import Send定义状态 class OverallState (TypedDict ): subjects: List [str ] jokes: Annotated[List [str ], lambda x, y: x + y] 第一个节点:生成需要处理的主题列表 def generate_subjects (state: OverallState ) -> dict : """生成需要处理的主题列表""" print ("执行节点: generate_subjects" ) subjects = ["猫" , "狗" , "程序员" ] print (f"生成主题列表: {subjects} " ) return {"subjects" : subjects} Map节点:为每个主题生成笑话 def make_joke (state: OverallState ) -> dict : """为单个主题生成笑话""" subject = state.get("subject" , "未知" ) print (f"执行节点: make_joke,处理主题: {subject} " ) jokes_map = { "猫" : "为什么猫不喜欢在线购物?因为它们更喜欢实体店!" , "狗" : "为什么狗不喜欢计算机?因为它们害怕被鼠标咬!" , "程序员" : "为什么程序员喜欢洗衣服?因为他们在寻找bugs!" , "未知" : "这是一个关于未知主题的神秘笑话。" } joke = jokes_map.get(subject, f"这是一个关于{subject} 的即兴笑话。" ) print (f"生成笑话: {joke} " ) return {"jokes" : [joke]} 条件边函数:根据主题列表生成Send对象列表 def map_subjects_to_jokes (state: OverallState ) -> Sequence [Send]: """将主题列表映射到joke生成任务""" print ("执行条件边函数: map_subjects_to_jokes" ) subjects = state["subjects" ] print (f"映射主题到joke任务: {subjects} " ) send_list = [Send("make_joke" , {"subject" : subject}) for subject in subjects] print (f"生成Send对象列表: {send_list} " ) return send_list def main (): """演示Map-Reduce模式""" print ("= Map-Reduce 模式演示 =\n" ) builder = StateGraph(OverallState) builder.add_node("generate_subjects" , generate_subjects) builder.add_node("make_joke" , make_joke) builder.add_edge(START, "generate_subjects" ) builder.add_conditional_edges( "generate_subjects" , map_subjects_to_jokes ) builder.add_edge("make_joke" , END) graph = builder.compile () initial_state = {"subjects" : [], "jokes" : []} print ("初始状态:" , initial_state) print ("\n开始执行图..." ) result = graph.invoke(initial_state) print (f"\n最终结果: {result} " ) print ("\n= 演示完成 =" ) if name == "main" : main()
从运行输出可以看到:
首先执行 generate_subjects 节点,生成主题列表:[‘猫’, ‘狗’, ‘程序员’]
这种模式非常适合处理动态数量的任务,比如:
批量处理用户请求
并行处理文档集合
分布式任务调度
通过使用 Send 对象,LangGraph 提供了一种优雅的方式来实现这种动态图结构,使得我们可以根据运行时状态来决定执行路径。
同时,条件边的指向节点需要消费的send对象中的私有参数
示例 1 2 3 4 5 6 7 8 9 10 11 def map_subjects_to_jokes (state: OverallState ) -> Sequence [Send]: """将主题列表映射到joke生成任务""" print ("执行条件边函数: map_subjects_to_jokes" ) subjects = state["subjects" ] print (f"映射主题到joke任务: {subjects} " ) send_list = [Send("make_joke" , {"subject" : subject}) for subject in subjects] print (f"生成Send对象列表: {send_list} " ) return send_list
![[file-20260428001428777]]
3.5 Command 将控制流(边)和状态更新(节点)结合起来可能会很有用。例如,你可能希望在同一个节点中既执行状态更新,又决定下一步前往哪个节点。LangGraph 提供了一种实现方式,即从节点函数返回一个 Command 对象。
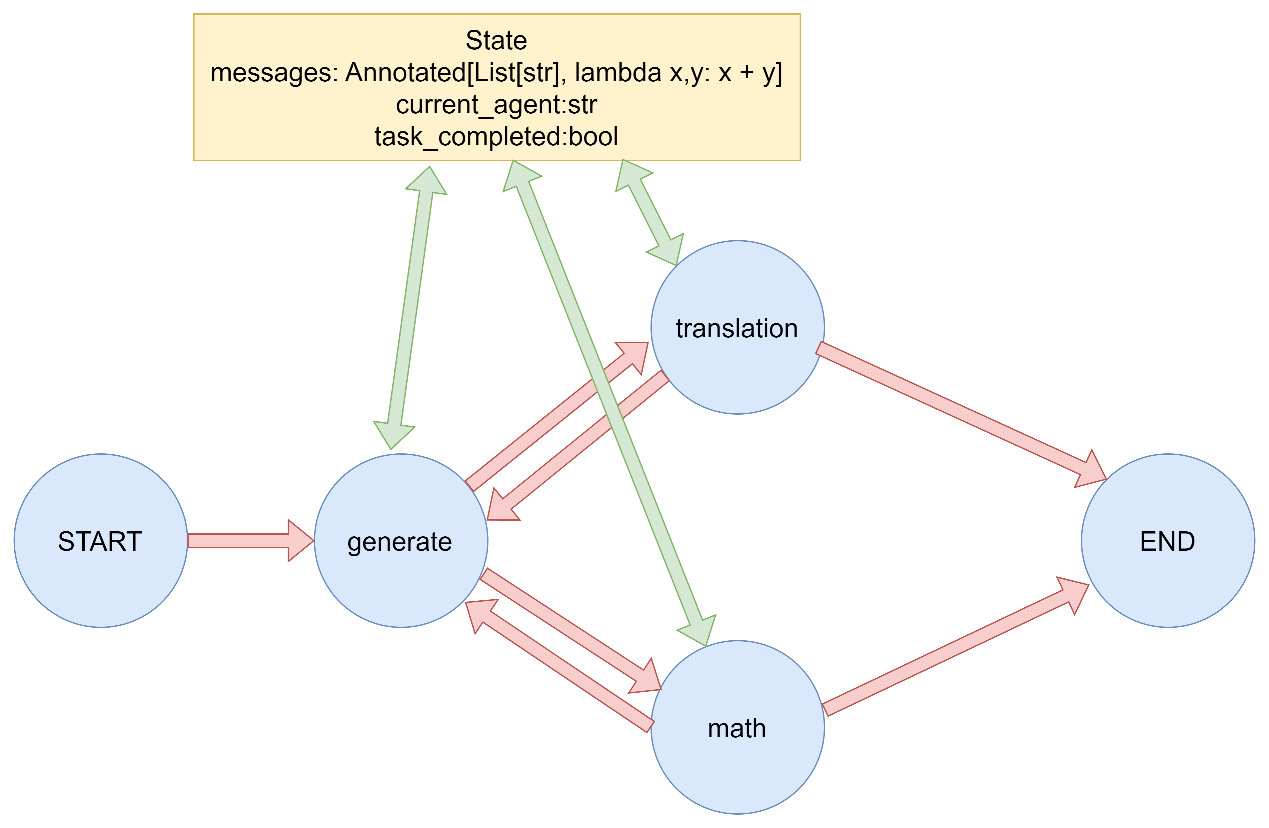
3.5.1 Command基本用法 借助Command,可以实现动态控制流行为(与条件边相同):根据消息内容动态决定执行路径,并在节点中同时更新状态和控制流程。
Command基础用法 1 2 3 4 5 6 7 8 9 10 11 12 13 14 15 16 17 18 19 20 21 22 23 24 25 26 27 28 29 30 31 32 33 34 35 36 37 38 39 40 41 42 43 44 45 46 47 48 49 50 51 52 53 54 55 56 57 58 59 60 61 62 63 64 65 66 67 68 69 70 71 72 73 74 75 76 77 78 79 80 81 82 83 84 85 86 87 88 89 90 91 92 93 94 95 96 97 98 99 100 101 102 103 104 105 106 107 108 109 110 111 112 113 114 115 116 117 118 119 120 121 122 123 124 125 126 127 128 129 130 """ LangGraph Command 基础演示 演示如何在节点中使用 Command 对象同时更新状态和控制流程。 """ from typing import Annotatedfrom typing_extensions import TypedDictfrom langgraph.graph import StateGraph, START, ENDfrom langgraph.types import Command定义状态 class AgentState (TypedDict ): messages: Annotated[list , lambda x, y: x + y] current_agent: str task_completed: bool 节点函数:决策代理 def decision_agent (state: AgentState ) -> Command[AgentState]: """决策代理节点,根据消息内容决定下一步操作""" print ("执行节点: decision_agent" ) last_message = state["messages" ][-1 ] if state["messages" ] else "" print (f"最新消息: {last_message} " ) if "数学" in last_message: return Command( update={ "messages" : [("system" , "路由到数学代理" )], "current_agent" : "math_agent" }, goto="math_agent" ) elif "翻译" in last_message: return Command( update={ "messages" : [("system" , "路由到翻译代理" )], "current_agent" : "translation_agent" }, goto="translation_agent" ) else : return Command( update={ "messages" : [("system" , "任务完成" )], "task_completed" : True }, goto=END ) 节点函数:数学代理 def math_agent (state: AgentState ) -> Command[AgentState]: """数学代理节点""" print ("执行节点: math_agent" ) result = "2 + 2 = 4" print (f"计算结果: {result} " ) return Command( update={ "messages" : [("assistant" , f"数学计算结果: {result} " )], "current_agent" : "decision_agent" }, goto="decision_agent" ) 节点函数:翻译代理 def translation_agent (state: AgentState ) -> Command[AgentState]: """翻译代理节点""" print ("执行节点: translation_agent" ) translation = "Hello -> 你好" print (f"翻译结果: {translation} " ) return Command( update={ "messages" : [("assistant" , f"翻译结果: {translation} " )], "current_agent" : "decision_agent" }, goto="decision_agent" ) def main (): """演示Command基础用法""" print ("= Command 基础演示 =\n" ) builder = StateGraph(AgentState) builder.add_node("decision_agent" , decision_agent) builder.add_node("math_agent" , math_agent) builder.add_node("translation_agent" , translation_agent) builder.add_edge(START, "decision_agent" ) graph = builder.compile () print ("测试1: 数学任务" ) initial_state = { "messages" : [("user" , "我需要计算数学题" )], "current_agent" : "user" , "task_completed" : False } print ("初始状态:" , initial_state) result = graph.invoke(initial_state) print ("最终状态:" , result) print ("\n" + "=" *50 + "\n" ) print ("测试2: 翻译任务" ) initial_state = { "messages" : [("user" , "我需要翻译文本" )], "current_agent" : "user" , "task_completed" : False } print ("初始状态:" , initial_state) result = graph.invoke(initial_state) print ("最终状态:" , result) print ("\n" + "=" *50 + "\n" ) print ("测试3: 完成任务" ) initial_state = { "messages" : [("user" , "你好" )], "current_agent" : "user" , "task_completed" : False } print ("初始状态:" , initial_state) result = graph.invoke(initial_state) print ("最终状态:" , result) if name == "main" : main()
案例中使用Command对象同时更新状态和控制流程。主要特点包括:
决策代理节点根据消息内容决定下一步操作。
数学代理和翻译代理分别处理特定任务。
每个节点都使用Command对象更新状态并指定下一步要执行的节点。
3.5.2 Command vs 条件边 应该在什么时候使用Command而不是条件边?
使用Command:当你需要在更新状态的同时决定下一步执行哪个节点时。例如,在多智能体系统中,需要在切换智能体的同时传递信息。
使用条件边:当你只需要在节点之间有条件地路由而不需要更新状态时。
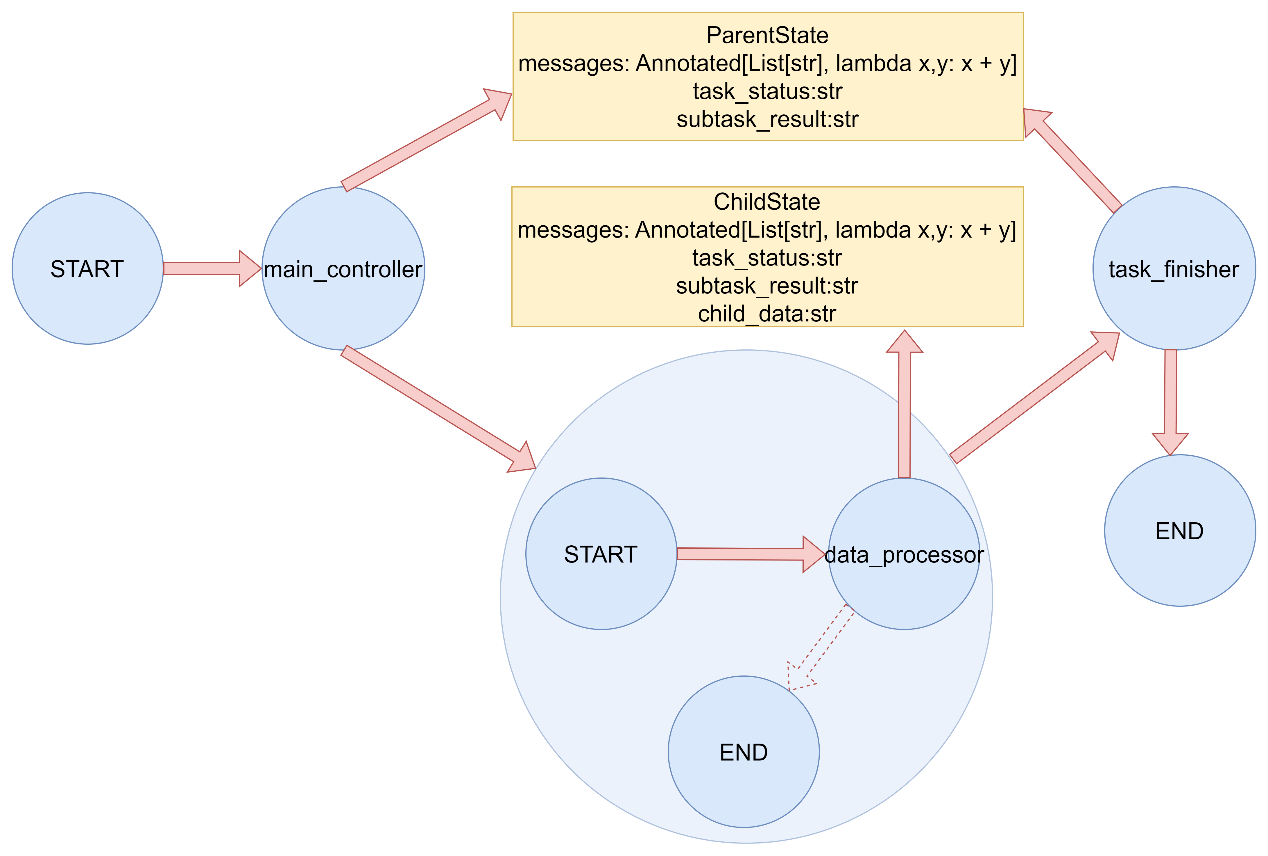
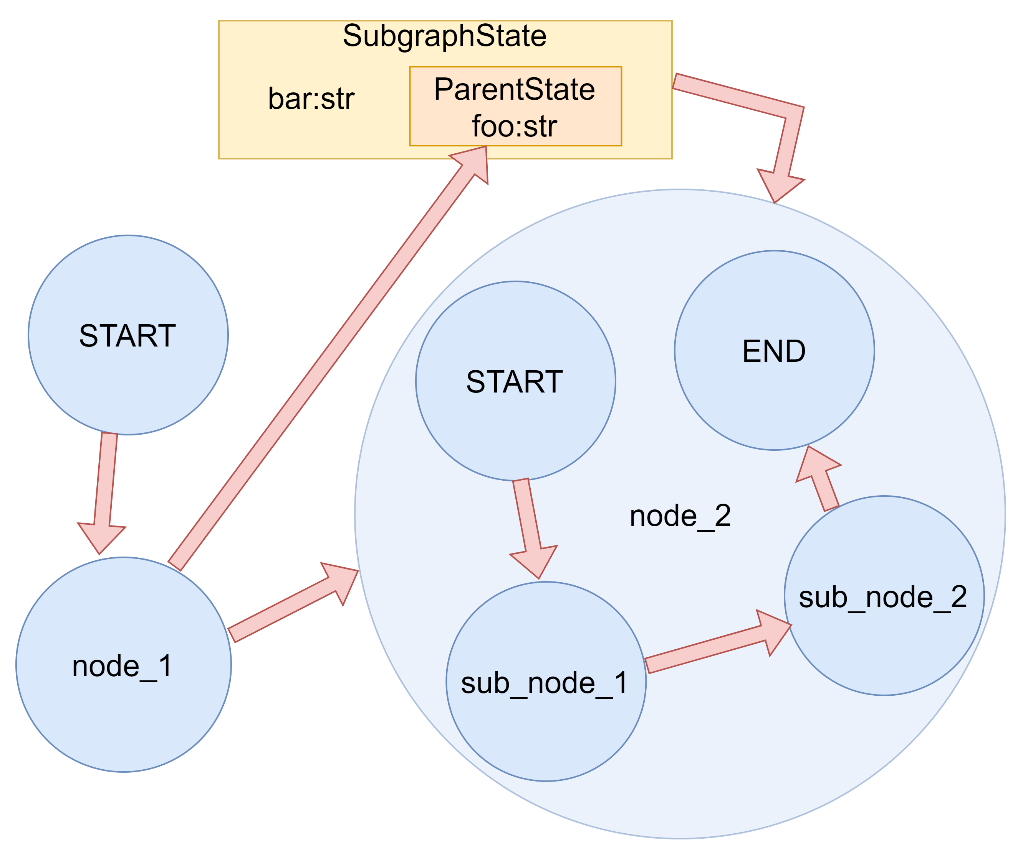
3.5.3 父图导航 使用子图时,可能希望从子图内的某个节点导航到另一个子图(即父图中的另一个节点)。这在实现多智能体交接时特别有用。
要实现这一点,可以在Command中指定graph=Command.PARENT:
将graph设置为Command.PARENT将导航到最近的父图。
当从子图节点向父图节点发送更新,且更新的键是父图和子图的共享的状态模式时,必须为父图状态中要更新的键定义一个reducer。
子图节点如何通过Command对象导航回父图,并更新父图的状态:
当从父图进入子图时候,父图会将子图中出现的字段进行赋值
父图导航 1 2 3 4 5 6 7 8 9 10 11 12 13 14 15 16 17 18 19 20 21 22 23 24 25 26 27 28 29 30 31 32 33 34 35 36 37 38 39 40 41 42 43 44 45 46 47 48 49 50 51 52 53 54 55 56 57 58 59 60 61 62 63 64 65 66 67 68 69 70 71 72 73 74 75 76 77 78 79 80 81 82 83 84 85 86 87 88 89 90 91 92 """ LangGraph Command 父图导航演示 演示如何使用 Command 对象从子图导航到父图节点。 """ from typing import Annotatedfrom typing_extensions import TypedDictfrom langgraph.graph import StateGraph, START, ENDfrom langgraph.types import Command定义父图状态 class ParentState (TypedDict ): messages: Annotated[list , lambda x, y: x + y] task_status: str subtask_result: str 定义子图状态(继承父图状态) class ChildState (TypedDict ): messages: Annotated[list , lambda x, y: x + y] task_status: str subtask_result: str child_data: str 父图节点:主控制器 def main_controller (state: ParentState ) -> Command[ParentState]: """主控制器节点""" print ("执行节点: main_controller (父图)" ) return Command( update={ "messages" : [("system" , "启动子任务" )], "task_status" : "subtask_started" }, goto="subgraph_node" ) 父图节点:任务结束 def task_finisher (state: ParentState ) -> dict : """任务结束节点""" print ("执行节点: task_finisher (父图)" ) return { "messages" : [("system" , "任务完成" )], "task_status" : "completed" } 子图节点:数据处理器 def data_processor (state: ChildState ) -> Command[ParentState]: """数据处理器节点(在子图中)""" print ("执行节点: data_processor (子图)" ) processed_data = "处理后的数据" print (f"处理结果: {processed_data} " ) return Command( update={ "messages" : [("subtask" , f"子任务完成: {processed_data} " )], "subtask_result" : processed_data, "task_status" : "subtask_completed" }, goto="task_finisher" , graph=Command.PARENT ) def create_subgraph () -> StateGraph: """创建子图""" subgraph_builder = StateGraph(ChildState) subgraph_builder.add_node("data_processor" , data_processor) subgraph_builder.add_edge(START, "data_processor" ) subgraph_builder.add_edge("data_processor" , END) return subgraph_builder.compile () def main (): """演示Command父图导航""" print ("= Command 父图导航演示 =\n" ) parent_builder = StateGraph(ParentState) parent_builder.add_node("main_controller" , main_controller) parent_builder.add_node("task_finisher" , task_finisher) parent_builder.add_node("subgraph_node" , create_subgraph()) parent_builder.add_edge(START, "main_controller" ) parent_builder.add_edge("main_controller" , "subgraph_node" ) graph = parent_builder.compile () initial_state = { "messages" : [("user" , "开始任务" )], "task_status" : "init" , "subtask_result" : "" } print ("初始状态:" , initial_state) result = graph.invoke(initial_state) print ("最终状态:" , result) if name == "main" : main()
案例中使用Command对象从子图导航到父图节点。主要特点包括:
创建了一个包含主控制器和任务结束节点的父图。
创建了一个包含数据处理器节点的子图。
数据处理器节点使用graph=Command.PARENT参数导航回父图的特定节点。
展示了父子图之间的状态传递和控制流转移。
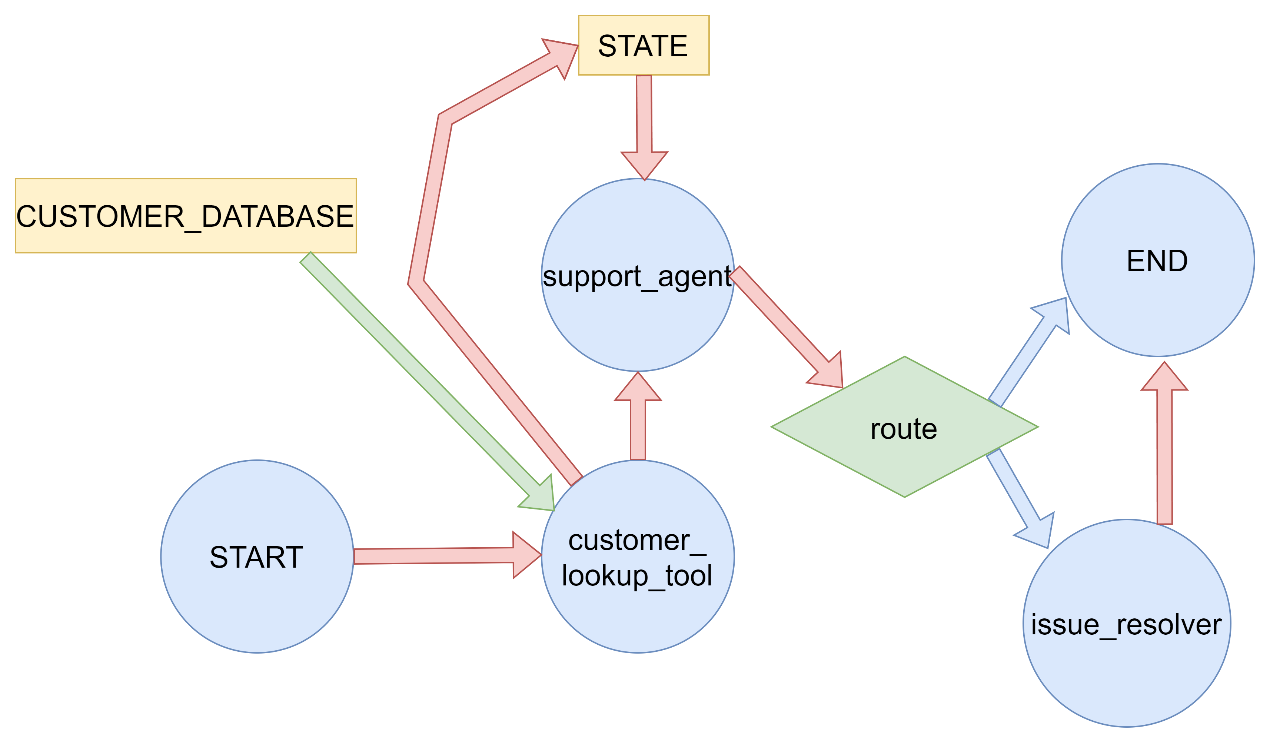
3.5.4案例:工具中更新图状态 在客户支持应用程序中,你可能希望在对话开始时根据客户的账号或ID查询客户信息。以客户支持应用程序为例,演示了如何在工具内部使用Command对象更新图状态。主要特点包括:
场景设定:客户支持应用,根据客户ID查询客户信息。
工具函数:lookup_customer_info 模拟查询客户信息的工具。
状态管理:使用Command对象在工具执行后更新客户信息和消息历史。
流程控制:根据查询结果决定下一步执行的节点。
示例 1 2 3 4 5 6 7 8 9 10 11 12 13 14 15 16 17 18 19 20 21 22 23 24 25 26 27 28 29 30 31 32 33 34 35 36 37 38 39 40 41 42 43 44 45 46 47 48 49 50 51 52 53 54 55 56 57 58 59 60 61 62 63 64 65 66 67 68 69 70 71 72 73 74 75 76 77 78 79 80 81 82 83 84 85 86 87 88 89 90 91 92 93 94 95 96 97 98 99 100 101 102 103 104 105 106 107 108 109 110 111 112 113 114 115 116 117 118 119 120 121 122 123 124 125 126 127 128 129 130 131 132 133 134 135 136 137 138 139 140 141 142 143 144 145 146 147 148 149 150 151 152 153 154 155 156 157 158 159 160 161 162 163 164 165 166 167 168 169 170 171 172 173 174 175 176 177 178 179 180 181 182 183 184 185 186 187 188 189 190 191 192 193 194 195 196 197 198 199 200 201 202 203 204 205 206 207 208 209 210 211 212 213 214 215 216 217 218 219 220 221 222 223 224 225 226 227 228 229 230 231 232 233 234 235 236 237 238 239 240 241 242 243 244 245 246 247 248 249 250 251 252 253 254 255 256 257 258 259 260 261 262 263 264 265 266 267 268 269 270 271 272 273 274 275 276 277 278 279 280 281 282 283 284 285 286 287 288 289 290 291 292 293 294 295 296 297 298 299 300 301 302 303 304 305 306 307 308 309 310 311 312 313 314 315 316 317 318 319 320 321 322 323 324 325 326 327 328 329 330 331 332 333 334 335 336 337 338 339 340 341 """ LangGraph Command 工具内部状态更新演示 演示如何在工具内部使用 Command 对象更新图状态。 以客户支持应用程序为例,在对话开始时根据客户ID查询客户信息。 """ import timeimport randomfrom typing import Annotatedfrom typing_extensions import TypedDictfrom langgraph.graph import StateGraph, START, ENDfrom langgraph.types import Commandclass SupportState (TypedDict ): customer_id: str customer_info: dict messages: Annotated[list , lambda x, y: x + y] issue_resolved: bool CUSTOMER_DATABASE = { "CUST001" : { "name" : "张三" , "email" : "zhangsan@example.com" , "membership_level" : "金牌会员" , "account_status" : "正常" }, "CUST002" : { "name" : "李四" , "email" : "lisi@example.com" , "membership_level" : "银牌会员" , "account_status" : "正常" }, "CUST003" : { "name" : "王五" , "email" : "wangwu@example.com" , "membership_level" : "普通会员" , "account_status" : "欠费" } } def lookup_customer_info (customer_id: str ) -> dict : """ 模拟查询客户信息的工具函数 在实际应用中,这可能是一个API调用或数据库查询 """ print (f"正在查询客户ID: {customer_id} 的信息..." ) time.sleep(1 ) customer_info = CUSTOMER_DATABASE.get(customer_id, {}) if customer_info: print (f"找到客户信息: {customer_info} " ) else : print (f"未找到客户ID: {customer_id} 的信息" ) customer_info = {"error" : "客户未找到" } return customer_info def customer_lookup_tool (state: SupportState ) -> Command[SupportState]: """客户信息查询工具节点""" print ("执行节点: customer_lookup_tool" ) customer_id = state["customer_id" ] customer_info = lookup_customer_info(customer_id) return Command( update={ "customer_info" : customer_info, "messages" : [("system" , f"已查询客户 {customer_id} 的信息" )] }, goto="support_agent" ) def support_agent (state: SupportState ) -> Command[SupportState]: """客服代理节点""" print ("执行节点: support_agent" ) customer_info = state["customer_info" ] messages = state["messages" ] if "error" in customer_info: response = "抱歉,我们无法找到您的客户信息,请您确认提供的客户ID是否正确。" next_node = END else : membership_level = customer_info.get("membership_level" , "未知" ) name = customer_info.get("name" , "客户" ) if membership_level == "金牌会员" : response = f"尊敬的金牌会员{name} ,您好!我们非常重视您的问题,将优先为您处理。" elif membership_level == "银牌会员" : response = f"{name} 您好!我们会尽快为您解决问题。" else : response = f"{name} 您好!感谢您的咨询。" response += "\n我们已经收到您的问题,正在为您处理..." next_node = "issue_resolver" return Command( update={ "messages" : [("assistant" , response)] }, goto=next_node ) def issue_resolver (state: SupportState ) -> Command[SupportState]: """问题解决器节点""" print ("执行节点: issue_resolver" ) print ("正在分析和解决客户问题..." ) time.sleep(1 ) resolved = random.choice([True , False ]) if resolved: response = "您的问题已成功解决!如果还有其他需要帮助的地方,请随时告诉我们。" issue_status = True else : response = "我们正在进一步处理您的问题,稍后会有专员与您联系。" issue_status = False return Command( update={ "messages" : [("system" , response)], "issue_resolved" : issue_status }, goto=END ) def main (): """演示Command工具内部状态更新""" print ("=== Command 工具内部状态更新演示 ===\n" ) builder = StateGraph(SupportState) builder.add_node("customer_lookup_tool" , customer_lookup_tool) builder.add_node("support_agent" , support_agent) builder.add_node("issue_resolver" , issue_resolver) builder.add_edge(START, "customer_lookup_tool" ) graph = builder.compile () print ("测试1: 金牌会员客户" ) initial_state = { "customer_id" : "CUST001" , "customer_info" : {}, "messages" : [("user" , "我需要查询我的账户信息" )], "issue_resolved" : False } print ("初始状态:" , initial_state) result = graph.invoke(initial_state) print ("最终状态:" , result) print ("\n" + "=" *50 + "\n" ) print ("测试2: 不存在的客户" ) initial_state = { "customer_id" : "CUST999" , "customer_info" : {}, "messages" : [("user" , "我想查询账户信息" )], "issue_resolved" : False } print ("初始状态:" , initial_state) result = graph.invoke(initial_state) print ("最终状态:" , result) print ("\n" + "=" *50 + "\n" ) print ("测试3: 普通会员客户" ) initial_state = { "customer_id" : "CUST003" , "customer_info" : {}, "messages" : [("user" , "账户有问题需要处理" )], "issue_resolved" : False } print ("初始状态:" , initial_state) result = graph.invoke(initial_state) print ("最终状态:" , result) if __name__ == "__main__" : main()
从运行结果可以看出:
测试1(金牌会员):
成功查询到客户信息
提供个性化服务(优先处理)
问题成功解决
测试2(不存在的客户):
查询失败,返回错误信息
客服代理提示客户确认ID
流程结束
测试3(普通会员):
成功查询到客户信息
提供标准服务
问题需要进一步处理
在这个示例中,使用Command对象的优势体现在:
状态更新与流程控制一体化:在工具执行后同时更新状态和决定下一步流程。
避免额外的条件边:不需要额外的条件边来处理工具执行结果。
清晰的控制流:每个节点明确知道下一步要执行什么操作。
灵活的状态管理:可以在节点执行过程中精确控制状态更新。
这种模式特别适用于需要在工具执行后立即更新状态并根据结果决定下一步操作的场景,如API调用、数据库查询、外部服务集成等。
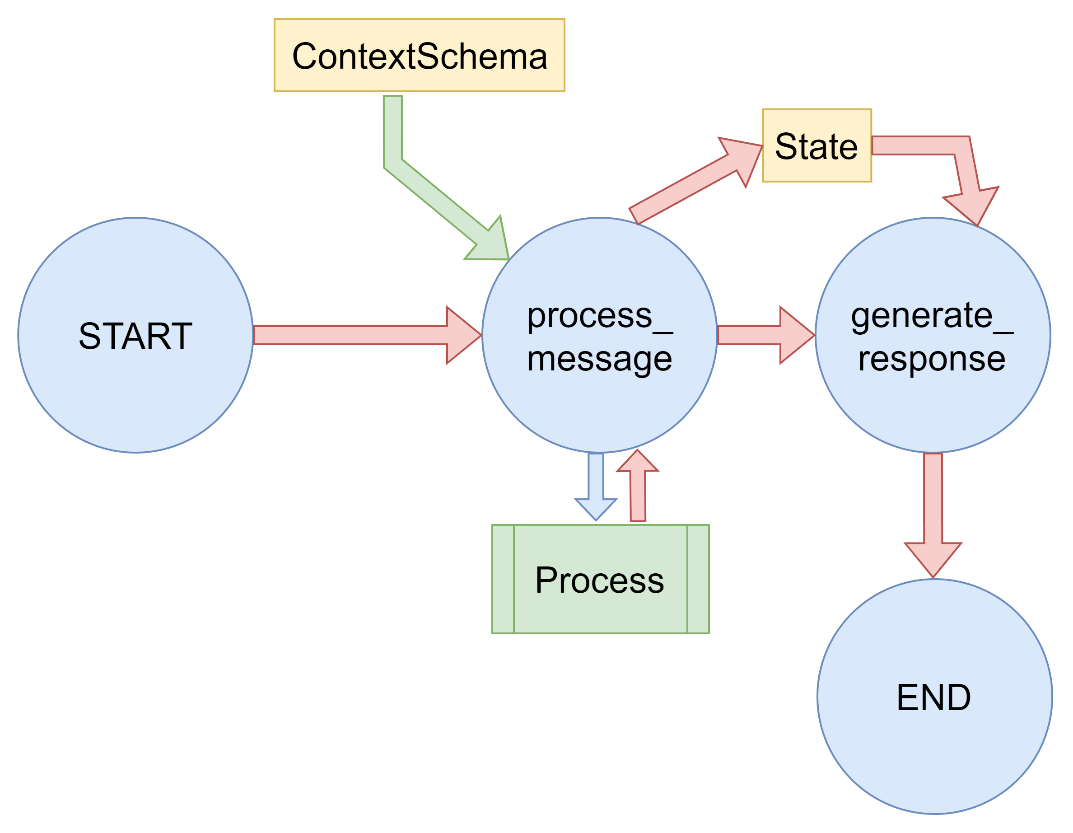
3.6 Runtime Context 创建Graph时,可以为传递给节点的运行时上下文指定一个context_schema。这对于向节点传递不属于图状态 的信息很有用。例如,可以传递诸如模型名称或数据库连接之类的依赖项。
3.6.1 使用 context_schema 的优势: 分离关注点:将运行时配置与图状态分离,保持状态的纯净性
类型安全:通过定义数据类,提供类型检查和 IDE 自动补全支持
易于管理:统一管理运行时依赖,如数据库连接、API密钥等
3.6.2 适用场景包括: 传递模型配置信息(如模型名称、参数等)
3.6.3 使用方式 Context Schema(上下文结构)
使用 @dataclass 定义了一个 ContextSchema 类,定义的内容不属于图的状态,但在运行时需要被节点访问
节点函数定义
节点函数接收两个参数:state(图的状态)和 runtime(运行时上下文)
通过 runtime.context 访问上下文信息,如 runtime.context.model_name
图的创建和执行
创建 StateGraph 时传入 context_schema=ContextSchema 参数
调用 graph.invoke() 时通过 context 参数传递上下文数据
3.6.4 案例 1 2 3 4 5 6 7 8 9 10 11 12 13 14 15 16 17 18 19 20 21 22 23 24 25 26 27 28 29 30 31 32 33 34 35 36 37 38 39 40 41 42 43 44 45 46 47 48 49 50 51 52 53 54 55 56 57 58 59 60 61 62 63 64 65 66 67 68 69 70 71 72 73 74 75 76 77 78 79 80 81 82 83 84 85 86 87 88 89 90 91 92 93 94 95 96 97 98 99 100 101 102 103 104 105 106 107 108 109 110 111 112 113 114 115 116 117 118 119 120 121 122 123 124 125 126 127 128 129 130 131 132 133 134 135 136 137 138 139 140 141 142 143 144 145 146 147 148 149 150 151 152 153 154 155 156 157 158 159 160 161 162 163 164 165 166 167 168 169 170 171 172 173 174 175 176 177 178 179 180 181 182 183 184 185 186 187 188 189 190 191 """ LangGraph Context Schema 演示 演示如何在 LangGraph 1.0 中使用 context_schema 向节点传递不属于图表状态的信息。 这在传递模型名称、数据库连接等依赖项时非常有用。 """ from typing import Annotatedfrom typing_extensions import TypedDictfrom langgraph.graph import StateGraph, START, ENDfrom langgraph.runtime import Runtimefrom langchain_core.messages import AIMessage, HumanMessagefrom dataclasses import dataclassclass AgentState (TypedDict ): messages: Annotated[list , lambda x, y: x + y] response: str @dataclass class ContextSchema : model_name: str db_connection: str api_key: str def process_message (state: AgentState, runtime: Runtime[ContextSchema] ) -> dict : """处理用户消息的节点,使用context中的信息""" print ("执行节点: process_message" ) last_message = state["messages" ][-1 ].content if state["messages" ] else "" print (f"用户消息: {last_message} " ) model_name = runtime.context.model_name db_connection = runtime.context.db_connection api_key = runtime.context.api_key print (f"使用的模型: {model_name} " ) print (f"数据库连接: {db_connection} " ) print (f"API密钥前缀: {api_key[:5 ]} ***" ) response = f"使用 {model_name} 处理了您的请求,已连接到 {db_connection} " return { "messages" : [AIMessage(content=response)], "response" : response } def generate_response (state: AgentState, runtime: Runtime[ContextSchema] ) -> dict : """生成最终响应的节点""" print ("执行节点: generate_response" ) model_name = runtime.context.model_name print (f"使用模型 {model_name} 生成最终响应" ) previous_response = state["response" ] final_response = f"{previous_response} \n这是使用 {model_name} 生成的完整响应。" return { "messages" : [AIMessage(content=final_response)], "response" : final_response } def main (): """演示 context_schema 的使用""" print ("=== Context Schema 演示 ===\n" ) builder = StateGraph(AgentState, context_schema=ContextSchema) builder.add_node("process_message" , process_message) builder.add_node("generate_response" , generate_response) builder.add_edge(START, "process_message" ) builder.add_edge("process_message" , "generate_response" ) builder.add_edge("generate_response" , END) graph = builder.compile () initial_state = { "messages" : [HumanMessage(content="请帮我查询最新的订单信息" )], "response" : "" } context = ContextSchema( model_name="gpt-4-turbo" , db_connection="postgresql://user:pass@localhost:5432/orders_db" , api_key="sk-abcdefghijklmnopqrstuvwxyz123456" ) print ("初始状态:" , initial_state) print ("上下文信息:" , { "model_name" : context.model_name, "db_connection" : context.db_connection, "api_key" : f"{context.api_key[:5 ]} ***" }) print ("\n" + "-" *50 + "\n" ) result = graph.invoke(initial_state, context=context) print ("\n" + "=" *50 ) print ("最终状态:" , result) print ("\n最终响应:" ) print (result["response" ]) if __name__ == "__main__" : main()
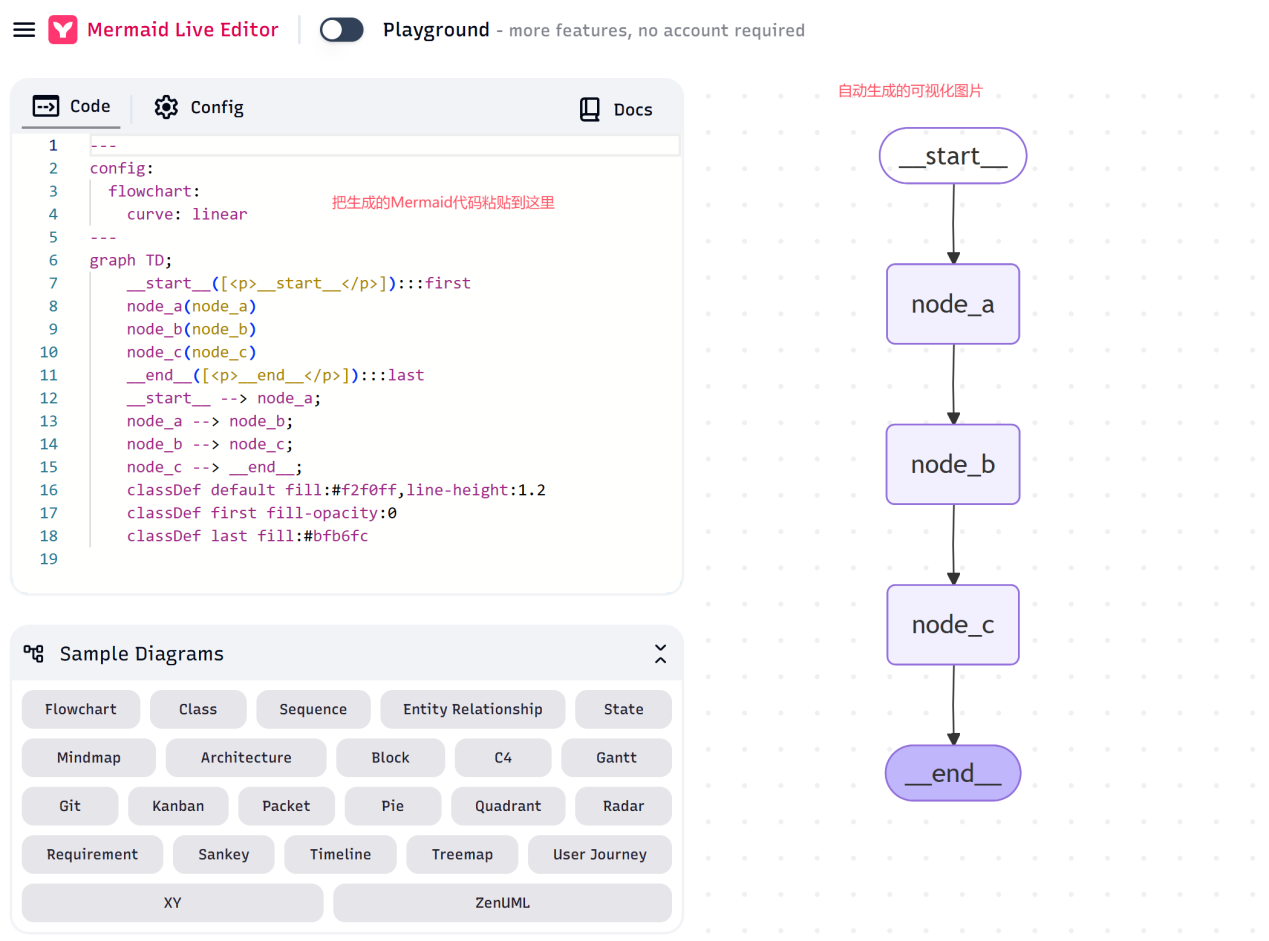
3.7. 可视化 LangGraph 提供了多种图表可视化方式,帮助开发者更好地理解和调试工作流。
通过 graph.get_graph() 方法可以获取图的结构信息,包括节点和边的详细信息。基于这个信息,可以使用如下方式进行可视化:
生成 Mermaid 代码来可视化图结构。
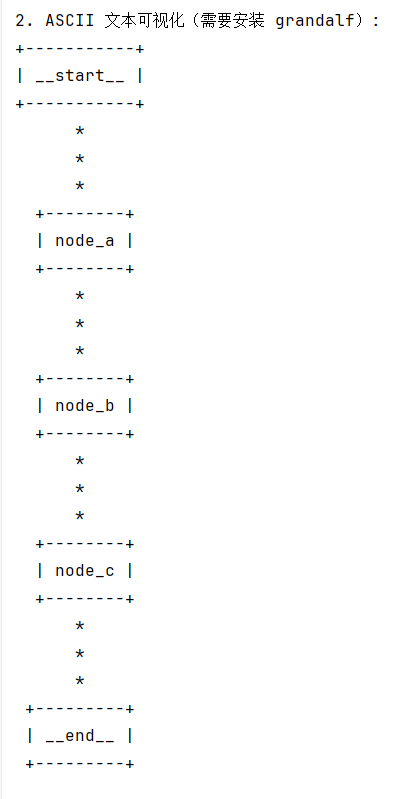
生成简单的 ASCII 文本图表,但需要安装额外的依赖。
安装grandalf 来支持 ASCII 可视化。
pip install grandalf
案例: fold 1 2 3 4 5 6 7 8 9 10 11 12 13 14 15 16 17 18 19 20 21 22 23 24 25 26 27 28 29 30 31 32 33 34 35 36 37 38 39 40 41 42 43 44 45 46 47 48 49 50 51 52 53 54 55 56 57 58 59 60 61 62 63 64 65 66 67 68 69 70 71 72 73 74 75 76 77 78 79 80 81 82 83 84 85 86 87 88 89 90 91 92 93 94 95 96 97 98 99 100 101 102 103 104 105 106 107 108 109 110 111 112 113 114 115 116 117 118 119 120 121 122 123 124 125 126 127 128 129 130 131 132 133 134 135 136 137 138 139 140 141 142 143 144 145 146 147 148 149 150 151 152 153 """ 简单的 LangGraph 可视化演示 这个演示展示了一个更简单的图结构,用于更好地理解可视化功能 """ from typing import Annotatedfrom typing_extensions import TypedDictfrom langgraph.graph import StateGraph, START, ENDclass SimpleState (TypedDict ): value: int messages: Annotated[list , lambda x, y: x + y] def node_a (state: SimpleState ) -> dict : """节点A""" print ("执行节点A" ) return { "value" : state["value" ] + 1 , "messages" : [("system" , "执行了节点A" )] } def node_b (state: SimpleState ) -> dict : """节点B""" print ("执行节点B" ) return { "value" : state["value" ] * 2 , "messages" : [("system" , "执行了节点B" )] } def node_c (state: SimpleState ) -> dict : """节点C""" print ("执行节点C" ) return { "value" : state["value" ] + 10 , "messages" : [("system" , "执行了节点C" )] } def main (): """简单可视化演示""" print ("=== 简单 LangGraph 可视化演示 ===\n" ) builder = StateGraph(SimpleState) builder.add_node("node_a" , node_a) builder.add_node("node_b" , node_b) builder.add_node("node_c" , node_c) builder.add_edge(START, "node_a" ) builder.add_edge("node_a" , "node_b" ) builder.add_edge("node_b" , "node_c" ) builder.add_edge("node_c" , END) graph = builder.compile () graph_structure = graph.get_graph() print ("1. Mermaid 图表代码:" ) try : mermaid_code = graph_structure.draw_mermaid() print (mermaid_code) except Exception as e: print (f"生成 Mermaid 图表失败: {e} " ) print () print ("2. ASCII 文本可视化(需要安装 grandalf):" ) try : ascii_graph = graph_structure.draw_ascii() print (ascii_graph) except Exception as e: print (f"ASCII 可视化失败: {e} " ) print ("提示:可以通过以下命令安装 grandalf 来支持 ASCII 可视化:" ) print (" pip install grandalf" ) print () print ("3. 执行图:" ) initial_state = { "value" : 5 , "messages" : [] } print ("初始状态:" , initial_state) result = graph.invoke(initial_state) print ("最终状态:" , result) if __name__ == "__main__" : main()
打印的Mermaid代码可以用支持的工具进行展示,或者用在线网站查看效果(https://mermaid.live/ ):
如果使用Jupyter Notebook,可直接查看Mermaid图片,调用方式如下:
需要先安装Ipython:pip install ipython from IPython.display import Image, displaydisplay(Image(graph.get_graph().draw_mermaid_png()))
ASCII 文本图表在控制台直接可以看到:
3.8 Async异步编程 采用异步编程范式在并发运行受IO限制的代码时(例如,向聊天模型提供商并发发送API请求),可以显著提升性能。
使用async/await语法实现异步IO操作
所有节点函数都是async def定义的异步函数
使用await graph.ainvoke()而不是graph.invoke()来执行异步图
利用asyncio.gather()实现任务并发执行
协程的使用 1 2 3 4 5 6 7 8 9 10 11 12 13 14 15 16 17 18 19 20 21 22 23 24 25 26 27 28 29 30 31 32 33 34 35 36 37 38 39 40 41 42 43 44 45 46 47 48 49 50 51 52 53 54 55 56 57 58 59 60 61 62 63 64 65 66 67 68 69 70 71 72 73 74 75 76 77 78 79 80 81 82 83 84 85 86 87 88 89 90 91 92 93 94 95 96 97 98 99 100 101 102 103 104 105 106 107 108 109 110 111 112 113 114 115 116 117 118 119 120 121 122 123 124 125 126 127 128 129 130 131 132 133 134 135 136 137 138 139 140 141 142 143 144 145 146 147 148 149 150 151 152 153 154 155 156 157 158 159 160 161 162 163 164 165 166 167 168 169 170 171 172 173 174 175 176 177 178 179 180 181 182 183 184 185 186 187 188 189 190 191 192 193 194 195 196 197 198 199 200 201 202 203 204 205 206 207 208 209 210 211 212 213 214 215 216 217 218 219 220 221 222 223 224 225 226 227 228 229 230 231 232 233 234 235 236 237 238 239 240 241 242 243 244 245 246 247 248 249 250 251 252 253 254 255 256 257 258 259 260 261 262 263 264 265 266 267 268 269 270 271 272 273 274 275 276 277 278 279 280 281 282 283 284 285 286 287 288 289 290 291 292 293 294 295 296 297 298 299 300 301 302 303 304 305 306 307 308 309 """ LangGraph 异步并发IO任务演示 本示例展示了如何使用LangGraph 1.0版本和异步编程范式, 在处理IO密集型任务(如并发API请求)时显著提升性能。 """ import asyncioimport timefrom typing import Annotatedfrom typing_extensions import TypedDictfrom langgraph.graph import StateGraph, START, ENDclass IOState (TypedDict ): """ 状态定义,用于跟踪并发IO任务的结果 """ results: Annotated[list , lambda x, y: x + y] task_count: int async def simulated_api_call (task_id: int , delay: float = 1.0 ) -> str : """ 模拟API调用的异步函数 Args: task_id: 任务ID delay: 延迟时间(秒),模拟网络请求耗时 Returns: str: API响应结果 """ print (f"开始执行API调用 {task_id} ..." ) await asyncio.sleep(delay) result = f"API调用 {task_id} 的结果" print (f"完成API调用 {task_id} " ) return result async def io_task_1 (state: IOState ) -> dict : """ IO密集型任务1 - 模拟API调用 """ result = await simulated_api_call(1 , 1.0 ) return {"results" : [result]} async def io_task_2 (state: IOState ) -> dict : """ IO密集型任务2 - 模拟API调用 """ result = await simulated_api_call(2 , 1.5 ) return {"results" : [result]} async def io_task_3 (state: IOState ) -> dict : """ IO密集型任务3 - 模拟API调用 """ result = await simulated_api_call(3 , 0.8 ) return {"results" : [result]} async def io_task_4 (state: IOState ) -> dict : """ IO密集型任务4 - 模拟API调用 """ result = await simulated_api_call(4 , 1.2 ) return {"results" : [result]} def summary_node (state: IOState ) -> dict : """ 汇总节点 - 收集所有并发任务的结果 """ print (f"\n=== 所有任务已完成 ===" ) print (f"总共执行了 {state['task_count' ]} 个任务" ) print (f"收集到 {len (state['results' ])} 个结果:" ) for i, result in enumerate (state['results' ], 1 ): print (f" {i} . {result} " ) return {"results" : state["results" ] + ["所有任务已完成" ]} def sync_version (): """ 同步版本用于性能对比 """ print ("=== 同步执行版本 ===" ) start_time = time.time() results = [] delays = [1.0 , 1.5 , 0.8 , 1.2 ] for i, delay in enumerate (delays, 1 ): print (f"开始执行同步任务 {i} ..." ) time.sleep(delay) result = f"同步任务 {i} 的结果" results.append(result) print (f"完成同步任务 {i} " ) elapsed = time.time() - start_time print (f"\n同步执行总耗时: {elapsed:.2 f} 秒" ) return results async def async_version (): """ 异步版本用于性能对比 """ print ("\n=== 异步执行版本 ===" ) start_time = time.time() tasks = [ simulated_api_call(1 , 1.0 ), simulated_api_call(2 , 1.5 ), simulated_api_call(3 , 0.8 ), simulated_api_call(4 , 1.2 ) ] results = await asyncio.gather(*tasks) elapsed = time.time() - start_time print (f"\n异步执行总耗时: {elapsed:.2 f} 秒" ) return results def build_async_graph (): """ 构建LangGraph异步工作流 """ builder = StateGraph(IOState) builder.add_node("io_task_1" , io_task_1) builder.add_node("io_task_2" , io_task_2) builder.add_node("io_task_3" , io_task_3) builder.add_node("io_task_4" , io_task_4) builder.add_node("summary" , summary_node) builder.add_edge(START, "io_task_1" ) builder.add_edge(START, "io_task_2" ) builder.add_edge(START, "io_task_3" ) builder.add_edge(START, "io_task_4" ) builder.add_edge("io_task_1" , "summary" ) builder.add_edge("io_task_2" , "summary" ) builder.add_edge("io_task_3" , "summary" ) builder.add_edge("io_task_4" , "summary" ) builder.add_edge("summary" , END) return builder.compile () async def main (): """ 主函数 - 演示异步并发IO任务的优势 """ print ("LangGraph 异步并发IO任务演示" ) print ("=" * 50 ) sync_results = sync_version() async_results = await async_version() print ("\n=== LangGraph异步工作流版本 ===" ) start_time = time.time() graph = build_async_graph() result = await graph.ainvoke({ "results" : [], "task_count" : 4 }) elapsed = time.time() - start_time print (f"\nLangGraph异步工作流总耗时: {elapsed:.2 f} 秒" ) print ("\n=== 性能对比总结 ===" ) print ("通过异步并发执行IO密集型任务,可以显著提升性能:" ) print ("- 同步执行: 任务依次执行,总耗时为各任务耗时之和" ) print ("- 异步执行: 任务并发执行,总耗时近似于最耗时的任务" ) print ("- LangGraph异步工作流: 提供了结构化的异步任务编排能力" ) if __name__ == "__main__" : asyncio.run(main())
和普通节点一样,注册编译到图中。但是使用时候需要用{python icon} await graph.ainvoke() 并将其包装成为一个async函数
``
4 高级特性 4.1 持久化 Persisitance LangGraph 具有内置的持久化层,通过检查点工具来实现。当使用检查点工具编译图时,检查点工具会在每个超级步骤保存图状态的checkpoint。这些检查点会被保存到一个thread中,在图执行后可以访问该线程。由于threads允许在执行后访问图的状态,因此多种强大功能成为可能,包括人机协同、记忆、时间回溯和容错等。
LangGraph API 会自动处理检查点。 使用 LangGraph API 时,无需手动实现或配置检查点工具。该 API 会在后台为您处理所有持久化基础架构。
4.1.1Threads 线程(Thread)是检查点工具为其保存的每个检查点分配的唯一 ID 或线程标识符,它包含了一系列运行实例的累积状态。当某个运行实例执行时,底层图的状态会持久化到该线程中。使用检查点调用图时,必须在配置的可配置部分指定thread_id。
{python icon}{"configurable": {"thread_id": "1"}}
可以检索线程的当前状态和历史状态。要持久化状态,必须在执行运行之前创建线程。
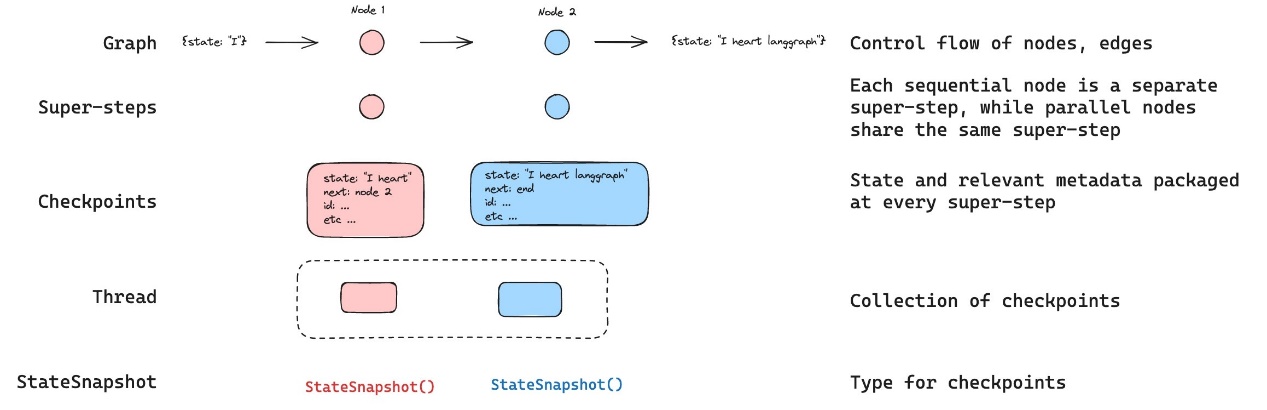
4.1.2 Checkpoints 线程在特定时间点的状态称为检查点。检查点是在每个超级步骤保存的图状态快照,由具有以下关键属性的StateSnapshot对象表示:
config:与此检查点相关联的配置。
metadata:与此检查点相关联的元数据。
values:此时状态通道的值。
next 下一个要在图中执行的节点名称元组。
tasks:一个包含PregelTask对象的元组,这些对象包含关于接下来要执行的任务的信息。如果该步骤之前已尝试过,它将包含错误信息。如果图形从节点内部被动态中断,任务将包含与中断相关的额外数据。
检查点会被持久化,并可用于在之后恢复线程的状态。
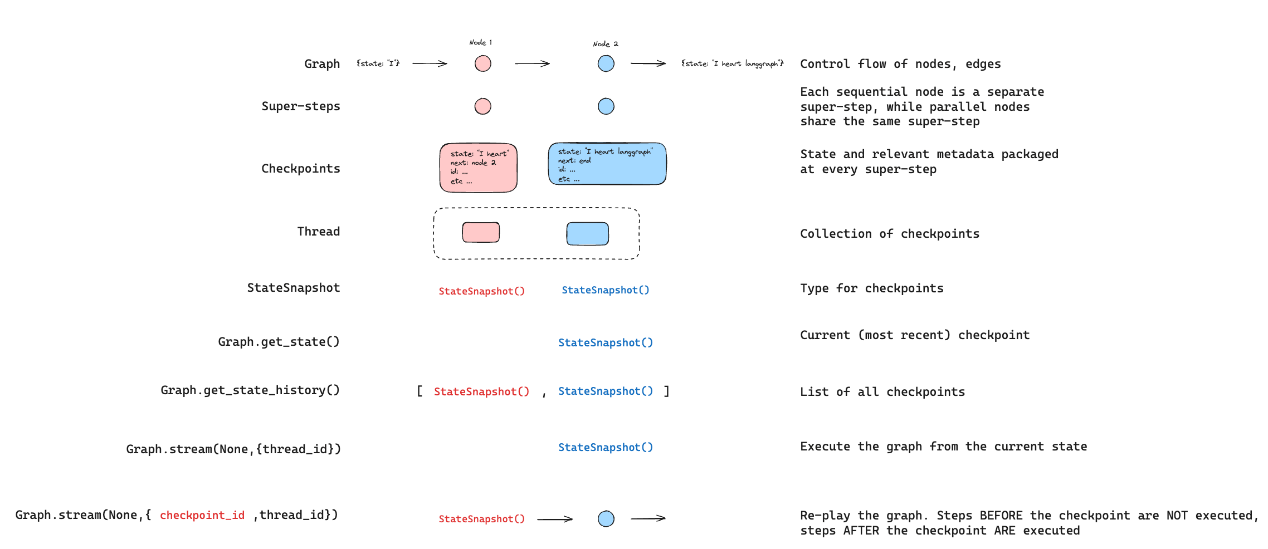
{python icon} graph.get_state(config):来查看图的最新状态。{python icon} graph.get_state_history(config):可以获取特定线程的图执行完整历史。
4.1.3 内存检查点 langgraph-checkpoint:检查点保存器(BaseCheckpointSaver)的基础接口以及序列化/反序列化接口(SerializerProtocol)。包含用于实验的内存中检查点实现(InMemorySaver)。LangGraph 已内置 langgraph-checkpoint。
RAM检查点 1 2 3 4 5 6 7 8 9 10 11 12 13 14 15 16 17 18 19 20 21 22 23 24 25 26 27 28 29 30 31 32 33 34 35 36 37 38 39 40 41 42 43 44 45 46 47 48 49 50 51 52 53 54 55 56 57 58 59 60 61 62 63 64 65 66 67 68 69 70 71 72 73 74 75 76 77 """ LangGraph 1.0 持久化存储演示 - 内存存储 (In-Memory) 特点: * 数据暂存于内存,程序关闭后丢失 * 无需额外配置 * 适用于本地测试和临时验证工作流逻辑 """ from typing import Annotatedfrom typing_extensions import TypedDictfrom langgraph.graph import StateGraph, START, ENDfrom langgraph.checkpoint.memory import InMemorySaverimport operator定义状态 class PersistenceDemoState (TypedDict ): messages: Annotated[list , operator.add] step_count: Annotated[int , operator.add] 节点函数 def step_one (state: PersistenceDemoState ) -> dict : print ("执行步骤 1" ) return { "messages" : ["执行了步骤 1" ], "step_count" : 1 } def step_two (state: PersistenceDemoState ) -> dict : print ("执行步骤 2" ) return { "messages" : ["执行了步骤 2" ], "step_count" : 1 } def step_three (state: PersistenceDemoState ) -> dict : print ("执行步骤 3" ) return { "messages" : ["执行了步骤 3" ], "step_count" : 1 } 构建图 def create_graph (): builder = StateGraph(PersistenceDemoState) builder.add_node("step_one" , step_one) builder.add_node("step_two" , step_two) builder.add_node("step_three" , step_three) builder.add_edge(START, "step_one" ) builder.add_edge("step_one" , "step_two" ) builder.add_edge("step_two" , "step_three" ) builder.add_edge("step_three" , END) return builder def main (): print ("= LangGraph 1.0 内存持久化存储演示 =\n" ) memory = InMemorySaver() graph = create_graph() app = graph.compile (checkpointer=memory) config = {"configurable" : {"thread_id" : "demo_thread_1" }} print ("1. 首次执行工作流:" ) result = app.invoke({ "messages" : ["开始执行" ], "step_count" : 0 }, config) print (f"执行结果: {result} \n" ) print ("2. 检查存储的状态:" ) saved_state = app.get_state(config) print (f"保存的状态: {saved_state.values} " ) print (f"下一个节点: {saved_state.next } \n" ) print ("3. 恢复执行工作流:" ) result2 = app.invoke(None , config) print (f"恢复执行结果: {result2} \n" ) print ("= 演示结束 =" ) if name == "main" : main()
4.1.4 数据库检查点 在底层,检查点功能由符合BaseCheckpointSaver接口的检查点对象提供支持。LangGraph提供了多种检查点实现,所有这些实现都通过独立的、可安装的库来完成,数据库类型的有:
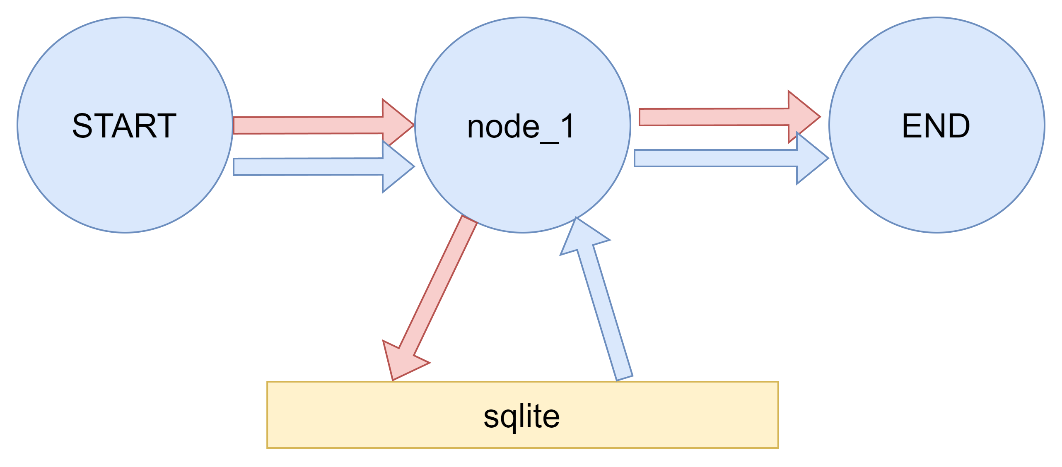
langgraph-checkpoint-sqlite:使用SQLite数据库(SqliteSaver / AsyncSqliteSaver)存储检查点。非常适合实验和本地工作流程。需要单独安装。
langgraph-checkpoint-postgres:使用Postgres数据库(PostgresSaver / AsyncPostgresSaver)存储检查点,用于LangSmith。非常适合在生产环境中使用。需要单独安装。
4.1.5 sqlite 安装sqlite所需依赖 {Bash icon}pip install langgraph-checkpoint-sqlite
案例一
持久化 1 2 3 4 5 6 7 8 9 10 11 12 13 14 15 16 17 18 19 20 21 22 23 24 25 26 27 28 29 30 31 32 33 34 35 36 37 38 39 40 41 42 43 44 45 46 47 48 49 50 51 52 53 54 55 56 57 58 59 60 61 62 63 64 import operatorfrom typing import TypedDict, Annotatedfrom langgraph.checkpoint.sqlite import SqliteSaverfrom langgraph.graph import StateGraph,START,ENDimport sqlite3class MyState (TypedDict ): messages:Annotated[list ,operator.add] def node_1 (state:MyState ): return {"messages" :["abc" ,"def" ]} def main (): conn = sqlite3.connect(database="./sqlite_data/langgraph_sqlite" ,check_same_thread=False ) memory = SqliteSaver(conn=conn) builder = StateGraph(MyState) builder.add_node("node_1" ,node_1) builder.add_edge(START, "node_1" ) builder.add_edge("node_1" , END) graph = builder.compile (checkpointer=memory) config = {"configurable" : {"thread_id" : "1" }} initial_state = graph.get_state(config) print (f"Initial state: {initial_state} " ) result = graph.invoke({"messages" :[]}, config) print (f"Result: {result} " ) final_state = graph.get_state(config) print (f"Final state: {final_state} " ) conn.close() if __name__ == '__main__' :main()
4.2 持久化执行(Durable execution) LangGraph 中的 “持久化执行” 指:即便在工作流执行过程中遭遇系统崩溃、网络中断或服务重启等意外状况,仍能确保工作流从断点处继续执行,而非从头重新运行的能力 。它是对 “持久化(Persistence)” 能力的延伸 —— 持久化侧重 “状态保存”,而持久化执行侧重 “基于已保存的状态实现可靠续跑”。
持久执行是一种流程或工作流在关键节点保存进度的技术,它允许流程暂停,之后能从暂停的精确位置继续执行。这在需要人机协同的场景中尤为有用,在这类场景中,用户可以在继续执行前检查、验证或修改流程;同时,在可能遇到中断或错误(例如,调用大语言模型超时)的长时间运行任务中也很有帮助。通过保留已完成的工作,持久执行使流程能够在无需重新处理先前步骤的情况下恢复——即使经过较长时间的延迟(例如,一周后)。
LangGraph 的内置持久化层为工作流提供持久执行能力,确保每个执行步骤的状态都能保存到持久化存储中。这一功能保证,无论工作流因系统故障还是人机交互而中断,都能从最后记录的状态恢复执行。
4.2.1 确定性与一致重放 当你恢复工作流运行时,代码不会从执行停止的同一行代码处恢复;相反,它会确定一个合适的起始点,从该点继续执行。这意味着工作流将从起始点重新执行所有步骤,直到到达停止的位置。
因此,当你为持久化执行编写工作流时,必须将任何非确定性操作(例如随机数生成)以及任何具有副作用的操作(例如文件写入、API调用)封装在任务或节点中。
为确保工作流程具有确定性且能够被一致地重放,确保以下几点:
避免重复工作 如果一个节点包含多个具有副作用的操作(例如,日志记录、文件写入或网络调用),请将每个操作包装在单独的任务中。这确保了在工作流恢复时,这些操作不会被重复执行,并且它们的结果会从持久化层中检索。
封装非确定性操作 将任何可能产生非确定性结果的代码(例如随机数生成)包装在任务 或节点 中。这确保了在恢复时,工作流会按照确切记录的步骤序列执行,并得到相同的结果。
使用幂等操作 在可能的情况下,确保副作用(例如API调用、文件写入)是幂等的。这意味着,如果某个操作在工作流中失败后重试,其效果将与第一次执行时相同。这对于导致数据写入的操作尤为重要。如果某个任务 开始执行但未能成功完成,工作流的恢复将重新运行该任务 ,并依靠已记录的结果来保持一致性。使用幂等键或验证现有结果,以避免意外的重复,确保工作流执行顺畅且可预测。
参照后面5.12章节。
4.2.2 持久性模式 LangGraph支持三种持久性模式,从持久性最低到最高的模式如下:
更高的持久性模式会给工作流执行增加更多开销。
调用任何图执行方法时,你可以指定持久性模式:
`{python icon}graph.stream({“input”: “test”},durability=”sync”)
exit 只有当图执行完成(无论是成功完成还是出现错误)时,更改才会被持久化。这为长时间运行的图提供了最佳性能,但意味着中间状态不会被保存,因此您无法从中途执行失败中恢复,也无法中断图的执行。 async 在执行下一步时,变更会异步持久化。这提供了良好的性能和耐久性,但存在一个小风险:如果进程在执行期间崩溃,检查点可能无法写入。 sync :在下一个步骤开始前,变更会被同步持久化。这确保了每个检查点都在继续执行前写入,以一定的性能开销为代价提供了高持久性。 4.2.3 恢复工作流 在工作流中启用持久化执行后,可以在以下场景中恢复执行:
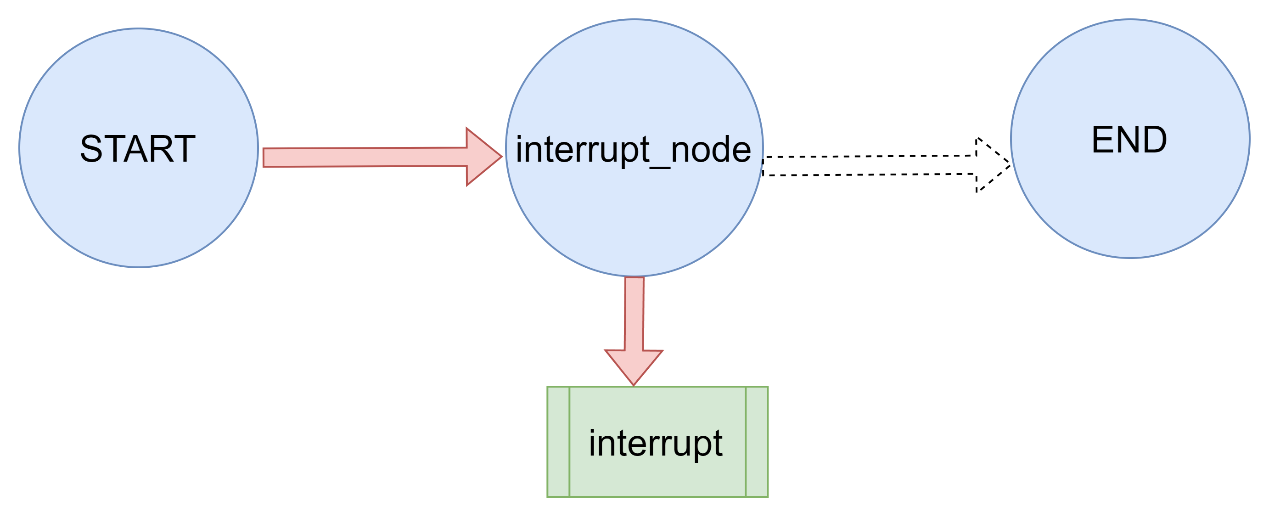
暂停和恢复工作流:使用中断函数在特定点暂停工作流,并使用Command原语通过更新的状态恢复工作流(参见Graph API中的3.5.5的示例)。
从故障中恢复: 发生异常(例如,大语言模型提供商中断)后,自动从最后一个成功的检查点恢复工作流。这需要通过提供None作为输入值,使用相同的线程标识符执行工作流(参见函数式API中5.8的示例)。
4.3 流处理(Streaming) LangGraph 实现了一个流式传输系统,以呈现实时更新。通过逐步显示输出内容(即便完整响应尚未生成),流式传输能显著提升用户体验(UX),尤其在应对大语言模型(LLMs)的延迟问题时效果突出。
LangGraph 流式传输可以实现的功能:
图状态流式输出:通过updates和values模式获取图状态(也即通过state_schema指定的状态)的更新。
子图流式输出:将所有父图和嵌套子图输出内容进行流式输出。
大模型tokens流式输出:捕获来自于工具调用,子节点,子图等地方所有的token,并进行流式输出。
流式传输自定义数据:直接从工具函数发送自定义更新或进度信号。
使用多种流模式:可从values(完整状态)、updates(状态增量)、messages(大语言模型tokens+元数据)、custom(任意用户数据)或debug(详细跟踪)中选择多种模式进行流式输出。
4.3.1 支持的流模式 将以下一种或多种流模式以列表形式传递给stream或astream方法:
模式
描述
values
在图的每一步之后流式传输状态的完整值。
updates
在图的每一步之后流式传输状态更新。如果在同一步骤中进行了多项更新(例如,运行了多个节点),这些更新将被单独流式传输。
custom
从图节点内部流式传输自定义数据。
messages
从任何调用了大语言模型的图节点流式传输二元组(大语言模型token,元数据)。
debug
在图的整个执行过程中尽可能多地流式传输信息。
4.3.2 基本用法 LangGraph有stream(同步)和astream(异步)方法,以迭代器的形式生成流式输出。
多模式流 将列表作为stream_mode参数传递,以同时流式传输多种模式。流式输出将是(mode, chunk)形式的元组,其中mode是流模式的名称,chunk是该模式所流式传输的数据。
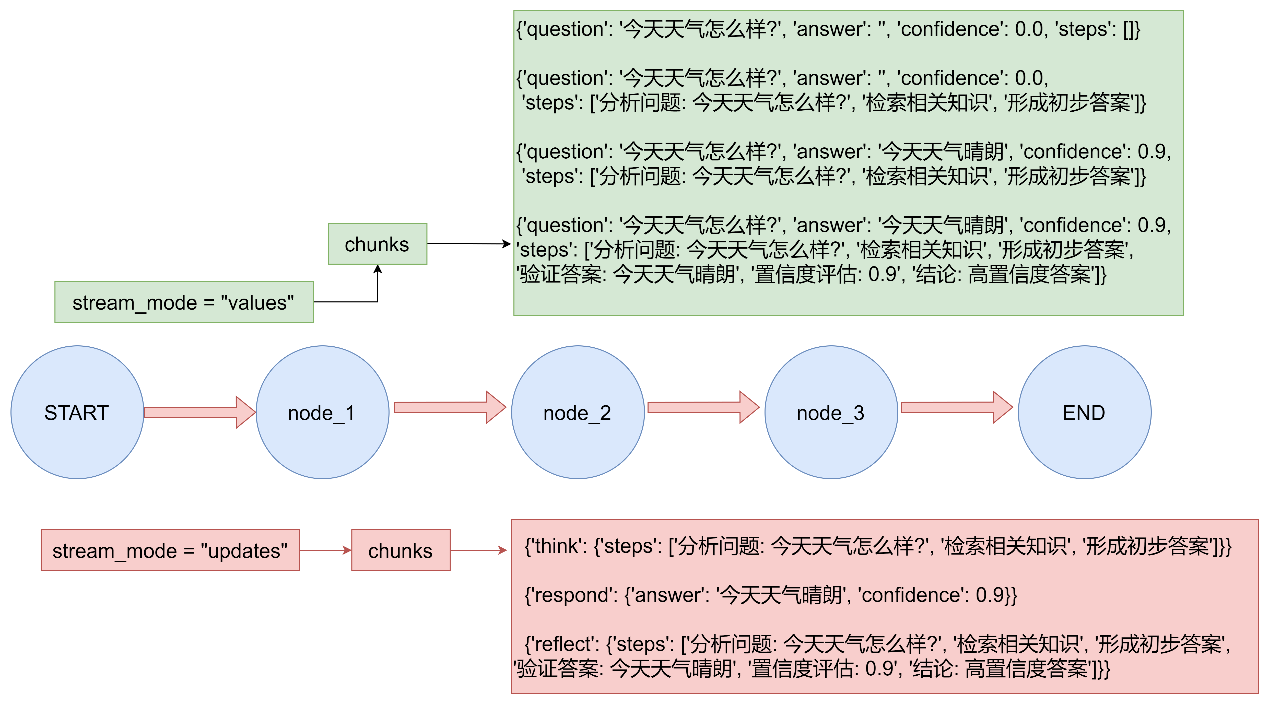
使用流模式 updates和values来流式传输图在执行时的状态。
调试 使用debug流模式,在图的执行过程中流式传输尽可能多的信息。流式输出包括节点名称以及完整状态。
流式输出子图结果 要在流式输出中包含子图的输出,可以在父图的.stream()方法中设置subgraphs=True。这样将同时流式传输父图和所有子图的输出。
4.3.3案例演示 案例一:多模式流
案例一 1 2 3 4 5 6 7 8 9 10 11 12 13 14 15 16 17 18 19 20 21 22 23 24 25 26 27 28 29 30 31 32 33 34 35 36 37 38 39 40 41 42 43 44 45 46 47 48 49 50 51 52 53 54 55 56 57 58 59 60 61 62 63 64 65 66 67 68 69 70 71 72 73 74 75 76 77 78 79 80 81 82 83 84 85 86 87 88 89 90 91 92 93 94 95 96 97 98 99 100 101 102 103 104 105 106 107 108 109 110 111 112 113 114 115 116 117 118 119 120 121 122 123 124 125 126 127 128 129 130 131 132 133 134 135 136 137 138 139 140 141 142 143 144 145 146 147 148 149 150 151 152 153 154 155 156 157 158 159 160 161 162 163 164 165 166 167 168 169 170 171 172 173 174 175 176 177 178 179 180 181 182 183 184 185 186 187 188 189 190 """ LangGraph 多模式流式传输演示 展示LangGraph支持的各种流模式 """ from typing import TypedDictfrom langgraph.graph import StateGraph, START, ENDclass State (TypedDict ): question: str answer: str confidence: float steps: list def think (state: State ) -> State: """思考节点""" question = state["question" ] steps = [f"分析问题: {question} " , "检索相关知识" , "形成初步答案" ] return {"steps" : steps} def respond (state: State ) -> State: """回应节点""" question = state["question" ] if "天气" in question: answer = "今天天气晴朗" confidence = 0.9 elif "时间" in question: answer = "现在是上午10点" confidence = 0.8 else : answer = "这是一个很好的问题" confidence = 0.7 return { "answer" : answer, "confidence" : confidence } def reflect (state: State ) -> State: """反思节点""" answer = state["answer" ] confidence = state["confidence" ] steps = state.get("steps" , []) steps.append(f"验证答案: {answer} " ) steps.append(f"置信度评估: {confidence} " ) if confidence > 0.8 : conclusion = "高置信度答案" elif confidence > 0.5 : conclusion = "中等置信度答案" else : conclusion = "低置信度答案" steps.append(f"结论: {conclusion} " ) return {"steps" : steps} def main (): builder = StateGraph(State) builder.add_node("think" , think) builder.add_node("respond" , respond) builder.add_node("reflect" , reflect) builder.add_edge(START, "think" ) builder.add_edge("think" , "respond" ) builder.add_edge("respond" , "reflect" ) builder.add_edge("reflect" , END) graph = builder.compile () print ("=== LangGraph 多模式流式传输演示 ===\n" ) input_state = { "question" : "今天天气怎么样?" , "answer" : "" , "confidence" : 0.0 , "steps" : [] } print ("--- 1. 使用 stream_mode='values' 模式 ---" ) print ("显示每一步执行后的完整状态:" ) for chunk in graph.stream(input_state, stream_mode="values" ): print (f" {chunk} " ) print ("\n" + "=" *60 + "\n" ) print ("--- 2. 使用 stream_mode='updates' 模式 ---" ) print ("只显示每一步的状态更新:" ) for chunk in graph.stream(input_state, stream_mode="updates" ): print (f" {chunk} " ) print ("\n" + "=" *60 + "\n" ) print ("--- 3. 同时使用多种流模式 ---" ) print ("同时显示完整状态和状态更新:" ) for mode, chunk in graph.stream(input_state, stream_mode=["values" , "updates" ]): print (f" [{mode} ]: {chunk} " ) print ("\n" + "=" *60 + "\n" ) print ("--- 4. 使用 debug 模式 ---" ) print ("显示详细的调试信息:" ) try : for chunk in graph.stream(input_state, stream_mode="debug" ): print (f" {chunk} " ) except Exception as e: print (f" Debug模式可能需要特殊配置: {e} " ) if __name__ == "__main__" : main()
案例二:流式输出子图结果
1 2 3 4 5 6 7 8 9 10 11 12 13 14 15 16 17 18 19 20 21 22 23 24 25 26 27 28 29 30 31 32 33 34 35 36 37 38 39 40 41 42 43 44 45 46 47 48 49 50 51 52 53 54 55 56 57 58 59 60 61 62 63 64 65 66 67 68 69 70 71 72 73 74 75 76 77 78 79 80 81 82 83 84 85 86 87 88 89 90 91 """ LangGraph 子图流式传输演示 展示如何在流式输出中包含子图的输出 """ from langgraph.graph import START, StateGraph, ENDfrom typing import TypedDict定义子图状态 class SubgraphState (TypedDict ): foo: str bar: str def subgraph_node_1 (state: SubgraphState ): """子图节点1""" print (f" 执行子图节点1,当前状态: {state} " ) return {"bar" : "bar" } def subgraph_node_2 (state: SubgraphState ): """子图节点2""" print (f" 执行子图节点2,当前状态: {state} " ) return {"foo" : state["foo" ] + state["bar" ]} 定义父图状态 class ParentState (TypedDict ): foo: str def node_1 (state: ParentState ): """父图节点1""" print (f" 执行父图节点1,当前状态: {state} " ) return {"foo" : "hi! " + state["foo" ]} def main (): print ("= LangGraph 子图流式传输演示 =\n" ) subgraph_builder = StateGraph(SubgraphState) subgraph_builder.add_node("subgraph_node_1" , subgraph_node_1) subgraph_builder.add_node("subgraph_node_2" , subgraph_node_2) subgraph_builder.add_edge(START, "subgraph_node_1" ) subgraph_builder.add_edge("subgraph_node_1" , "subgraph_node_2" ) subgraph_builder.add_edge("subgraph_node_2" , END) subgraph = subgraph_builder.compile () builder = StateGraph(ParentState) builder.add_node("node_1" , node_1) builder.add_node("node_2" , subgraph) builder.add_edge(START, "node_1" ) builder.add_edge("node_1" , "node_2" ) graph = builder.compile () print ("--- 1. 不包含子图的常规流式输出 ---" ) for chunk in graph.stream( {"foo" : "foo" }, stream_mode="updates" ): print (f" 流式输出块: {chunk} " ) print ("\n" + "=" *50 + "\n" ) print ("--- 2. 包含子图的流式输出 (subgraphs=True) ---" ) for chunk in graph.stream( {"foo" : "foo" }, stream_mode="updates" , subgraphs=True , ): print (f" 流式输出块: {chunk} " ) print ("\n" + "=" *50 + "\n" ) print ("--- 3. 使用 values 模式并包含子图输出 ---" ) for chunk in graph.stream( {"foo" : "foo" }, stream_mode="values" , subgraphs=True ): print (f" 流式输出块: {chunk} " ) print ("\n" + "=" *50 + "\n" ) print ("--- 4. 详细分析子图流式输出 ---" ) print ("当 subgraphs=True 时,输出格式为 (namespace, chunk) 元组:" ) for chunk in graph.stream( {"foo" : "foo" }, stream_mode="updates" , subgraphs=True ): namespace, data = chunk if namespace: print (f" 子图 '{namespace[0 ]} ' 输出: {data} " ) else : print (f" 父图输出: {data} " ) if name == "main" : main()
4.3.4 流式输出LLM响应 使用messages流模式,从图中的任何部分(包括节点、工具、子图或任务)逐token 流式传输大型语言模型(LLM)的输出。
messages模式的流式输出是一个元组(message_chunk, metadata),其中:
message_chunk:来自大语言模型(LLM)的令牌或消息片段。
metadata:一个包含图节点和大语言模型调用详情的字典。
执行 pip install langchain pip install -U langchain-openai
llm流失输出 1 2 3 4 5 6 7 8 9 10 11 12 13 14 15 16 17 18 19 20 21 22 23 24 25 26 27 28 29 30 31 32 33 34 35 36 37 38 39 40 41 42 43 44 45 46 47 48 49 50 51 52 53 54 55 56 57 58 59 60 from typing import TypedDictfrom langgraph.graph import StateGraph,STARTfrom langchain.chat_models import init_chat_modelmodel = init_chat_model(model="gpt-4o-mini" ,model_provider="openai" ) class State (TypedDict ): query:str answer:str def node (state:State ): print ("开始调用node节点" ) llm_result = model.invoke( [("user" ,state["query" ])] ) print ("llm invoke结束" ) return {"answer" :llm_result} def main (): graph = ( StateGraph( state_schema=State ) .add_node(node) .add_edge(START,"node" ) .compile () ) inputs = {"query" :"帮我生成一个300字的小学生作文,主题为我的一天" } for chunk,meta_data in graph.stream(inputs,stream_mode="messages" ): print (chunk.content,end="" ) if __name__ == '__main__' : main()
LLM节点中写的是invoke 方法,但是在图的stream方法中开启message流式传输之后,自动使用stream方法
4.3.4 流式传输自定义数据 要从LangGraph节点或工具内部发送自wo r定义用户定义数据,请遵循以下步骤:
使用get_stream_writer访问流写入器并发送自定义数据。
调用.stream()或.astream()时,设置stream_mode=”custom”以在流中获取自定义数据。你可以组合多种模式(例如[“updates”, “custom”]),但至少有一种模式必须是”custom”。
1.从节点内部发送自定义用户定义数据 节点内部发送自定义中间结果 1 2 3 4 5 6 7 8 9 10 11 12 13 14 15 16 17 18 19 20 21 22 23 24 25 26 27 28 29 30 31 32 33 34 35 36 37 38 39 40 41 42 43 44 45 46 47 48 49 50 51 52 53 54 55 56 57 58 59 60 61 62 63 64 65 66 67 68 69 70 71 72 73 74 75 76 77 78 79 80 81 82 83 84 85 86 87 88 89 90 91 92 93 94 95 96 97 98 99 100 101 102 103 104 105 106 107 108 109 110 111 112 113 114 115 116 117 118 119 120 121 122 123 """ LangGraph 自定义数据流式传输演示 展示如何从节点内部发送自定义用户定义数据 """ from typing import TypedDictfrom langgraph.config import get_stream_writerfrom langgraph.graph import StateGraph, START, ENDclass State (TypedDict ): query: str answer: str progress: list def node_with_custom_streaming (state: State ) -> State: """带自定义流式传输的节点""" writer = get_stream_writer() writer({"custom_key" : "开始处理查询" }) writer({"progress" : "步骤1: 分析查询内容" , "status" : "running" }) query = state["query" ] result = f"处理结果: {query.upper()} " writer({"progress" : "步骤2: 生成结果" , "status" : "running" }) writer({"progress" : "步骤3: 完成处理" , "status" : "completed" }) writer({"custom_key" : "查询处理完成" }) return { "answer" : result, "progress" : state.get("progress" , []) + ["处理完成" ] } def main (): print ("=== LangGraph 自定义数据流式传输演示 ===\n" ) graph = ( StateGraph(State) .add_node("node_with_custom_streaming" , node_with_custom_streaming) .add_edge(START, "node_with_custom_streaming" ) .add_edge("node_with_custom_streaming" , END) .compile () ) inputs = {"query" : "hello world" , "answer" : "" , "progress" : []} print ("--- 1. 使用 custom 流模式 ---" ) try : for chunk in graph.stream(inputs, stream_mode="custom" ): print (f"自定义数据块: {chunk} " ) except Exception as e: print (f"错误: {e} " ) print ("说明: 在Graph API中,自定义流数据需要在节点中通过特定方式发送" ) print ("\n" + "=" *50 + "\n" ) print ("--- 2. 使用 updates 流模式 ---" ) for chunk in graph.stream(inputs, stream_mode="updates" ): print (f"状态更新: {chunk} " ) print ("\n" + "=" *50 + "\n" ) print ("--- 3. 同时使用 custom 和 updates 流模式 ---" ) try : for mode, chunk in graph.stream(inputs, stream_mode=["custom" , "updates" ]): print (f"[{mode} ]: {chunk} " ) except Exception as e: print (f"错误: {e} " ) print ("说明: 在Graph API中,需要特殊配置才能使用自定义流模式" ) if __name__ == "__main__" : main()
2. 从工具内部发送自定义用户定义数据 使用工具进行流式输出 1 2 3 4 5 6 7 8 9 10 11 12 13 14 15 16 17 18 19 20 21 22 23 24 25 26 27 28 29 30 31 32 33 34 35 36 37 38 39 40 41 42 43 44 45 46 47 48 49 50 51 52 53 54 55 56 57 58 59 60 61 62 63 64 65 66 67 68 69 70 71 72 73 74 75 76 77 78 79 80 81 82 83 """ LangGraph 工具中的自定义数据流式传输演示 展示如何从工具内部发送自定义用户定义数据 """ from typing import TypedDictfrom langchain.tools import toolfrom langgraph.config import get_stream_writerfrom langgraph.graph import StateGraph, START, END@tool def query_database (query: str ) -> str : """查询数据库工具""" writer = get_stream_writer() writer({"data" : "开始查询数据库" , "type" : "info" }) writer({"data" : "Retrieved 0/100 records" , "type" : "progress" }) writer({"data" : "Retrieved 50/100 records" , "type" : "progress" }) writer({"data" : "Retrieved 100/100 records" , "type" : "progress" }) writer({"data" : "查询完成" , "type" : "info" }) return f"查询'{query} '的结果: 找到25条匹配记录" class GraphState (TypedDict ): query: str result: str def create_graph_with_tool (): """创建使用工具的图""" def tool_node (state: GraphState ) -> GraphState: """工具节点""" result = query_database.invoke(state["query" ]) return {"result" : result} builder = StateGraph(GraphState) builder.add_node("tool_node" , tool_node) builder.add_edge(START, "tool_node" ) builder.add_edge("tool_node" , END) return builder.compile () def graph_api_demo (): """Graph API 演示""" print ("\n" + "=" * 60 + "\n" ) print ("=== LangGraph Graph API 中的自定义数据流式传输演示 ===\n" ) graph = create_graph_with_tool() inputs = {"query" : "产品信息" , "result" : "" } print ("--- 从工具中流式传输自定义数据 ---" ) try : for mode, chunk in graph.stream(inputs, stream_mode=["custom" , "updates" ]): if mode == "custom" : print (f" [自定义数据] {chunk} " ) elif mode == "updates" : print (f" [状态更新] {chunk} " ) except Exception as e: print (f"错误: {e} " ) def main_demo (): """主演示函数""" graph_api_demo() print ("\n" + "=" * 60 ) print ("说明:" ) print ("1. 自定义数据流允许从节点或工具内部发送用户定义的数据" ) print ("2. 使用 get_stream_writer() 获取流写入器" ) print ("3. 可以发送进度更新、日志信息等任何自定义数据" ) print ("4. 在流式传输时设置 stream_mode='custom' 或包含 'custom' 的模式列表" ) if __name__ == "__main__" : main_demo()
4.4 中断(Interrupts) 中断允许在特定点暂停图的执行,并在继续之前等待外部输入。这支持了“人在回路”模式,即需要外部输入才能继续的场景。当中断被触发时,LangGraph会利用其持久化层保存图的状态,并无限期等待,直到恢复执行。
通过在图形节点中的任意位置调用interrupt()函数,即可实现中断功能。该函数接受任何可序列化为JSON的值,并将其提供给调用者。
当需要从中断点继续时,只需调用Command即可。该命令的resume参数将会作为interrupt()函数的返回值,graph随之从当前点继续往下执行。
与静态断点(在特定节点之前或之后暂停,调用compile()时,所传递的interrupt_before/ interrupt_after 参数)不同,中断是动态的——它们可以放在代码中的任何位置,并且可以根据应用程序逻辑设置为条件性的。
4.4.1 使用interrupt暂停 interrupt函数会暂停图的执行,并向调用者返回一个值。当在节点内调用interrupt时,LangGraph会保存当前的图状态,并等待用户通过输入来恢复执行。
使用interrrupt时,需要使用checkpointer来保存图状态,langgraph会将图状态保存到特定的thread ID当中。
当调用interrupt时,会发生以下情况:
图执行会在调用interrupt的确切位置暂停。
保存状态,以便之后可以恢复执行。
值会被返回给处于__interrupt__状态下的调用方;该值可以是任何可序列化为JSON的值(字符串、对象、数组等)。
图会无限期等待 ,直到你通过响应恢复执行当恢复时,响应会传递回 节点,成为interrupt()调用的返回值。
代码示例如下:
使用中断函数 1 2 3 4 5 6 7 8 9 10 11 12 13 14 15 16 17 18 19 20 21 22 23 24 25 26 27 28 29 30 31 32 33 34 35 36 37 38 from typing import TypedDict,Annotatedfrom langgraph.types import interruptfrom langgraph.graph import StateGraphfrom langgraph.constants import STARTfrom langgraph.checkpoint.memory import MemorySaverclass MyState (TypedDict ): state_1:str state_2:Annotated[list ,lambda x,y:x+y] def node_1 (state:MyState ): print ("entering node_1" ) res = interrupt( { "key_1" :"value_1" , "key_2" :"value_2" } ) return {"state_2" :res} graph = StateGraph(MyState) graph.add_node(node_1) graph.add_edge(START,"node_1" ) checkpointer = MemorySaver() graph = graph.compile (checkpointer=checkpointer) config = {"configurable" :{"thread_id" :1 }} invoke_result = graph.invoke( { "state_1" :"test" , "state_2" :["1" ] }, config=config ) print (invoke_result['__interrupt__' ])
interrupt节点之后,interrupt 方法的返回值res放到了节点的状态更新中。graph.invoke(Command(resume=[""]) 会更新到状态中
4.4.2 恢复中断 当中断暂停执行后,可以通过再次调用图并传入包含恢复值的Command来恢复图的运行。恢复值会被传回interrupt调用,使节点能够利用外部输入继续执行。
恢复时必须使用与中断发生时相同的线程ID。
传递给Command(resume=...)的值会成为interrupt调用的返回值。
节点在恢复时会从调用interrupt的节点开头重新启动,因此该节点interrupt之前的所有代码会再次运行。
可以将任何可JSON序列化的值作为恢复值传递。(跨域,不同端)
恢复4.4.1节中断的图的执行 1 2 3 4 5 6 7 from langgraph.types import Commandgraph.invoke(Command(resume=["the value returned to interrupt invoke" ]),config=config)
4.4.3 常见用法 中断的关键在于能够暂停执行并等待外部输入。这在多种使用场景中都很有用,包括:
审批工作流:在执行关键操作(例如API调用、数据库更改、财务交易等风险等级较高的操作)前暂停。
审阅和编辑:让人类在继续之前审阅并修改大模型的输出或工具调用。
中断工具调用:在执行工具调用前暂停,以便在执行前检查和编辑工具调用。
验证人工输入:在进入下一步之前暂停,以验证人工输入。
审批工作流 中断最常见的用途之一是在执行关键操作前暂停并请求批准。例如,希望让用户批准一项API调用、一次数据库更改或其他任何高风险操作。
审批工作流 1 2 3 4 5 6 7 8 9 10 11 12 13 14 15 16 17 18 19 20 21 22 23 24 25 26 27 28 29 30 31 32 33 34 35 36 37 38 39 40 41 42 43 44 45 46 47 48 49 50 51 52 53 54 55 56 57 58 59 60 61 62 63 64 65 66 67 68 69 70 71 72 73 74 75 76 77 78 79 80 81 82 83 84 85 86 87 88 89 90 91 92 93 94 95 96 97 98 99 100 101 102 103 104 105 106 107 108 109 110 111 112 113 114 115 116 117 118 119 """ LangGraph 审批工作流演示 该演示展示了如何使用 LangGraph 的中断功能实现需要人工审批的工作流。 当工作流遇到关键操作时会暂停,并等待用户的批准或拒绝。 """ import sqlite3from typing import Literal , Optional , TypedDictfrom langgraph.checkpoint.memory import MemorySaverfrom langgraph.graph import StateGraph, START, ENDfrom langgraph.types import Command, interruptclass ApprovalState (TypedDict ): """审批状态定义""" action_details: str status: Optional [Literal ["pending" , "approved" , "rejected" ]] def approval_node (state: ApprovalState ) -> Command[Literal ["proceed" , "cancel" ]]: """ 审批节点 Args: state: 当前状态 Returns: Command: 包含中断信息和后续路由指令的命令对象 """ print (f"执行节点: approval_node" ) print (f"操作详情: {state['action_details' ]} " ) print ("工作流暂停,等待用户审批..." ) decision = interrupt({ "question" : "批准此操作吗?" , "details" : state["action_details" ], }) next_node = "proceed" if decision else "cancel" print (f"审批决定: {'批准' if decision else '拒绝' } ,路由到节点: {next_node} " ) return Command(goto=next_node) def proceed_node (state: ApprovalState ): """ 执行节点 - 当审批被批准时执行 Args: state: 当前状态 Returns: dict: 更新后的状态 """ print ("执行节点: proceed_node" ) print ("操作已被批准,正在执行..." ) return {"status" : "approved" } def cancel_node (state: ApprovalState ): """ 取消节点 - 当审批被拒绝时执行 Args: state: 当前状态 Returns: dict: 更新后的状态 """ print ("执行节点: cancel_node" ) print ("操作已被拒绝,正在取消..." ) return {"status" : "rejected" } def main (): """主函数 - 演示审批工作流""" print ("=== LangGraph 审批工作流演示 ===\n" ) builder = StateGraph(ApprovalState) builder.add_node("approval" , approval_node) builder.add_node("proceed" , proceed_node) builder.add_node("cancel" , cancel_node) builder.add_edge(START, "approval" ) builder.add_edge("proceed" , END) builder.add_edge("cancel" , END) checkpointer = MemorySaver() graph = builder.compile (checkpointer=checkpointer) config = {"configurable" : {"thread_id" : "approval-123" }} print ("1. 启动审批工作流..." ) initial = graph.invoke( {"action_details" : "转账 $500" , "status" : "pending" }, config=config, ) print (f"工作流中断信息: {initial['__interrupt__' ]} \n" ) print ("2. 模拟用户审批过程..." ) interrupt_value = initial["__interrupt__" ][0 ].value print ("操作详情:" , interrupt_value["details" ]) print ("问题:" , interrupt_value["question" ]) while True : user_input = input ("\n请输入审批决定 (y/n): " ).strip().lower() if user_input in ['y' , 'yes' , '是' ]: decision = True break elif user_input in ['n' , 'no' , '否' ]: decision = False break else : print ("无效输入,请输入 y/yes/是 或 n/no/否" ) print (f"\n3. 使用审批决定恢复工作流执行..." ) resumed = graph.invoke(Command(resume=decision), config=config) print (f"最终状态: {resumed} " ) print (f"操作状态: {resumed['status' ]} " ) print ("\n=== 演示完成 ===" ) if __name__ == "__main__" : main()
审阅和编辑 有时希望让人类在继续之前审核并编辑部分图状态。这在纠正大语言模型、补充缺失信息或进行调整等场景下很有用。
审阅和编辑图的状态 1 2 3 4 5 6 7 8 9 10 11 12 13 14 15 16 17 18 19 20 21 22 23 24 25 26 27 28 29 30 31 32 33 34 35 36 37 38 39 40 41 42 43 44 45 46 47 48 49 50 51 52 53 54 55 56 57 58 59 60 61 62 63 64 65 66 67 68 69 70 71 72 73 """ LangGraph 审阅和编辑工作流演示 该演示展示了如何使用 LangGraph 的中断功能实现人工审阅和编辑工作流。 这对于让人类在继续之前审核并编辑图状态非常有用。 """ import sqlite3from typing import TypedDictfrom langgraph.checkpoint.memory import MemorySaverfrom langgraph.graph import StateGraph, START, ENDfrom langgraph.types import Command, interruptclass ReviewState (TypedDict ): """审阅状态定义""" generated_text: str def review_node (state: ReviewState ): """ 审阅节点 Args: state: 当前状态,包含生成的文本内容 Returns: dict: 更新后的状态 """ print (f"执行节点: review_node" ) print (f"当前文本内容: {state['generated_text' ]} " ) print ("工作流暂停,等待用户审阅和编辑..." ) updated = interrupt({ "instruction" : "请审阅并编辑以下内容" , "content" : state["generated_text" ], }) print (f"收到编辑后的内容: {updated} " ) return {"generated_text" : updated} def main (): """主函数 - 演示审阅和编辑工作流""" print ("=== LangGraph 审阅和编辑工作流演示 ===\n" ) builder = StateGraph(ReviewState) builder.add_node("review" , review_node) builder.add_edge(START, "review" ) builder.add_edge("review" , END) checkpointer = MemorySaver() graph = builder.compile (checkpointer=checkpointer) config = {"configurable" : {"thread_id" : "review-42" }} print ("1. 启动审阅工作流..." ) initial = graph.invoke({"generated_text" : "这是初始草稿内容" }, config=config) print (f"工作流中断信息: {initial['__interrupt__' ]} \n" ) print ("2. 模拟用户审阅和编辑过程..." ) interrupt_value = initial["__interrupt__" ][0 ].value print ("指导说明:" , interrupt_value["instruction" ]) print ("原文内容:" , interrupt_value["content" ]) edited_text = input ("\n请输入编辑后的内容: " ).strip() print (f"\n3. 使用编辑后的内容恢复工作流执行..." ) final_state = graph.invoke( Command(resume=edited_text), config=config, ) print (f"最终状态: {final_state} " ) print (f"最终文本内容: {final_state['generated_text' ]} " ) print ("\n=== 演示完成 ===" ) if __name__ == "__main__" : main()
工具中的中断 将中断直接放在工具函数内部。这会使工具在每次被调用时暂停以等待批准,并允许在执行工具调用之前进行人工检查和编辑。
工具的中断 1 2 3 4 5 6 7 8 9 10 11 12 13 14 15 16 17 18 19 20 21 22 23 24 25 26 27 28 29 30 31 32 33 34 35 36 37 38 39 40 41 42 43 44 45 46 47 48 49 50 51 52 53 54 55 56 57 58 59 60 61 62 63 64 65 66 67 68 69 70 71 72 73 74 75 76 77 78 79 80 81 82 83 84 85 86 87 88 89 90 91 92 93 94 95 96 97 98 99 100 101 102 103 104 105 106 107 108 109 110 111 112 113 114 115 116 117 118 119 120 121 122 123 124 125 126 127 128 129 130 131 132 133 134 135 136 137 138 139 140 141 142 143 144 145 146 147 148 149 150 151 152 153 154 155 156 157 158 159 160 """ LangGraph 工具中断演示 该演示展示了如何在工具函数内部使用中断功能, 使工具在每次被调用时暂停以等待批准,并允许在执行前进行人工检查和编辑。 """ import sqlite3from typing import TypedDictfrom langchain.tools import toolfrom langgraph.checkpoint.memory import MemorySaverfrom langgraph.graph import StateGraph, START, ENDfrom langgraph.types import Command, interruptclass AgentState (TypedDict ): """代理状态定义""" messages: list [dict ] @tool def send_email (to: str , subject: str , body: str ): """ 发送邮件给收件人。 Args: to (str): 收件人邮箱地址 subject (str): 邮件主题 body (str): 邮件正文 Returns: str: 发送结果信息 """ print (f"执行工具: send_email" ) print (f"收件人: {to} " ) print (f"主题: {subject} " ) print (f"正文: {body} " ) response = interrupt({ "action" : "send_email" , "to" : to, "subject" : subject, "body" : body, "message" : "是否批准发送此邮件?" , }) if response.get("action" ) == "approve" : final_to = response.get("to" , to) final_subject = response.get("subject" , subject) final_body = response.get("body" , body) print (f"[send_email] to={final_to} subject={final_subject} body={final_body} " ) return f"邮件已发送至 {final_to} " return "用户取消了邮件发送" def agent_node (state: AgentState ): """ 代理节点函数 Args: state: 当前状态,包含消息历史 Returns: dict: 更新后的状态 """ print ("执行节点: agent_node" ) if len (state["messages" ]) == 1 : tool_call = { "name" : "send_email" , "arguments" : { "to" : "alice@example.com" , "subject" : "会议安排" , "body" : "你好,我想安排一个会议讨论项目进展。" } } try : result = send_email.invoke(tool_call["arguments" ]) return { "messages" : state["messages" ] + [ {"role" : "assistant" , "content" : f"调用工具: {tool_call['name' ]} " }, {"role" : "tool" , "name" : tool_call["name" ], "content" : result} ] } except Exception as e: raise e else : return {"messages" : state["messages" ]} def main (): """主函数 - 演示工具中断功能""" print ("=== LangGraph 工具中断演示 ===\n" ) builder = StateGraph(AgentState) builder.add_node("agent" , agent_node) builder.add_edge(START, "agent" ) builder.add_edge("agent" , END) checkpointer = MemorySaver() graph = builder.compile (checkpointer=checkpointer) config = {"configurable" : {"thread_id" : "email-workflow" }} print ("1. 启动邮件发送工作流..." ) try : initial = graph.invoke( { "messages" : [ {"role" : "user" , "content" : "请发送邮件给alice@example.com关于会议安排" } ] }, config=config, ) print (f"工作流中断信息: {initial['__interrupt__' ]} \n" ) print ("2. 模拟用户审批过程..." ) interrupt_value = initial["__interrupt__" ][0 ].value print ("操作:" , interrupt_value["action" ]) print ("消息:" , interrupt_value["message" ]) print ("收件人:" , interrupt_value["to" ]) print ("主题:" , interrupt_value["subject" ]) print ("正文:" , interrupt_value["body" ]) while True : user_input = input ("\n是否批准发送邮件?(y/n): " ).strip().lower() if user_input in ['y' , 'yes' , '是' ]: new_subject = input ("请输入新主题(直接回车保持原主题): " ).strip() if not new_subject: approval_response = {"action" : "approve" } else : approval_response = {"action" : "approve" , "subject" : new_subject} break elif user_input in ['n' , 'no' , '否' ]: approval_response = {"action" : "reject" } break else : print ("无效输入,请输入 y/yes/是 或 n/no/否" ) print (f"\n3. 使用审批决恢复工作流执行..." ) resumed = graph.invoke( Command(resume=approval_response), config=config, ) print (f"最终消息: {resumed['messages' ][-1 ]} " ) print ("\n=== 演示完成 ===" ) except Exception as e: print (f"执行过程中出现错误: {e} " ) print ("\n=== 演示结束 ===" ) if __name__ == "__main__" : main()
验证人工输入 验证来自人类的输入,如果输入无效,就再次询问。通过在循环中多次调用interrupt来实现这一点。
LangGraph 高级表单验证演示
该演示展示了如何验证来自人类的多个输入字段,
如果输入无效,就再次询问。通过在循环中多次调用 interrupt 来实现这一点。
1 2 3 4 5 6 7 8 9 10 11 12 13 14 15 16 17 18 19 20 21 22 23 24 25 26 27 28 29 30 31 32 33 34 35 36 37 38 39 40 41 42 43 44 45 46 47 48 49 50 51 52 53 54 55 56 57 58 59 60 61 62 63 64 65 66 67 68 69 70 71 72 73 74 75 76 77 78 79 80 81 82 83 84 85 86 87 88 89 90 91 92 93 94 95 96 97 98 99 100 101 102 103 104 105 106 107 108 109 110 111 112 113 114 115 116 117 118 119 120 121 122 123 124 125 126 127 128 129 130 131 132 133 134 135 136 137 138 139 140 141 """ import sqlite3 from typing import TypedDict from langgraph.checkpoint.memory import MemorySaver from langgraph.graph import StateGraph, START, END from langgraph.types import Command, interrupt class AdvancedFormState(TypedDict): """ 高级表单状态定义""" name: str | None age: int | None email: str | None def get_name_node(state: AdvancedFormState): """ 获取姓名节点函数 Args: state: 当前状态 Returns: dict : 更新后的状态 """ print("执行节点: get_name_node") prompt = "请输入您的姓名:" while True: answer = interrupt(prompt) print(f"收到用户输入: {answer}") # 验证输入是否为非空字符串 if isinstance(answer, str) and len(answer.strip()) > 0: name = answer.strip() print(f"姓名验证通过: {name}") return {"name": name} prompt = "姓名不能为空,请重新输入您的姓名:" def get_age_node(state: AdvancedFormState): """ 获取年龄节点函数 Args: state: 当前状态 Returns: dict : 更新后的状态 """ print("执行节点: get_age_node") prompt = f"您好 {state['name']},请输入您的年龄:" while True: answer = interrupt(prompt) print(f"收到用户输入: {answer}") # 验证输入是否为正整数 if isinstance(answer, int) and answer > 0: print(f"年龄验证通过: {answer}") return {"age": answer} # 尝试将字符串转换为整数 if isinstance(answer, str): try: age_int = int(answer) if age_int > 0: print(f"年龄验证通过: {age_int}") return {"age": age_int} except ValueError: pass prompt = f"'{answer}' 不是有效的年龄。请输入一个正整数:" def get_email_node(state: AdvancedFormState): """ 获取邮箱节点函数 Args: state: 当前状态 Returns: dict : 更新后的状态 """ print("执行节点: get_email_node") prompt = f"您好 {state['name']} ({state['age']}岁),请输入您的邮箱地址:" while True: answer = interrupt(prompt) print(f"收到用户输入: {answer}") # 简单验证邮箱格式 if isinstance(answer, str) and "@" in answer and "." in answer: email = answer.strip() print(f"邮箱验证通过: {email}") return {"email": email} prompt = f"'{answer}' 不是有效的邮箱地址。请输入正确的邮箱格式 (example@domain.com):" def main(): """ 主函数 - 演示高级表单验证功能""" print("= LangGraph 高级表单验证演示 =\n") # 创建状态图 builder = StateGraph(AdvancedFormState) builder.add_node("collect_name", get_name_node) builder.add_node("collect_age", get_age_node) builder.add_node("collect_email", get_email_node) builder.add_edge(START, "collect_name") builder.add_edge("collect_name", "collect_age") builder.add_edge("collect_age", "collect_email") builder.add_edge("collect_email", END) # 使用内存保存器作为检查点 checkpointer = MemorySaver() # 编译图 graph = builder.compile(checkpointer=checkpointer) # 配置线程ID config = {"configurable": {"thread_id": "advanced-form-1"}} # 初始化状态并执行图 print("1. 启动高级表单收集工作流...") try: # 收集姓名 state_after_name = graph.invoke({"name": None, "age": None, "email": None}, config=config) print(f"工作流中断信息: {state_after_name['interrupt']}\n") # 输入有效姓名 print("2. 输入有效姓名...") state_after_name = graph.invoke(Command(resume="张三"), config=config) print(f"工作流中断信息: {state_after_name['interrupt']}\n") # 输入无效年龄 print("3. 输入无效年龄...") state_after_invalid_age = graph.invoke(Command(resume="二十"), config=config) print(f"工作流中断信息: {state_after_invalid_age['interrupt']}\n") # 输入有效年龄 print("4. 输入有效年龄...") state_after_age = graph.invoke(Command(resume=25), config=config) print(f"工作流中断信息: {state_after_age['interrupt']}\n") # 输入无效邮箱 print("5. 输入无效邮箱...") state_after_invalid_email = graph.invoke(Command(resume="zhangsan"), config=config) print(f"工作流中断信息: {state_after_invalid_email['interrupt']}\n") # 输入有效邮箱 print("6. 输入有效邮箱...") final_state = graph.invoke(Command(resume="zhangsan@example.com"), config=config) print(f"最终状态: {final_state}") print(f"姓名: {final_state['name']}") print(f"年龄: {final_state['age']}") print(f"邮箱: {final_state['email']}") print("\n= 演示完成 =") except Exception as e: print(f"执行过程中出现错误: {e}") print("\n= 演示结束 =") if name == "main": main()
4.4.4 中断规则 在节点内调用interrupt时,LangGraph会通过抛出一个异常来暂停执行,该异常会通知运行时暂停。此异常会沿调用栈向上传播,并被运行时捕获,运行时随后会通知图保存当前状态并等待外部输入。
当执行恢复时(在提供请求的输入后),运行时会从头重新启动整个节点——它不会从调用interrupt的确切行继续。这意味着在interrupt之前运行的任何代码都会再次执行。因此,在使用中断时需要遵循一些重要规则,以确保它们按预期运行。
不要将interrupt调用包裹在try/except中。
不要在节点内重新排序interrupt调用。
不要在interrupt调用中返回复杂值。
在interrupt前调用的副作用必须具有幂等性。
4.5 时间旅行(Time travel) 在处理基于模型做决策的非确定性系统(例如由大语言模型驱动的智能体)时,详细检查它们的决策过程可能会很有用:
理解推理过程:分析达成成功结果的各个步骤。
调试错误:确定错误发生的位置和原因。
探索替代方案:测试不同的路径以发现更好的解决方案。
LangGraph 提供了时间回溯功能来支持这些使用场景。具体来说,可以从之前的检查点恢复执行——要么重放相同的状态,要么对其进行修改以探索其他可能性。在所有情况下,恢复过去的执行都会在历史记录中产生一个新的分支。
使用invoke或stream方法,以初始输入来运行图表。
识别现有线程中的检查点:使用get_state_history方法检索特定thread_id的执行历史,并找到所需的checkpoint_id。或者,在希望执行暂停的节点之前设置一个interrupt。然后,你可以找到截至该中断记录的最新检查点。
更新图状态(可选):使用update_state方法在检查点修改图的状态,并从替代状态恢复执行。
从检查点恢复执行:使用invoke或stream方法,输入为None,配置中包含适当的thread_id和检查点ID
该演示展示了更复杂的时间旅行功能,包括:
运行图并生成多个状态
查看历史状态
从不同历史点恢复执行
比较不同执行路径的结果
时间旅行 1 2 3 4 5 6 7 8 9 10 11 12 13 14 15 16 17 18 19 20 21 22 23 24 25 26 27 28 29 30 31 32 33 34 35 36 37 38 39 40 41 42 43 44 45 46 47 48 49 50 51 52 53 54 55 56 57 58 59 60 61 62 63 64 65 66 67 68 69 70 71 72 73 74 75 76 77 78 79 80 81 82 83 84 85 86 87 88 89 90 91 92 93 94 95 96 97 98 99 100 101 102 103 104 105 106 107 108 109 110 111 112 113 114 115 116 117 118 119 120 121 122 123 124 125 126 127 128 129 130 131 132 133 134 135 136 137 138 139 140 141 142 143 144 145 146 147 148 149 150 151 152 153 import uuidfrom typing_extensions import TypedDict, NotRequiredfrom langgraph.graph import StateGraph, START, ENDfrom langgraph.checkpoint.memory import MemorySaverclass StoryState (TypedDict ): """故事状态定义""" character: NotRequired[str ] setting: NotRequired[str ] plot: NotRequired[str ] ending: NotRequired[str ] def create_character (state: StoryState ): """ 创建故事角色 Args: state: 当前状态 Returns: dict: 更新后的状态 """ print ("执行节点: create_character" ) mock_character = "一只会说话的猫" print (f"创建的角色: {mock_character} " ) return {"character" : mock_character} def set_setting (state: StoryState ): """ 设置故事背景 Args: state: 当前状态 Returns: dict: 更新后的状态 """ print ("执行节点: set_setting" ) mock_setting = "在一个神秘的图书馆里" print (f"设置的背景: {mock_setting} " ) return {"setting" : mock_setting} def develop_plot (state: StoryState ): """ 发展故事情节 Args: state: 当前状态 Returns: dict: 更新后的状态 """ print ("执行节点: develop_plot" ) character = state.get("character" , "未知角色" ) setting = state.get("setting" , "未知背景" ) mock_plot = f"{character} 在{setting} 发现了一本会发光的书" print (f"发展的剧情: {mock_plot} " ) return {"plot" : mock_plot} def write_ending (state: StoryState ): """ 编写故事结局 Args: state: 当前状态 Returns: dict: 更新后的状态 """ print ("执行节点: write_ending" ) plot = state.get("plot" , "未知剧情" ) mock_ending = f"当{plot} 时,整个图书馆都被魔法光芒照亮了" print (f"编写的结局: {mock_ending} " ) return {"ending" : mock_ending} def main (): """主函数 - 演示高级时间旅行功能""" print ("= LangGraph 高级时间旅行演示 =\n" ) workflow = StateGraph(StoryState) workflow.add_node("create_character" , create_character) workflow.add_node("set_setting" , set_setting) workflow.add_node("develop_plot" , develop_plot) workflow.add_node("write_ending" , write_ending) workflow.add_edge(START, "create_character" ) workflow.add_edge("create_character" , "set_setting" ) workflow.add_edge("set_setting" , "develop_plot" ) workflow.add_edge("develop_plot" , "write_ending" ) workflow.add_edge("write_ending" , END) checkpointer = MemorySaver() graph = workflow.compile (checkpointer=checkpointer) print ("1. 生成第一个故事..." ) config1 = { "configurable" : { "thread_id" : str (uuid.uuid4()), } } story1 = graph.invoke({}, config1) print (f"角色: {story1['character' ]} " ) print (f"背景: {story1['setting' ]} " ) print (f"剧情: {story1['plot' ]} " ) print (f"结局: {story1['ending' ]} " ) print () print ("2. 查看第一个故事的历史状态..." ) states1 = list (graph.get_state_history(config1)) print ("历史状态:" ) for i, state in enumerate (states1): print (f" {i} . 下一步节点: {state.next } " ) print (f" 检查点ID: {state.config['configurable' ]['checkpoint_id' ]} " ) if state.values: print (f" 状态值: {state.values} " ) print () print ("3. 从中间状态恢复执行,创建第二个故事..." ) character_state = states1[2 ] print (f"选中的状态: {character_state.next } " ) print (f"选中的状态值: {character_state.values} " ) new_config = graph.update_state( character_state.config, values={"character" : "一只会飞的龙" } ) print (f"新配置: {new_config} " ) print () print ("4. 从新检查点恢复执行,生成第二个故事..." ) story2 = graph.invoke(None , new_config) print (f"新角色: {story2['character' ]} " ) print (f"背景: {story2['setting' ]} " ) print (f"剧情: {story2['plot' ]} " ) print (f"结局: {story2['ending' ]} " ) print () print ("5. 比较两个故事:" ) print (" 故事1:" ) print (f" 角色: {story1['character' ]} " ) print (f" 背景: {story1['setting' ]} " ) print (f" 剧情: {story1['plot' ]} " ) print (f" 结局: {story1['ending' ]} " ) print () print (" 故事2:" ) print (f" 角色: {story2['character' ]} " ) print (f" 背景: {story2['setting' ]} " ) print (f" 剧情: {story2['plot' ]} " ) print (f" 结局: {story2['ending' ]} " ) print () print ("= 演示完成 =" ) if name == "main" : main()
4.6 记忆(Memory) 人工智能应用需要内存来在多次交互中共享上下文。在LangGraph中,你可以添加两种类型的内存:
将短期记忆(Checkpointer)**作为智能体状态的一部分添加,以实现多轮对话。
作用域:单个 thread(对话线程)
存储内容:对话历史、状态数据
生命周期:仅在当前 thread 内有效
实现方式:通过 checkpointer 持久化 state
添加长期记忆(Store)**以跨会话存储用户特定数据或应用程序级数据。
作用域:跨 thread,可在任何对话中访问
存储内容:用户偏好、知识库等跨会话数据
生命周期:跨会话持久化
实现方式:通过 store 存储,支持 namespace 组织
4.6.1 添加短期记忆 短期记忆(线程级持久性)使智能体能够跟踪多轮对话。
添加短期记忆就是制定检查点存储,并且指定线程id,按thread_id隔离(4.1.3和4.1.4的案例就是属于短期记忆的实现)。
如果图包含子图,只需在编译父图时提供检查点工具即可。LangGraph会自动将检查点工具传播到子图中。
以下是新的案例:
案例一:使用内存检查点 ram 1 2 3 4 5 6 7 8 9 10 11 12 13 14 15 16 17 18 19 20 21 22 23 24 25 26 27 28 29 30 31 32 33 34 35 36 37 38 39 40 41 42 43 44 45 46 47 48 49 50 51 52 53 54 55 56 57 58 59 60 61 62 63 64 65 66 67 68 69 70 71 72 73 74 75 76 77 78 79 80 81 82 83 84 85 86 87 88 89 90 91 92 93 94 95 96 97 98 99 100 101 102 103 104 105 106 107 108 109 110 111 112 113 114 115 116 117 118 119 120 121 122 123 124 125 126 127 128 129 130 131 132 133 """ LangGraph 短期记忆演示 该演示展示了如何使用短期记忆(线程级持久性)使智能体能够跟踪多轮对话。 """ from typing import Annotatedfrom typing_extensions import TypedDictimport operatorfrom langgraph.checkpoint.memory import InMemorySaverfrom langgraph.graph import StateGraph, START, END定义状态,包含消息历史 class ChatState (TypedDict ): """聊天状态定义""" messages: Annotated[list , operator.add] user_name: str def greeting_node (state: ChatState ) -> dict : """ 问候节点 Args: state: 当前状态 Returns: dict: 更新后的状态 """ print ("执行节点: greeting_node" ) user_name = state.get("user_name" , "访客" ) greeting_message = f"你好,{user_name} !我是你的AI助手。" return { "messages" : [("assistant" , greeting_message)] } def respond_node (state: ChatState ) -> dict : """ 回应节点 Args: state: 当前状态 Returns: dict: 更新后的状态 """ print ("执行节点: respond_node" ) user_messages = [msg for msg in state["messages" ] if msg[0 ] == "user" ] if user_messages: latest_user_message = user_messages[-1 ][1 ] user_name = state.get("user_name" , "访客" ) if "你好" in latest_user_message or "hello" in latest_user_message.lower(): response = f"你好,{user_name} !有什么我可以帮助你的吗?" elif "天气" in latest_user_message: response = f"抱歉,{user_name} ,我无法获取实时天气信息。" elif "名字" in latest_user_message or "我是" in latest_user_message: response = f"我知道你叫{user_name} ,很高兴认识你!" else : response = f"我理解你说的,{user_name} 。能告诉我更多吗?" else : response = "我没有看到你的消息,请再说一遍。" return { "messages" : [("assistant" , response)] } def main (): """主函数 - 演示短期记忆功能""" print ("= LangGraph 短期记忆演示 =\n" ) memory = InMemorySaver() builder = StateGraph(ChatState) builder.add_node("greeting" , greeting_node) builder.add_node("respond" , respond_node) builder.add_edge(START, "greeting" ) builder.add_edge("greeting" , "respond" ) builder.add_edge("respond" , END) graph = builder.compile (checkpointer=memory) config = {"configurable" : {"thread_id" : "chat_1" }} print ("1. 第一轮对话:" ) result1 = graph.invoke({ "messages" : [("user" , "你好!我叫张三" )], "user_name" : "张三" }, config) print ("对话历史:" ) for role, message in result1["messages" ]: print (f" {role} : {message} " ) print () print ("2. 检查存储的状态:" ) saved_state = graph.get_state(config) print ("保存的对话历史:" ) for role, message in saved_state.values["messages" ]: print (f" {role} : {message} " ) print () print ("3. 第二轮对话(继续之前的对话):" ) result2 = graph.invoke({ "messages" : [("user" , "今天天气怎么样?" )], "user_name" : "张三" }, config) print ("对话历史:" ) for role, message in result2["messages" ]: print (f" {role} : {message} " ) print () print ("4. 第三轮对话:" ) result3 = graph.invoke({ "messages" : [("user" , "你能记住我的名字吗?" )], "user_name" : "张三" }, config) print ("对话历史:" ) for role, message in result3["messages" ]: print (f" {role} : {message} " ) print () print ("5. 最终状态:" ) final_state = graph.get_state(config) print ("完整的对话历史:" ) for role, message in final_state.values["messages" ]: print (f" {role} : {message} " ) print () print ("= 演示完成 =" ) if name == "main" : main()
案例二:使用数据库检查点 database 1 2 3 4 5 6 7 8 9 10 11 12 13 14 15 16 17 18 19 20 21 22 23 24 25 26 27 28 29 30 31 32 33 34 35 36 37 38 39 40 41 42 43 44 45 46 47 48 49 50 51 52 53 54 55 56 57 58 59 60 61 62 63 64 65 66 67 68 69 70 71 72 73 74 75 76 77 78 79 80 81 82 83 84 85 86 87 88 89 90 91 92 93 94 95 96 97 98 99 100 101 102 103 104 105 106 107 108 109 110 111 112 113 114 115 116 117 118 119 120 121 122 123 124 125 126 127 128 129 130 131 132 133 134 135 136 137 138 139 140 141 142 """ LangGraph SQLite 短期记忆演示 该演示展示了如何在生产环境中使用 SQLite 数据库作为检查点存储, 使智能体能够跟踪多轮对话。 """ import sqlite3from typing import Annotatedfrom typing_extensions import TypedDictimport operatorfrom langgraph.checkpoint.sqlite import SqliteSaverfrom langgraph.graph import StateGraph, START, ENDclass ChatState (TypedDict ): """聊天状态定义""" messages: Annotated[list , operator.add] user_name: str def greeting_node (state: ChatState ) -> dict : """ 问候节点 Args: state: 当前状态 Returns: dict: 更新后的状态 """ print ("执行节点: greeting_node" ) user_name = state.get("user_name" , "访客" ) greeting_message = f"你好,{user_name} !我是你的AI助手。" return { "messages" : [("assistant" , greeting_message)] } def respond_node (state: ChatState ) -> dict : """ 回应节点 Args: state: 当前状态 Returns: dict: 更新后的状态 """ print ("执行节点: respond_node" ) user_messages = [msg for msg in state["messages" ] if msg[0 ] == "user" ] if user_messages: latest_user_message = user_messages[-1 ][1 ] user_name = state.get("user_name" , "访客" ) if "你好" in latest_user_message or "hello" in latest_user_message.lower(): response = f"你好,{user_name} !有什么我可以帮助你的吗?" elif "天气" in latest_user_message: response = f"抱歉,{user_name} ,我无法获取实时天气信息。" elif "名字" in latest_user_message or "我是" in latest_user_message: response = f"我知道你叫{user_name} ,很高兴认识你!" else : response = f"我理解你说的,{user_name} 。能告诉我更多吗?" else : response = "我没有看到你的消息,请再说一遍。" return { "messages" : [("assistant" , response)] } def main (): """主函数 - 演示 SQLite 短期记忆功能""" print ("= LangGraph SQLite 短期记忆演示 =\n" ) conn = sqlite3.connect("../chat_checkpoints.sqlite" , check_same_thread=False ) sqlite_saver = SqliteSaver(conn) builder = StateGraph(ChatState) builder.add_node("greeting" , greeting_node) builder.add_node("respond" , respond_node) builder.add_edge(START, "greeting" ) builder.add_edge("greeting" , "respond" ) builder.add_edge("respond" , END) graph = builder.compile (checkpointer=sqlite_saver) config = {"configurable" : {"thread_id" : "sqlite_chat_1" }} print ("1. 第一轮对话:" ) result1 = graph.invoke({ "messages" : [("user" , "你好!我叫李四" )], "user_name" : "李四" }, config) print ("对话历史:" ) for role, message in result1["messages" ]: print (f" {role} : {message} " ) print () print ("2. 检查存储的状态:" ) saved_state = graph.get_state(config) print ("保存的对话历史:" ) for role, message in saved_state.values["messages" ]: print (f" {role} : {message} " ) print () print ("3. 第二轮对话(继续之前的对话):" ) result2 = graph.invoke({ "messages" : [("user" , "今天天气怎么样?" )], "user_name" : "李四" }, config) print ("对话历史:" ) for role, message in result2["messages" ]: print (f" {role} : {message} " ) print () print ("4. 使用不同的线程ID(新对话):" ) config2 = {"configurable" : {"thread_id" : "sqlite_chat_2" }} result3 = graph.invoke({ "messages" : [("user" , "你好,我是王五" )], "user_name" : "王五" }, config2) print ("新对话历史:" ) for role, message in result3["messages" ]: print (f" {role} : {message} " ) print () print ("5. 查看不同线程的状态:" ) thread1_state = graph.get_state(config) thread2_state = graph.get_state(config2) print ("线程1对话历史:" ) for role, message in thread1_state.values["messages" ]: print (f" {role} : {message} " ) print ("\n线程2对话历史:" ) for role, message in thread2_state.values["messages" ]: print (f" {role} : {message} " ) print () conn.close() print ("= 演示完成 =" ) if name == "main" : main()
就是langchain不同版本的使用,本质没有什么不同,MemorySaver更加精简,高效
4.6.2 添加长期记忆 利用长期记忆跨对话存储用户特定或应用程序特定的数据。本质为使用在节点中使用外部的存储对象来存储数据
案例一:使用内存存储 内存长期存储 1 2 3 4 5 6 7 8 9 10 11 12 13 14 15 16 17 18 19 20 21 22 23 24 25 26 27 28 29 30 31 32 33 34 35 36 37 38 39 40 41 42 43 44 45 46 47 48 49 50 51 52 53 54 55 56 57 58 59 60 61 62 63 64 65 66 67 68 69 70 71 72 73 74 75 76 77 78 79 80 81 82 83 84 85 86 87 88 89 90 91 92 93 94 95 96 97 98 99 100 101 102 103 104 105 106 107 108 109 110 111 112 113 114 115 116 117 118 119 120 121 122 123 124 125 126 127 128 129 130 131 132 133 134 135 136 137 138 139 140 141 142 143 144 145 146 147 148 149 150 151 152 153 154 155 156 157 158 159 160 161 162 163 164 165 166 167 """ LangGraph 长期记忆演示 该演示展示了如何使用长期记忆跨对话存储用户特定或应用程序特定的数据。 """ from typing import Annotatedfrom typing_extensions import TypedDictfrom langchain_core.messages import HumanMessage, AIMessagefrom langgraph.graph import StateGraph, STARTfrom langgraph.store.memory import InMemoryStore定义状态 class ChatState (TypedDict ): """聊天状态定义""" messages: Annotated[list , lambda x, y: x + y] def chat_node (state: ChatState, *, store ): """ 聊天节点 Args: state: 当前状态 store: 存储对象 Returns: dict: 更新后的状态 """ print ("执行节点: chat_node" ) user_id = "user_123" try : user_info_item = store.get(("users" ,), user_id) user_info = user_info_item.value if user_info_item else {} print (f"从存储中获取用户信息: {user_info} " ) except Exception as e: print (f"获取用户信息时出错: {e} " ) user_info = {} user_messages = [msg for msg in state["messages" ] if isinstance (msg, HumanMessage)] if user_messages: latest_message = user_messages[-1 ].content print (f"用户消息: {latest_message} " ) if "我叫" in latest_message or "我是" in latest_message: if "我叫" in latest_message: name_start = latest_message.find("我叫" ) + 2 else : name_start = latest_message.find("我是" ) + 2 name_end = len (latest_message) for i in range (name_start, len (latest_message)): if latest_message[i] in ["," , "," , "." , "。" , "!" , "!" , "?" , "?" ]: name_end = i break name = latest_message[name_start:name_end].strip() if name: user_info["name" ] = name if "岁" in latest_message: age_pos = latest_message.find("岁" ) age_str = "" for i in range (age_pos - 1 , -1 , -1 ): if latest_message[i].isdigit(): age_str = latest_message[i] + age_str else : break if age_str and age_str.isdigit(): user_info["age" ] = int (age_str) if "来自" in latest_message: location_start = latest_message.find("来自" ) + 2 location_end = len (latest_message) for i in range (location_start, len (latest_message)): if latest_message[i] in ["," , "," , "." , "。" , "!" , "!" , "?" , "?" ]: location_end = i break location = latest_message[location_start:location_end].strip() if location: user_info["location" ] = location if user_info: try : store.put(("users" ,), user_id, user_info) print (f"保存用户信息到存储: {user_info} " ) except Exception as e: print (f"保存用户信息时出错: {e} " ) if "你好" in latest_message or "hello" in latest_message.lower(): if user_info.get("name" ): response = f"你好,{user_info['name' ]} !很高兴再次见到你。" else : response = "你好!我是AI助手。能告诉我你的名字吗?" elif "我叫" in latest_message or "我是" in latest_message: name = user_info.get("name" , "朋友" ) response = f"很高兴认识你,{name} !有什么我可以帮助你的吗?" elif "再见" in latest_message or "bye" in latest_message.lower(): name = user_info.get("name" , "朋友" ) response = f"再见,{name} !期待下次与你交流。" else : info_parts = [] if user_info.get("name" ): info_parts.append(f"名字是{user_info['name' ]} " ) if user_info.get("age" ): info_parts.append(f"年龄是{user_info['age' ]} 岁" ) if user_info.get("location" ): info_parts.append(f"来自{user_info['location' ]} " ) if info_parts: info_summary = ",而且我知道你" + "," .join(info_parts) response = f"我理解你的问题。{info_summary} 。让我来帮助你解答。" else : response = "我理解你的问题。让我来帮助你解答。" else : response = "我没有收到你的消息,请再说一遍。" print (f"生成的回复: {response} " ) return {"messages" : [AIMessage(content=response)]} def main (): """主函数 - 演示长期记忆功能""" print ("= LangGraph 长期记忆演示 =\n" ) store = InMemoryStore() builder = StateGraph(ChatState) builder.add_node("chat" , chat_node) builder.add_edge(START, "chat" ) graph = builder.compile (store=store) print ("1. 第一轮对话:" ) result1 = graph.invoke({ "messages" : [HumanMessage(content="你好,我叫张三,来自北京。" )] }) print ("对话历史:" ) for msg in result1["messages" ]: print (f" {type (msg).name} : {msg.content} " ) print () print ("2. 第二轮对话:" ) result2 = graph.invoke({ "messages" : [HumanMessage(content="我今年25岁了。" )] }) print ("对话历史:" ) for msg in result2["messages" ]: print (f" {type (msg).name} : {msg.content} " ) print () print ("3. 第三轮对话:" ) result3 = graph.invoke({ "messages" : [HumanMessage(content="你好!" )] }) print ("对话历史:" ) for msg in result3["messages" ]: print (f" {type (msg).name} : {msg.content} " ) print () print ("4. 查看存储的内容:" ) try : user_info_item = store.get(("users" ,), "user_123" ) if user_info_item: print (f"存储的用户信息: {user_info_item.value} " ) else : print ("未找到用户信息" ) except Exception as e: print (f"查看存储内容时出错: {e} " ) print ("\n= 演示完成 =" ) if name == "main" : main()
案例二:使用数据库存储 database 1 2 3 4 5 6 7 8 9 10 11 12 13 14 15 16 17 18 19 20 21 22 23 24 25 26 27 28 29 30 31 32 33 34 35 36 37 38 39 40 41 42 43 44 45 46 47 48 49 50 51 52 53 54 55 56 57 58 59 60 61 62 63 64 65 66 67 68 69 70 71 72 73 74 75 76 77 78 79 80 81 82 83 84 85 86 87 88 89 90 91 92 93 94 95 96 97 98 99 100 101 102 103 104 105 106 107 108 109 110 111 112 113 114 115 116 117 118 119 120 121 122 123 124 125 126 127 128 129 130 131 132 133 134 135 136 137 138 139 140 141 142 143 144 145 146 147 148 149 150 151 152 153 154 155 156 157 158 159 """ LangGraph SQLite 长期记忆演示 该演示展示了如何在生产环境中使用 SQLite 数据库作为长期记忆存储。 参考 PostgreSQL 的正确用法,使用上下文管理器来避免事务冲突。 """ import sqlite3import uuidfrom typing import Annotatedfrom typing_extensions import TypedDictfrom langchain_core.messages import HumanMessage, AIMessagefrom langchain_core.runnables import RunnableConfigfrom langgraph.graph import StateGraph, MessagesState, STARTfrom langgraph.checkpoint.sqlite import SqliteSaverfrom langgraph.store.sqlite import SqliteStore from langgraph.store.base import BaseStore定义状态(使用 MessagesState 简化代码) class ChatState (MessagesState ): """聊天状态定义 - 继承自 MessagesState""" pass def call_model ( state: ChatState, config: RunnableConfig, *, store: BaseStore, """ 调用模型的节点函数 Args: state: 当前状态 config: 配置信息 store: 存储对象 Returns: dict: 更新后的状态 """ print ("执行节点: call_model" ) user_id = config["configurable" ]["user_id" ] namespace = ("memories" , user_id) try : memories = store.search(namespace, query=str (state["messages" ][-1 ].content)) info = "\n" .join([d.value["data" ] for d in memories]) print (f"检索到的记忆: {info} " ) except Exception as e: print (f"检索记忆时出错: {e} " ) info = "" system_msg = f"你是一个有帮助的助手,正在与用户交谈。用户信息: {info} " if info else "你是一个有帮助的助手。" print (f"系统消息: {system_msg} " ) last_message = state["messages" ][-1 ] if "记住" in last_message.content.lower() or "remember" in last_message.content.lower(): memory = "用户的名字是张三" if "张三" in last_message.content else "用户要求记住一些信息" try : store.put(namespace, str (uuid.uuid4()), {"data" : memory}) print (f"已存储记忆: {memory} " ) except Exception as e: print (f"存储记忆时出错: {e} " ) user_message = last_message.content if "你好" in user_message or "hello" in user_message.lower(): response = "你好!我是AI助手。有什么我可以帮助你的吗?" elif "记住" in user_message.lower() or "remember" in user_message.lower(): response = "好的,我已经记住了你说的信息。" elif "名字" in user_message or "name" in user_message.lower(): if info: response = f"根据我的记忆,你的名字是张三。" else : response = "我还不知道你的名字,能告诉我吗?" else : response = "我理解你的问题。让我来帮助你解答。" print (f"生成的回复: {response} " ) return {"messages" : [AIMessage(content=response)]} def main (): """主函数 - 演示 SQLite 长期记忆功能""" print ("= LangGraph SQLite 长期记忆演示 =\n" ) DB_PATH = "long_term_memory.db" with ( SqliteStore.from_conn_string(DB_PATH) as store, SqliteSaver.from_conn_string(DB_PATH) as checkpointer, ): builder = StateGraph(ChatState) builder.add_node(call_model) builder.add_edge(START, "call_model" ) graph = builder.compile ( checkpointer=checkpointer, store=store, ) print ("1. 第一次对话 - 要求记住信息:" ) config1 = { "configurable" : { "thread_id" : "1" , "user_id" : "user_123" , } } for chunk in graph.stream( {"messages" : [HumanMessage(content="你好!请记住:我的名字是张三" )]}, config1, stream_mode="values" , ): if chunk["messages" ]: last_message = chunk["messages" ][-1 ] if hasattr (last_message, 'content' ): print (f" {type (last_message).name} : {last_message.content} " ) else : print (f" {type (last_message).name} : {last_message} " ) print () print ("2. 第二次对话 - 查询记忆:" ) config2 = { "configurable" : { "thread_id" : "2" , "user_id" : "user_123" , } } for chunk in graph.stream( {"messages" : [HumanMessage(content="我的名字是什么?" )]}, config2, stream_mode="values" , ): if chunk["messages" ]: last_message = chunk["messages" ][-1 ] if hasattr (last_message, 'content' ): print (f" {type (last_message).name} : {last_message.content} " ) else : print (f" {type (last_message).name} : {last_message} " ) print () print ("3. 第三次对话 - 不同用户:" ) config3 = { "configurable" : { "thread_id" : "3" , "user_id" : "user_456" , } } for chunk in graph.stream( {"messages" : [HumanMessage(content="我的名字是什么?" )]}, config3, stream_mode="values" , ): if chunk["messages" ]: last_message = chunk["messages" ][-1 ] if hasattr (last_message, 'content' ): print (f" {type (last_message).name} : {last_message.content} " ) else : print (f" {type (last_message).name} : {last_message} " ) print () print ("= 演示完成 =" ) if name == "main" : main()
短期记忆直接用checkpointer注册,配合config存储。不同的config不一样
长期记忆用graph.compile(store=store,checkpointer=checkpoint),进行存储。不同的config都可以读到,store本质也是一个MemorySaver或者一个数据库的存储对象
节点内部通过参数config接受到Ru RunnableConfig对象(就是invoke传入)的额外信息来访问这个长期记忆
4.6.3 管理短期记忆 启用短期记忆后,长对话可能会超出大语言模型(LLM)的上下文窗口。常见的解决方案包括:
修剪消息:删除开头或结尾的N条消息(在调用大语言模型之前)
从LangGraph状态中永久删除消息
总结消息:总结历史记录中较早的消息,并用摘要替换它们
管理检查点以存储和检索消息历史
自定义策略(例如,消息过滤等)
这使得智能体能够跟踪对话,同时不会超出大语言模型的上下文窗口。
修剪消息 大多数大语言模型都有一个最大支持的上下文窗口(以token为单位)。决定何时截断消息的一种方法是计算消息历史中的token数量,并在其接近该限制时进行截断。如果您使用LangChain,可以使用修剪消息工具,并指定要从列表中保留的token数量,以及用于处理边界的strategy(例如,保留最后的max_tokens)。
要修剪消息历史,请使用trim_messages函数:
message_trim 1 2 3 4 5 6 7 8 9 10 11 12 13 14 15 16 17 18 19 20 21 22 23 24 25 26 27 28 29 30 31 32 33 34 35 36 37 38 39 40 41 42 43 44 45 46 47 48 49 50 51 52 53 54 55 56 57 58 59 60 61 62 63 64 65 66 67 68 69 70 71 72 73 74 75 76 77 78 79 80 81 82 83 84 85 86 87 88 89 90 91 92 93 94 95 96 97 98 99 100 101 102 103 104 105 106 107 108 109 110 111 112 113 114 115 116 117 118 119 120 121 122 123 124 125 126 127 128 129 130 131 132 133 134 135 136 137 138 139 140 141 142 143 144 145 146 147 148 """ LangGraph 消息修剪演示 展示了如何使用 trim_messages 函数来管理消息历史, 确保消息历史不会超过模型的最大上下文窗口限制。 如果环境中配置了API密钥,将使用百炼平台的通义大模型;否则使用模拟响应。 """ import osfrom typing import List from langchain_core.messages import HumanMessage, AIMessagefrom langchain_core.messages.utils import ( trim_messages, count_tokens_approximately ) from langchain.chat_models import init_chat_modelfrom langgraph.graph import StateGraph, START, MessagesStatefrom langgraph.checkpoint.memory import InMemorySaver初始化模型 model = None try : api_key = "替换成你的百炼平台API-KEY:sk-xxx" model = init_chat_model( "qwen-plus" , model_provider="openai" , api_key=api_key, base_url="https://dashscope.aliyuncs.com/compatible-mode/v1" , temperature=0.7 ) print ("成功初始化百炼平台的通义大模型" ) except Exception as e: print (f"初始化模型失败: {e} " ) print ("将使用模拟响应模式" ) def call_model (state: MessagesState ): """ 调用模型的节点函数 Args: state: 当前状态,包含消息历史 Returns: dict: 更新后的状态 """ print ("\n执行节点: call_model" ) print (f"原始消息数量: {len (state['messages' ])} " ) messages = trim_messages( state["messages" ], strategy="last" , token_counter=count_tokens_approximately, max_tokens=128 , //128 个token start_on="human" , end_on=("human" , "tool" ), ) print (f"修剪后消息数量: {len (messages)} " ) if model: try : response = model.invoke(messages) print (f"生成的回复: {response.content} " ) return {"messages" : [response]} except Exception as e: print (f"调用模型出错: {e} " ) pass last_message = state["messages" ][-1 ].content if state["messages" ] else "" if "名字" in last_message or "name" in last_message.lower(): response = "我记得你的名字是bob。" elif "诗" in last_message or "poem" in last_message.lower(): if "猫" in last_message or "cat" in last_message.lower(): response = "这里是一首关于猫的短诗:\n小猫咪咪叫,\n尾巴摇啊摇,\n捉鼠本领高,\n主人乐陶陶。" elif "狗" in last_message or "dog" in last_message.lower(): response = "这里是一首关于狗的短诗:\n小狗汪汪叫,\n忠诚又可靠,\n看家护院好,\n人类好朋友。" else : response = "我可以为你写一首关于猫或狗的诗。" elif "你好" in last_message or "hi" in last_message.lower(): response = "你好!我是AI助手。" else : response = "我理解你的问题,让我来帮助你解答。" print (f"生成的模拟回复: {response} " ) return {"messages" : [AIMessage(content=response)]} def main (): """主函数 - 演示消息修剪功能""" print ("= LangGraph 消息修剪演示 (基于参考资料) =\n" ) checkpointer = InMemorySaver() builder = StateGraph(MessagesState) builder.add_node(call_model) builder.add_edge(START, "call_model" ) graph = builder.compile (checkpointer=checkpointer) config = {"configurable" : {"thread_id" : "1" }} print ("1. 第一次调用 - 问候:" ) result1 = graph.invoke({ "messages" : [HumanMessage(content="hi, my name is bob" )] }, config) print (f"回复: {result1['messages' ][-1 ].content} " ) print ("\n2. 第二次调用 - 请求写诗(关于猫):" ) result2 = graph.invoke({ "messages" : [HumanMessage(content="write a short poem about cats" )] }, config) print (f"回复: {result2['messages' ][-1 ].content} " ) print ("\n3. 第三次调用 - 请求写诗(关于狗):" ) result3 = graph.invoke({ "messages" : [HumanMessage(content="now do the same but for dogs" )] }, config) print (f"回复: {result3['messages' ][-1 ].content} " ) print ("\n4. 第四次调用 - 询问名字:" ) final_response = graph.invoke({ "messages" : [HumanMessage(content="what's my name?" )] }, config) print (f"回复: {final_response['messages' ][-1 ].content} " ) print ("\n5. 模拟大量消息以展示修剪效果:" ) many_messages: List [HumanMessage] = [] for i in range (20 ): many_messages.append(HumanMessage(content=f"这是第{i+1 } 条测试消息,内容很长很长很长很长很长很长很长很长很长很长很长很长很长很长很长很长很长很长很长很长很长很长很长很长" )) result5 = graph.invoke({ "messages" : many_messages + [HumanMessage(content="what's my name?" )] }, config) print (f"回复: {result5['messages' ][-1 ].content} " ) print ("\n= 演示完成 =" ) if name == "main" : main()
![[file-20260429003325907]]
删除消息 要从图状态中删除消息,可以使用RemoveMessage。RemoveMessage要正常工作,需要state的key带有add_messages这个reducer,例如MessagesState。
RemoveMessage(id)->Message 接受message的id删除对应消息,并返回要被删除的id
消息删除 1 2 3 4 5 6 7 8 9 10 11 12 13 14 15 16 17 18 19 20 21 22 23 24 25 26 27 28 29 30 31 32 33 34 35 36 37 38 39 40 41 42 43 44 45 46 47 48 49 50 51 52 53 54 55 56 57 58 59 60 61 62 63 64 65 66 67 68 69 70 71 72 73 74 75 76 77 78 79 80 81 82 83 84 85 86 87 88 89 90 91 92 93 94 95 96 97 98 99 100 101 102 103 104 105 106 107 108 109 110 111 112 113 114 115 116 117 118 119 120 121 122 123 124 125 126 127 128 129 130 131 132 133 134 135 136 137 138 139 140 141 142 143 144 145 146 147 148 149 150 151 152 153 154 155 156 157 158 159 160 161 162 163 164 165 166 167 168 169 170 171 172 """ LangGraph 消息删除演示 该演示展示了如何使用 RemoveMessage 从图状态中删除消息。 当状态的 key 带有 add_messages 这个 reducer 时(例如 MessagesState),RemoveMessage 可以正常工作。 """ from typing import Annotated, Sequence from langchain_core.messages import ( HumanMessage, AIMessage, RemoveMessage, BaseMessage ) from langchain_core.messages.utils import count_tokens_approximatelyfrom langchain.chat_models import init_chat_modelfrom langgraph.graph import StateGraph, START, MessagesStatefrom langgraph.checkpoint.memory import InMemorySaverfrom typing_extensions import TypedDict定义状态类型 class CustomMessagesState (TypedDict ): messages: Annotated[Sequence [BaseMessage], "messages" ] 初始化模型(使用模拟模型) model = None try : api_key = "替换成你的百炼平台API-KEY:sk-xxx" model = init_chat_model( "qwen-plus" , model_provider="openai" , api_key=api_key, base_url="https://dashscope.aliyuncs.com/compatible-mode/v1" , temperature=0.7 ) print ("成功初始化百炼平台的通义大模型" ) except Exception as e: print (f"初始化模型失败: {e} " ) print ("将使用模拟响应模式" ) def call_model (state: MessagesState ): """ 调用模型的节点函数 Args: state: 当前状态,包含消息历史 Returns: dict: 更新后的状态 """ print ("\n执行节点: call_model" ) print (f"当前消息数量: {len (state['messages' ])} " ) for i, msg in enumerate (state["messages" ]): print (f" 消息 {i+1 } : {type (msg).name} - {msg.content[:50 ]} {'...' if len (msg.content) > 50 else '' } " ) if model: try : response = model.invoke(state["messages" ]) print (f"生成的回复: {response.content} " ) return {"messages" : [response]} except Exception as e: print (f"调用模型出错: {e} " ) pass last_message = state["messages" ][-1 ].content if state["messages" ] else "" if "名字" in last_message or "name" in last_message.lower(): response = "我记得你的名字是bob。" elif "诗" in last_message or "poem" in last_message.lower(): if "猫" in last_message or "cat" in last_message.lower(): response = "这里是一首关于猫的短诗:\n小猫咪咪叫,\n尾巴摇啊摇,\n捉鼠本领高,\n主人乐陶陶。" elif "狗" in last_message or "dog" in last_message.lower(): response = "这里是一首关于狗的短诗:\n小狗汪汪叫,\n忠诚又可靠,\n看家护院好,\n人类好朋友。" else : response = "我可以为你写一首关于猫或狗的诗。" elif "你好" in last_message or "hi" in last_message.lower(): response = "你好!我是AI助手。" else : response = "我理解你的问题,让我来帮助你解答。" print (f"生成的模拟回复: {response} " ) return {"messages" : [AIMessage(content=response)]} def delete_messages (state: MessagesState ): """ 删除消息的节点函数 Args: state: 当前状态,包含消息历史 Returns: dict: 更新后的状态 """ print ("\n执行节点: delete_messages" ) messages = state["messages" ] print (f"删除前消息数量: {len (messages)} " ) if len (messages) > 2 : to_remove = [RemoveMessage(id =m.id ) for m in messages[:2 ]] print (f"将删除 {len (to_remove)} 条消息" ) for i, msg in enumerate (messages[:2 ]): print (f" 删除消息 {i+1 } : {type (msg).name} - {msg.content[:50 ]} {'...' if len (msg.content) > 50 else '' } " ) return {"messages" : to_remove} else : print ("消息数量不足,无需删除" ) return {} def main (): """主函数 - 演示消息删除功能""" print ("= LangGraph 消息删除演示 =\n" ) checkpointer = InMemorySaver() builder = StateGraph(MessagesState) builder.add_node(call_model) builder.add_node(delete_messages) builder.add_edge(START, "call_model" ) builder.add_edge("call_model" , "delete_messages" ) app = builder.compile (checkpointer=checkpointer) config = {"configurable" : {"thread_id" : "1" }} print ("1. 第一次调用 - 问候:" ) for event in app.stream( {"messages" : [HumanMessage(content="hi! I'm bob" )]}, config, stream_mode="values" ): print (f"当前状态中的消息数量: {len (event['messages' ])} " ) if event["messages" ]: last_message = event["messages" ][-1 ] print (f"最新消息: {type (last_message).name} - {last_message.content} " ) print ("\n" + "=" *50 + "\n" ) print ("2. 第二次调用 - 询问名字:" ) for event in app.stream( {"messages" : [HumanMessage(content="what's my name?" )]}, config, stream_mode="values" ): print (f"当前状态中的消息数量: {len (event['messages' ])} " ) if event["messages" ]: last_message = event["messages" ][-1 ] print (f"最新消息: {type (last_message).name} - {last_message.content} " ) print ("\n" + "=" *50 + "\n" ) print ("3. 第三次调用 - 请求写诗:" ) for event in app.stream( {"messages" : [HumanMessage(content="write a short poem about cats" )]}, config, stream_mode="values" ): print (f"当前状态中的消息数量: {len (event['messages' ])} " ) if event["messages" ]: last_message = event["messages" ][-1 ] print (f"最新消息: {type (last_message).name} - {last_message.content} " ) print ("\n" + "=" *50 + "\n" ) print ("4. 第四次调用 - 请求写诗(关于狗):" ) for event in app.stream( {"messages" : [HumanMessage(content="now do the same but for dogs" )]}, config, stream_mode="values" ): print (f"当前状态中的消息数量: {len (event['messages' ])} " ) if event["messages" ]: last_message = event["messages" ][-1 ] print (f"最新消息: {type (last_message).name} - {last_message.content} " ) print ("\n= 演示完成 =" ) if name == "main" : main()
总结消息 修剪或删除消息存在一个问题,即清理消息队列时可能会丢失信息。正因为如此,一些应用程序会受益于一种更复杂的方法——使用聊天模型来总结消息历史。
提示词和编排逻辑可用于总结消息历史。
例如,在LangGraph中,你可以扩展MessagesState以包含一个summary键;然后,可以生成聊天历史的摘要,并将任何现有的摘要作为下一次摘要的上下文。在messages状态键中积累了一定数量的消息后,可以调用这个summarize_conversation节点。
消息总结 1 2 3 4 5 6 7 8 9 10 11 12 13 14 15 16 17 18 19 20 21 22 23 24 25 26 27 28 29 30 31 32 33 34 35 36 37 38 39 40 41 42 43 44 45 46 47 48 49 50 51 52 53 54 55 56 57 58 59 60 61 62 63 64 65 66 67 68 69 70 71 72 73 74 75 76 77 78 79 80 81 82 83 84 85 86 87 88 89 90 91 92 93 94 95 96 97 98 99 100 101 102 103 104 105 106 107 108 109 110 111 112 113 114 115 116 117 118 119 120 121 122 123 124 125 126 127 128 129 130 131 132 133 134 135 136 137 138 139 140 141 142 143 144 145 146 147 148 149 150 151 152 153 154 155 156 157 158 159 160 161 162 163 164 165 166 167 168 169 170 171 172 173 174 175 176 177 178 179 180 181 182 183 184 185 186 187 188 189 190 191 192 193 194 195 196 197 198 199 200 201 202 203 204 205 206 207 208 209 210 211 212 213 214 215 216 217 218 219 220 221 222 223 224 225 226 227 """ LangGraph 对话总结演示 该演示展示了如何使用聊天模型来总结消息历史,而不是简单地修剪或删除消息。 这种方法可以避免在清理消息队列时丢失信息。 """ from typing import Annotated, Sequence , TypedDictfrom langchain_core.messages import HumanMessage, AIMessage, BaseMessage, SystemMessagefrom langchain_core.messages.utils import count_tokens_approximatelyfrom langchain.chat_models import init_chat_modelfrom langgraph.graph import StateGraph, STARTfrom langgraph.checkpoint.memory import InMemorySaverfrom typing_extensions import TypedDict定义状态类型 class SummaryState (TypedDict ): messages: Annotated[Sequence [BaseMessage], "messages" ] summary: str 初始化模型(使用模拟模型) model = None summarization_model = None try : api_key = "替换成你的百炼平台API-KEY:sk-xxx" model = init_chat_model( "qwen-plus" , model_provider="openai" , api_key=api_key, base_url="https://dashscope.aliyuncs.com/compatible-mode/v1" , temperature=0.7 ) summarization_model = model.bind(max_tokens=128 ) print ("成功初始化百炼平台的通义大模型" ) except Exception as e: print (f"初始化模型失败: {e} " ) print ("将使用模拟响应模式" ) def summarize_conversation (messages: Sequence [BaseMessage], current_summary: str = "" ) -> str : """ 使用模型总结对话历史 Args: messages: 消息列表 current_summary: 当前摘要 Returns: str: 更新后的摘要 """ if not messages: return current_summary if summarization_model: try : summary_prompt = f"当前摘要: {current_summary} \n\n新对话:\n" for msg in messages: if isinstance (msg, HumanMessage): summary_prompt += f"人类: {msg.content} \n" elif isinstance (msg, AIMessage): summary_prompt += f"AI: {msg.content} \n" summary_prompt += "\n请提供一个简洁的摘要,包含重要的信息和上下文:" response = summarization_model.invoke([SystemMessage(content=summary_prompt)]) return response.content except Exception as e: print (f"调用总结模型出错: {e} " ) pass summary_content = " " .join([msg.content for msg in messages[-3 :]]) return f"对话摘要: {summary_content[:100 ]} ..." def summarize_node (state: SummaryState ): """ 总结节点函数 Args: state: 当前状态 Returns: dict: 更新后的状态 """ print ("\n执行节点: summarize_node" ) messages = state["messages" ] current_summary = state.get("summary" , "" ) print (f"当前消息数量: {len (messages)} " ) print (f"当前摘要: {current_summary} " ) if len (messages) > 4 : print ("消息数量超过阈值,开始总结对话历史..." ) recent_messages = messages[-4 :] new_summary = summarize_conversation(recent_messages, current_summary) print (f"生成的新摘要: {new_summary} " ) return { "summary" : new_summary, "messages" : messages[-2 :] } else : print ("消息数量未超过阈值,无需总结" ) return {"summary" : current_summary} def call_model (state: SummaryState ): """ 调用模型的节点函数 Args: state: 当前状态,包含消息历史和摘要 Returns: dict: 更新后的状态 """ print ("\n执行节点: call_model" ) messages = state["messages" ] summary = state.get("summary" , "" ) print (f"当前消息数量: {len (messages)} " ) print (f"当前摘要: {summary} " ) context_messages = [] if summary: context_messages.append(SystemMessage(content=f"之前的对话摘要: {summary} " )) context_messages.extend(messages) for i, msg in enumerate (context_messages): print (f" 消息 {i+1 } : {type (msg).name} - {msg.content[:50 ]} {'...' if len (msg.content) > 50 else '' } " ) if model: try : response = model.invoke(context_messages) print (f"生成的回复: {response.content} " ) return {"messages" : [response]} except Exception as e: print (f"调用模型出错: {e} " ) pass last_message = messages[-1 ].content if messages else "" if "名字" in last_message or "name" in last_message.lower(): if "bob" in last_message.lower(): response = "我记得你的名字是bob。" else : response = "你还没有告诉我你的名字呢。" elif "诗" in last_message or "poem" in last_message.lower(): if "猫" in last_message or "cat" in last_message.lower(): response = "这里是一首关于猫的短诗:\n小猫咪咪叫,\n尾巴摇啊摇,\n捉鼠本领高,\n主人乐陶陶。" elif "狗" in last_message or "dog" in last_message.lower(): response = "这里是一首关于狗的短诗:\n小狗汪汪叫,\n忠诚又可靠,\n看家护院好,\n人类好朋友。" else : response = "我可以为你写一首关于猫或狗的诗。" elif "你好" in last_message or "hi" in last_message.lower(): response = "你好!我是AI助手。" else : response = "我理解你的问题,让我来帮助你解答。" print (f"生成的模拟回复: {response} " ) return {"messages" : [AIMessage(content=response)]} def main (): """主函数 - 演示对话总结功能""" print ("= LangGraph 对话总结演示 =\n" ) checkpointer = InMemorySaver() builder = StateGraph(SummaryState) builder.add_node("summarize" , summarize_node) builder.add_node("call_model" , call_model) builder.add_edge(START, "summarize" ) builder.add_edge("summarize" , "call_model" ) graph = builder.compile (checkpointer=checkpointer) config = {"configurable" : {"thread_id" : "1" }} print ("1. 第一次调用 - 问候:" ) result1 = graph.invoke({ "messages" : [HumanMessage(content="hi, my name is bob" )], "summary" : "" }, config) print (f"回复: {result1['messages' ][-1 ].content} " ) print (f"当前摘要: {result1.get('summary' , '' )} " ) print ("\n" + "=" *50 + "\n" ) print ("2. 第二次调用 - 请求写诗(关于猫):" ) result2 = graph.invoke({ "messages" : [HumanMessage(content="write a short poem about cats" )], "summary" : result1.get("summary" , "" ) }, config) print (f"回复: {result2['messages' ][-1 ].content} " ) print (f"当前摘要: {result2.get('summary' , '' )} " ) print ("\n" + "=" *50 + "\n" ) print ("3. 第三次调用 - 请求写诗(关于狗):" ) result3 = graph.invoke({ "messages" : [HumanMessage(content="now do the same but for dogs" )], "summary" : result2.get("summary" , "" ) }, config) print (f"回复: {result3['messages' ][-1 ].content} " ) print (f"当前摘要: {result3.get('summary' , '' )} " ) print ("\n" + "=" *50 + "\n" ) print ("4. 第四次调用 - 询问名字:" ) result4 = graph.invoke({ "messages" : [HumanMessage(content="what's my name?" )], "summary" : result3.get("summary" , "" ) }, config) print (f"回复: {result4['messages' ][-1 ].content} " ) print (f"当前摘要: {result4.get('summary' , '' )} " ) print ("\n" + "=" *50 + "\n" ) print ("5. 第五次调用 - 添加更多对话以触发总结:" ) conversation_history = [ HumanMessage(content="让我们聊聊天气" ), AIMessage(content="好的,你想聊什么地区的天气?" ), HumanMessage(content="北京的天气怎么样?" ), AIMessage(content="我无法获取实时天气信息,但北京属于温带大陆性季风气候。" ), HumanMessage(content="what's my name?" ) ] result5 = graph.invoke({ "messages" : conversation_history, "summary" : result4.get("summary" , "" ) }, config) print (f"回复: {result5['messages' ][-1 ].content} " ) print (f"当前摘要: {result5.get('summary' , '' )} " ) print ("\n= 演示完成 =" ) if name == "main" : main()
4.7 子图(Subgraphs) 子图是一个用作另一个图中节点的图。子图可用于:
构建多智能体系统。
在多个图中重用一组节点。
分布式开发:当你希望不同的团队独立处理图的不同部分时,你可以将每个部分定义为子图,而且只要遵循子图接口(输入和输出模式),父图就可以在不了解子图任何细节的情况下构建出来。
添加子图时,需要定义父图和子图如何通信:
从节点调用图 — 子图从父图的节点内部被调用。
将图添加为节点——子图直接作为节点添加到父图中,并与父图共享状态。
使用父图导航,从节点跳转到一个图
从一个节点内部调用图,不跳转,就是invoke一个图
![[两种子图的调用方式]]
4.7.1 从节点调用图 实现子图的一种简单方法是从另一个图的节点内部调用一个图。在这种情况下,子图可以与父图具有完全不同的模式(没有共享键)。例如,你可能希望为多智能体系统中的每个智能体保存私人消息历史。如果你的应用程序是这种情况,你需要定义一个节点函数来调用子图。该函数需要在调用子图之前将输入(父级)状态转换为子图状态,并在从节点返回状态更新之前将结果转换回父级状态。
查看子图状态启用持久性后,您可以通过相应方法检查图状态(检查点)。要查看子图状态,可使用子图选项。
流式输出子图结
使用案例
从节点调用图(不同的状态模式)
将图添加为节点(共享状态模式)
查看子图状态
流式输出子图结果
节点调用子图 1 2 3 4 5 6 7 8 9 10 11 12 13 14 15 16 17 18 19 20 21 22 23 24 25 26 27 28 29 30 31 32 33 34 35 36 37 38 39 40 41 42 43 44 45 46 47 48 49 50 51 52 53 54 55 56 57 58 59 60 61 62 63 64 65 66 67 68 69 70 71 72 73 74 75 76 77 78 79 80 81 82 83 84 85 86 87 88 89 90 91 92 93 94 95 96 97 98 99 100 101 102 103 104 105 106 107 108 109 110 111 112 113 114 115 116 117 118 119 120 121 122 123 124 125 126 127 128 129 130 131 132 133 134 135 136 137 138 139 140 141 142 143 144 145 146 147 148 149 150 151 152 153 154 155 156 157 158 159 160 161 162 163 164 165 166 167 from typing import Annotatedfrom typing_extensions import TypedDictfrom langgraph.graph.state import StateGraph, STARTfrom langgraph.checkpoint.memory import MemorySaver定义子图状态(不同的状态模式) class SubgraphState (TypedDict ): bar: str baz: str 定义父图状态(不同的状态模式) class ParentState (TypedDict ): foo: str 定义共享状态的子图 class SharedSubgraphState (TypedDict ): foo: str bar: str 定义用于中断演示的状态 class InterruptState (TypedDict ): foo: str def subgraph_node_1 (state: SubgraphState ): """子图节点1""" print ("执行子图节点1" ) return {"baz" : "baz" } def subgraph_node_2 (state: SubgraphState ): """子图节点2""" print ("执行子图节点2" ) return {"bar" : state["bar" ] + state["baz" ]} def shared_subgraph_node_1 (state: SharedSubgraphState ): """共享状态子图节点1""" print ("执行共享状态子图节点1" ) return {"bar" : "bar" } def shared_subgraph_node_2 (state: SharedSubgraphState ): """共享状态子图节点2""" print ("执行共享状态子图节点2" ) return {"foo" : state["foo" ] + state["bar" ]} def interrupt_subgraph_node (state: InterruptState ): """用于中断演示的子图节点""" print ("执行中断子图节点" ) user_input = input ("请输入值(模拟中断): " ) return {"foo" : state["foo" ] + user_input} def create_subgraph_different_schemas (): """创建具有不同状态模式的子图""" print ("\n= 创建具有不同状态模式的子图 =" ) subgraph_builder = StateGraph(SubgraphState) subgraph_builder.add_node("subgraph_node_1" , subgraph_node_1) subgraph_builder.add_node("subgraph_node_2" , subgraph_node_2) subgraph_builder.add_edge(START, "subgraph_node_1" ) subgraph_builder.add_edge("subgraph_node_1" , "subgraph_node_2" ) return subgraph_builder.compile () def node_1 (state: ParentState ): """父图节点1""" print ("执行父图节点1" ) return {"foo" : "hi! " + state["foo" ]} def node_2 (subgraph ): """父图节点2 - 调用子图""" def _call_subgraph (state: ParentState ): print ("执行父图节点2(调用子图)" ) subgraph_input = {"bar" : state["foo" ], "baz" : "" } response = subgraph.invoke(subgraph_input) return {"foo" : response["bar" ]} return _call_subgraph def create_parent_graph_with_subgraph_call (subgraph ): """创建通过节点调用子图的父图""" print ("\n= 创建通过节点调用子图的父图 =" ) builder = StateGraph(ParentState) builder.add_node("node_1" , node_1) builder.add_node("node_2" , node_2(subgraph)) builder.add_edge(START, "node_1" ) builder.add_edge("node_1" , "node_2" ) return builder.compile () def create_shared_subgraph (): """创建具有共享状态的子图""" print ("\n= 创建具有共享状态的子图 =" ) subgraph_builder = StateGraph(SharedSubgraphState) subgraph_builder.add_node("shared_subgraph_node_1" , shared_subgraph_node_1) subgraph_builder.add_node("shared_subgraph_node_2" , shared_subgraph_node_2) subgraph_builder.add_edge(START, "shared_subgraph_node_1" ) subgraph_builder.add_edge("shared_subgraph_node_1" , "shared_subgraph_node_2" ) return subgraph_builder.compile () def create_parent_graph_with_node_subgraph (subgraph ): """创建将子图作为节点添加的父图""" print ("\n= 创建将子图作为节点添加的父图 =" ) builder = StateGraph(ParentState) builder.add_node("node_1" , node_1) builder.add_node("node_2" , subgraph) builder.add_edge(START, "node_1" ) builder.add_edge("node_1" , "node_2" ) return builder.compile () def create_interrupt_subgraph (): """创建用于中断演示的子图""" print ("\n= 创建用于中断演示的子图 =" ) subgraph_builder = StateGraph(InterruptState) subgraph_builder.add_node("interrupt_subgraph_node" , interrupt_subgraph_node) subgraph_builder.add_edge(START, "interrupt_subgraph_node" ) return subgraph_builder.compile () def create_parent_graph_with_interrupt_subgraph (subgraph ): """创建包含中断子图的父图""" print ("\n= 创建包含中断子图的父图 =" ) builder = StateGraph(InterruptState) builder.add_node("node_1" , subgraph) builder.add_edge(START, "node_1" ) return builder.compile () def demo_subgraph_call (): """演示从节点调用图""" print ("\n= 演示从节点调用图 =" ) subgraph = create_subgraph_different_schemas() parent_graph = create_parent_graph_with_subgraph_call(subgraph) print ("开始执行图:" ) for chunk in parent_graph.stream({"foo" : "foo" }, subgraphs=True ): print (f"流式输出: {chunk} " ) def demo_add_graph_as_node (): """演示将图添加为节点""" print ("\n= 演示将图添加为节点 =" ) subgraph = create_shared_subgraph() parent_graph = create_parent_graph_with_node_subgraph(subgraph) print ("开始执行图:" ) for chunk in parent_graph.stream({"foo" : "foo" }): print (f"流式输出: {chunk} " ) def demo_subgraph_streaming (): """演示流式输出子图结果""" print ("\n= 演示流式输出子图结果 =" ) subgraph = create_shared_subgraph() parent_graph = create_parent_graph_with_node_subgraph(subgraph) print ("开始流式执行图:" ) for chunk in parent_graph.stream( {"foo" : "foo" }, stream_mode="updates" , subgraphs=True , ): print (f"流式输出: {chunk} " ) def main (): """主函数""" print ("= LangGraph 子图功能演示 =" ) demo_subgraph_call() print ("\n" + "=" *50 + "\n" ) demo_add_graph_as_node() print ("\n" + "=" *50 + "\n" ) demo_subgraph_streaming() print ("\n= 演示完成 =" ) if name == "main" : main()