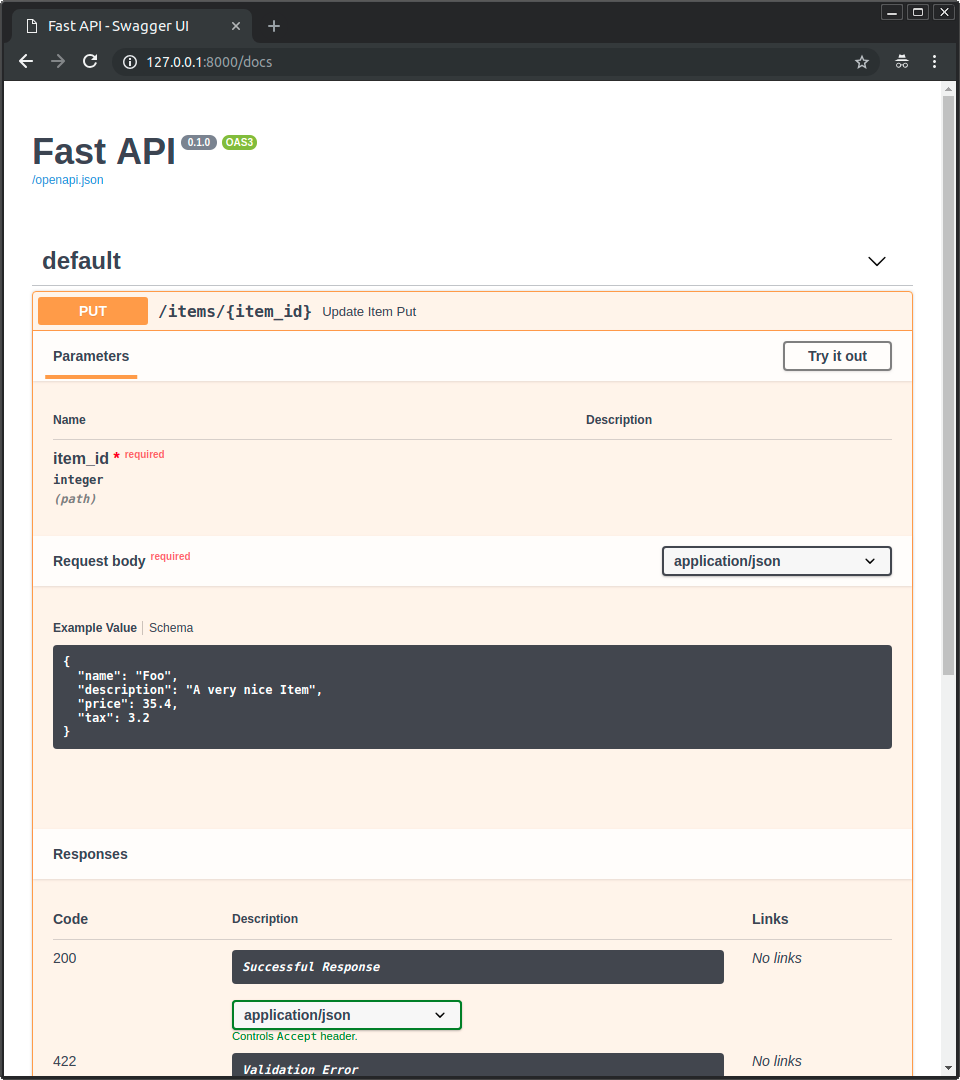
FastAPI的来历 启动一个web服务 1 2 3 4 5 6 7 8 unicorn main:app --reload --app-dir --port reload参数表明是热重载 port为监听端口 app-dir ,添加这个app-dir 所在的文件夹加入到模块查找路径中sys.path列表中 所以, 最好将根目录加入其中,在根目录中找到 uvicorn web.app:app --reload --app-dir =./src 层次化搜索包 在 /docs中可以动态调试api
编写main页面路由匹配规则
使用@app 注解在对应方法上方作为路由匹配,可以使用{} 捕获动态路由中路径的参数 类似f-string中的占位符.还可以在处理方法中使用对应key名捕获query参数
1 2 3 4 5 6 7 8 9 10 11 12 13 14 15 16 17 18 19 20 21 22 23 24 25 26 27 28 29 from typing import Union from fastapi import FastAPIapp =FastAPI() @app.get('/' def read_root (): return {'hello' : 'world' } @app.get('/items/{item_id}' def read_root (item_id, q ) -> 返回类型: return {} /items/1 /?q=1 默认使用json返回对应对象 可以想见,返回的对象类型可以使用http响应方法的对应字段进行设置 方法需要只当形参类型和返回类型,这样api测试才不会爆出422 类型错误 @app.put('/items/{item_id}' def update_item (item_id, item:Item )->str { return } class Item (BaseModel ): name:str price:float is_offer Item方法类似dataset注解的pojo类 return 方法返回的类型也可以是一个BaseModel类的子类pojo类需要和函数返回值相对应
不同的请求方法的处理函数编写 捕获参数需要和方法中形参的类型声明相对应,可以使用 本地接口 作为接口的测试网站
GET PUT方法 修改服务器已经含有的资源 1 2 3 4 5 6 7 8 9 10 @app.put('/items/{item_id}' def update_item (item_id, item:Item ){ } class Item (BaseModel ): name:str price:float is_offer Item方法类似dataset注解的pojo类
2. 三个基础捕获对象,动态路径,查询字符串,请求体 2.1 路径参数 2.1.1 带类型的路径参数 可以选择使用标准 Python 类型注解在函数中声明路径参数的类型,不带有就不进行数据类型的转换
1 2 3 4 5 6 7 from fastapi import FastAPI app = FastAPI () @app.get ("/items/{item_id}" ) async def read_item (item_id : int): return {"item_id" : item_id}
这将为你提供编辑器支持,包括函数内的错误检查、代码补全等。FastAPI 为你提供了自动化的请求 “解析” 。
数据验证 但如果你在浏览器中访问 http://127.0.0.1:8000/items/foo ,你会看到如下友好的 HTTP 错误
1 2 3 4 5 6 7 8 9 10 11 12 13 { "detail" : [ { "type" : "int_parsing" , "loc" : [ "path" , "item_id" ] , "msg" : "Input should be a valid integer, unable to parse string as an integer" , "input" : "foo" } ] }
因为路径参数 item_id 的值为 "foo" ,它不是一个 int 。
如果你提供的是 float 而不是 int ,也会出现同样的错误,例如: http://127.0.0.1:8000/items/4.2
所以,使用同样的 Python 类型声明, FastAPI 还为你提供了数据验证功能。
请注意,该错误还清楚地说明了验证未通过的确切位置。
这在开发和调试与 API 交互的代码时非常有用。
2.1.2 静态/动态路由顺序和不可重复性 在创建 路径操作 时,有时会遇到拥有固定路径的情况。
例如 /users/me ,假设它是为了获取当前用户的数据。
然后你还可以有一个路径 /users/{user_id} ,用于通过用户 ID 获取特定用户的数据。路径操作 是按顺序评估的,你需要确保 /users/me 的路径在 /users/{user_id} 之前声明
1 2 3 4 5 6 7 8 9 10 11 from fastapi import FastAPI app = FastAPI () @app.get ("/users/me" ) async def read_user_me (): return {"user_id" : "the current user" } @app.get ("/users/{user_id}" ) async def read_user (user_id : str): return {"user_id" : user_id}
否则, /users/{user_id} 的路径也会匹配 /users/me ,并“认为”它接收到的参数 user_id 的值为 "me" 。同样地,你不能重复定义路径操作
1 2 3 4 5 6 7 8 9 10 11 from fastapi import FastAPI app = FastAPI () @app.get ("/users" ) async def read_users (): return ["Rick" , "Morty" ] @app.get ("/users" ) async def read_users2 (): return ["Bean" , "Elfo" ]
因为路径首先匹配,所以总是会使用第一个定义的路径操作,后面的路由无效
2.1.3 动态路由中限定路由范围 如果你有一个接收 路径参数 的 路径操作 ,但你希望该 路径参数 的可能有效值是预定义的,则可以使用标准的 Python Enum 。
创建一个 Enum 类 1 2 3 4 5 6 7 8 9 10 11 12 13 14 15 16 17 18 19 20 from enum import Enumfrom fastapi import FastAPIclass ModelName (str , Enum): alexnet = "alexnet" resnet = "resnet" lenet = "lenet" app = FastAPI() @app.get("/models/{model_name}" async def get_model (model_name: ModelName ): if model_name is ModelName.alexnet: return {"model_name" : model_name, "message" : "Deep Learning FTW!" } if model_name.value == "lenet" : return {"model_name" : model_name, "message" : "LeCNN all the images" } return {"model_name" : model_name, "message" : "Have some residuals" }
2.1.4 路径转换器 使用直接来自 Starlette 的选项,你可以使用如下 URL 声明一个包含 路径 的 路径参数
在此例中,参数名为 file_path ,而最后一部分 :path 告诉它该参数应该匹配任何 路径 。**就是将后面的整个路径进行匹配了
因此,你可以这样使用它
1 2 3 4 5 6 7 from fastapi import FastAPIapp = FastAPI() @app.get("/files/{file_path:path}" async def read_file (file_path: str ): return {"file_path" : file_path}
你可能需要参数包含 /home/johndoe/myfile.txt ,并带有前导斜杠 (/)。
在这种情况下,URL 将是: /files//home/johndoe/myfile.txt ,在 files 和 home 之间有两个斜杠 (//)。
2.2 查询参数 2.2.1 查询参数的捕获 当你声明不属于路径参数的其他函数参数时,它们会自动被解释为“查询”参数。
1 2 3 4 5 6 7 8 9 from fastapi import FastAPIapp = FastAPI() fake_items_db = [{"item_name" : "Foo" }, {"item_name" : "Bar" }, {"item_name" : "Baz" }] @app.get("/items/" async def read_item (skip: int = 0 , limit: int = 10 ): return fake_items_db[skip : skip + limit]
默认值 由于查询参数不是路径的固定部分,它们可以是可选的,并且可以有默认值。skip=0 和 limit=10 。
可选参数 同理,你可以通过将默认值设置为 None 来声明可选的查询参数
1 2 3 4 5 6 7 8 9 from fastapi import FastAPIapp = FastAPI() @app.get("/items/{item_id}" async def read_item (item_id: str , q: str | None = None ): if q: return {"item_id" : item_id, "q" : q} return {"item_id" : item_id}
在这种情况下,函数参数 q 是可选的,且默认值为 None 。
还要注意, FastAPI 足够智能,可以识别出 item_id 是路径参数,而 q 不是,因此 q 是一个查询参数。
2.2.2 查询参数类型转换 你还可以声明 bool 类型,它们会被自动转换
1 2 3 4 5 6 7 8 9 10 11 12 13 14 from fastapi import FastAPIapp = FastAPI() @app.get("/items/{item_id}" async def read_item (item_id: str , q: str | None = None , short: bool = False ): item = {"item_id" : item_id} if q: item.update({"q" : q}) if not short: item.update( {"description" : "This is an amazing item that has a long description" } ) return item
2.2.3多个路径参数和查询参数的自动分配 你可以同时声明多个路径参数和查询参数, FastAPI 知道如何通过名称进行匹配。
1 2 3 4 5 6 7 8 9 10 11 12 13 14 15 16 from fastapi import FastAPIapp = FastAPI() @app.get("/users/{user_id}/items/{item_id}" async def read_user_item (4 user_id: int , item_id: str , q: str | None = None , short: bool = False item = {"item_id" : item_id, "owner_id" : user_id} if q: item.update({"q" : q}) if not short: item.update( {"description" : "This is an amazing item that has a long description" } ) return item
2.2.4 必选查询参数 为不是路径参数的参数声明默认值(至此,仅有查询参数),该参数就不是必选的了。None 。
2.2.5 使用pydantic打包查询参数 如果你有一组具有相关性的 查询参数 ,你可以创建一个 Pydantic 模型 来声明它们。这将允许你在 多个地方 去 复用模型 ,并且一次性为所有参数声明验证和元数据。😎Pydantic 模型 中声明你需要的 查询参数 ,然后将参数声明为 Query :
1 2 3 4 5 6 7 8 9 10 11 12 13 14 15 16 17 from typing import Annotated , Literal from fastapi import FastAPI , Query from pydantic import BaseModel , Field app = FastAPI () class FilterParams (BaseModel ): limit : int = Field (100 , gt=0 , le=100 ) offset : int = Field (0 , ge=0 ) order_by : Literal ["created_at" , "updated_at" ] = "created_at" tags : list[str] = [] @app.get ("/items/" ) async def read_items (filter_query : Annotated [FilterParams , Query ()]): return filter_query
FastAPI 将会从请求的 查询参数 中 提取 出 每个字段 的数据,并将其提供给你定义的 Pydantic 模型。
禁止额外的查询参数 在一些特殊的使用场景中(可能不是很常见),你可能希望 限制 你要接收的查询参数。forbid 任何 extra 字段:
1 2 3 4 5 6 7 8 9 10 11 12 13 14 15 16 17 18 from typing import Annotated , Literal from fastapi import FastAPI , Query from pydantic import BaseModel , Field app = FastAPI () class FilterParams (BaseModel ): model_config = {"extra" : "forbid" } limit : int = Field (100 , gt=0 , le=100 ) offset : int = Field (0 , ge=0 ) order_by : Literal ["created_at" , "updated_at" ] = "created_at" tags : list[str] = [] @app.get ("/items/" ) async def read_items (filter_query : Annotated [FilterParams , Query ()]): return filter_query
假设有一个客户端尝试在 查询参数 中发送一些 额外的 数据,它将会收到一个 错误 响应。plumbus 的 tool 查询参数,如:
他们将收到一个 错误 420响应,告诉他们查询参数 tool 是不允许的:
2.3 请求体 要声明 请求体 ,请使用 Pydantic 模型,以充分利用其强大的功能和优势。
发送数据时,应使用以下方法之一: POST (最常用)、 PUT 、 DELETE 或 PATCH 。
在规范中,使用 GET 请求发送请求体的行为未定义。不过,FastAPI 仍然支持它,仅适用于非常复杂或极端的情况。
由于不推荐这样做,使用 GET 时,带有 Swagger UI 的交互式文档将不会显示请求体的文档,且中间代理可能不支持该行为。
2.3.1 导入 Pydantic 的 BaseModel 首先,你需要从 pydantic 导入 BaseModel
1 2 3 4 5 6 7 8 9 10 11 12 13 14 from fastapi import FastAPIfrom pydantic import BaseModelclass Item (BaseModel ): name: str description: str | None = None price: float tax: float | None = None app = FastAPI() @app.post("/items/" async def create_item (item: Item ): return item
与声明查询参数时相同,如果模型属性具有默认值,则该属性不是必需的。否则,它是必需的。使用 None 可以使其变为可选。
只需这一行 Python 类型声明, FastAPI 就会:
将请求体读取为 JSON。
转换对应的类型(如果需要)。
校验数据。
如果数据无效,它将返回一个清晰明确的错误,指出错误数据的具体位置和原因。
在 item 参数中提供接收到的数据。
由于你在函数中将其声明为 Item 类型,你还将获得针对所有属性及其类型的编辑器支持(自动补全等)。
为你的模型生成 JSON Schema 定义;如果项目需要,你也可以在其他任何地方使用它们。
这些架构将成为生成的 OpenAPI 架构的一部分,并被自动文档 UI 使用。
它改进了 Pydantic 模型的编辑器支持,包括:
2.3.2 在请求处理方法中使用模型 在函数内部,你可以直接访问模型对象的所有属性。
1 2 3 4 5 6 7 8 9 10 11 12 13 14 15 16 17 18 from fastapi import FastAPI from pydantic import BaseModel class Item (BaseModel ): name : str description : str | None = None price : float tax : float | None = None app = FastAPI () @app.post ("/items/" ) async def create_item (item : Item ): item_dict = item.model_dump () if item.tax is not None : price_with_tax = item.price + item.tax item_dict.update ({"price_with_tax" : price_with_tax}) return item_dict
2.3.4 请求体 + 路径 + 查询参数 你也可以同时声明 请求体 、 路径 和 查询 参数。FastAPI 将识别它们中的每一个,并从正确的地方获取数据。
1 2 3 4 5 6 7 8 9 10 11 12 13 14 15 16 17 from fastapi import FastAPI from pydantic import BaseModel class Item (BaseModel ): name : str description : str | None = None price : float tax : float | None = None app = FastAPI () @app.put ("/items/{item_id}" ) async def update_item (item_id : int, item : Item , q : str | None = None ): result = {"item_id" : item_id, **item.model_dump ()} if q : result.update ({"q" : q}) return result
函数参数将识别如下:
如果参数也在 路径 中声明,它将被用作路径参数。
如果参数是 简单类型 (如 int 、 float 、 str 、 bool 等),它将被解释为 查询 参数。
如果参数声明为 Pydantic 模型 类型,它将被解释为请求 体 。
FastAPI 会知道 q 的值不是必需的,因为有默认值 None 。
str | None 并不是 FastAPI 判断值是否必需的依据,它知道不是必需的,是因为它有默认值 None 。但添加类型注解可以使你的编辑器提供更好的支持并检测错误。
2.4 三个对象一起使用的示例 2.4.1 混合使用 Path、Query 和请求体参数 首先,当然可以自由混合 Path 、 Query 和请求体参数声明, FastAPI 会自动处理。None ,将请求体参数声明为可选参数。
1 2 3 4 5 6 7 8 9 10 11 12 13 14 15 16 17 18 19 20 21 22 23 24 25 from typing import Annotatedfrom fastapi import FastAPI, Pathfrom pydantic import BaseModelapp = FastAPI() class Item (BaseModel ): name: str description: str | None = None price: float tax: float | None = None @app.put("/items/{item_id}" async def update_item ( item_id: Annotated[int , Path(title="The ID of the item to get" , ge=0 , le=1000 )], q: str | None = None , item: Item | None = None , results = {"item_id" : item_id} if q: results.update({"q" : q}) if item: results.update({"item" : item}) return results
1 2 3 4 5 6 7 8 9 10 11 12 13 14 15 16 17 18 19 20 21 22 23 24 from fastapi import FastAPI, Pathfrom pydantic import BaseModelapp = FastAPI() class Item (BaseModel ): name: str description: str | None = None price: float tax: float | None = None @app.put("/items/{item_id}" async def update_item ( *, item_id: int = Path(title="The ID of the item to get" , ge=0 , le=1000 ), q: str | None = None , item: Item | None = None , results = {"item_id" : item_id} if q: results.update({"q" : q}) if item: results.update({"item" : item}) return results
请注意,在这种情况下,从请求体获取的 item 是可选的,因为它有一个 None 的默认值。
2.4.2 多个请求体参数,本质为对请求体中的字段进行解包 但你也可以声明多个请求体参数,例如 item 和 user
1 2 3 4 5 6 7 8 9 10 11 12 13 14 15 16 17 18 19 from fastapi import FastAPI from pydantic import BaseModel app = FastAPI () class Item (BaseModel ): name : str description : str | None = None price : float tax : float | None = None class User (BaseModel ): username : str full_name : str | None = None @app.put ("/items/{item_id}" ) async def update_item (item_id : int, item : Item , user : User ): results = {"item_id" : item_id, "item" : item, "user" : user} return results
在这种情况下, FastAPI 会注意到函数中存在多个请求体参数(即两个 Pydantic 模型参数)。
因此,它会将参数名作为请求体中的键(字段名),并期望收到如下请求体:
1 2 3 4 5 6 7 8 9 10 11 12 { "item" : { "name" : "Foo" , "description" : "The pretender" , "price" : 42.0 , "tax" : 3.2 }, "user" : { "username" : "dave" , "full_name" : "Dave Grohl" } }
请注意,即使 item 的声明方式与之前相同,现在也要求将其置于以 item 为键的结构中。
FastAPI 会自动转换请求数据,使 item 参数接收其特定的内容, user 参数亦然。
它将执行组合数据的校验,并为 OpenAPI 模式和自动文档生成相应的文档。
2.4.3 请求体中的单值 正如 Query 和 Path 用于定义查询参数和路径参数的额外数据一样, FastAPI 也提供了对应的 Body 。item 和 user 之外,还在同一个请求体中包含另一个 importance 键。如果你直接声明它,由于它是一个单值, FastAPI 会默认将其视为查询参数。
数据类型
Python 类型
请求/响应表现形式
备注 / Schema 特性
UUIDuuid.UUIDstr通用唯一识别码,常用作数据库或系统 ID。
datetime.datetimedatetime.datetimeISO 8601 格式字符串 2008-09-15T15:53:00+05:00)
包含日期和时间的完整时间戳。
datetime.datedatetime.dateISO 8601 格式字符串 2008-09-15)
仅表示日期部分。
datetime.timedatetime.timeISO 8601 格式字符串 14:23:55.003)
仅表示时间部分(可含毫秒)。
datetime.timedeltadatetime.timedelta总秒数的 float
也支持 ISO 8601 时间差编码格式。
frozensetfrozenset请求:list → 自动去重转 set list
JSON Schema 中标记 uniqueItems: true,处理方式与 set 一致。
bytesbytesstrJSON Schema 中指定格式为 binary。
Decimaldecimal.Decimalfloat高精度十进制数,序列化时按浮点数处理。
1 2 3 4 5 6 7 8 9 10 11 12 13 14 15 16 17 18 19 20 21 22 23 from typing import Annotatedfrom fastapi import Body, FastAPIfrom pydantic import BaseModelapp = FastAPI() class Item (BaseModel ): name: str description: str | None = None price: float tax: float | None = None class User (BaseModel ): username: str full_name: str | None = None @app.put("/items/{item_id}" async def update_item ( item_id: int , item: Item, user: User, importance: Annotated[int , Body( results = {"item_id" : item_id, "item" : item, "user" : user, "importance" : importance} return results
在这种情况下, FastAPI 将期望收到如下请求体:
1 2 3 4 5 6 7 8 9 10 11 12 13 { "item" : { "name" : "Foo" , "description" : "The pretender" , "price" : 42.0 , "tax" : 3.2 }, "user" : { "username" : "dave" , "full_name" : "Dave Grohl" }, "importance" : 5 }
同样,它会自动转换数据类型、校验、生成文档等。
2.4.4 多个请求体参数与查询参数 当然,除了请求体参数外,你还可以根据需要声明额外的查询参数。
由于单值在默认情况下会被解析为查询参数,你无需显式添加 Query ,直接编写即可:
1 2 3 4 5 6 7 8 9 10 11 12 13 14 15 16 17 18 19 20 21 22 23 24 25 26 27 28 29 30 from typing import Annotatedfrom fastapi import Body, FastAPIfrom pydantic import BaseModelapp = FastAPI() class Item (BaseModel ): name: str description: str | None = None price: float tax: float | None = None class User (BaseModel ): username: str full_name: str | None = None @app.put("/items/{item_id}" async def update_item ( *, item_id: int , item: Item, user: User, importance: Annotated[int , Body(gt=0 )], q: str | None = None , results = {"item_id" : item_id, "item" : item, "user" : user, "importance" : importance} if q: results.update({"q" : q}) return results
Body 也具备与 Query 、 Path 等后续将学到的参数相同的额外校验和元数据参数。
2.4.5 嵌入单个请求体参数 假设你只有一个来自 Pydantic 模型 Item 的 item 请求体参数。默认情况下, FastAPI 会直接期望获取该模型的内容。
但如果你希望它像声明多个请求体参数时那样,期望一个包含 item 键的 JSON,并将模型内容放在该键内部,可以使用特殊的 Body 参数 embed 。
1 item : Item = Body (embed=True )
embed请求体键 1 2 3 4 5 6 7 8 9 10 11 12 13 14 15 16 17 from typing import Annotatedfrom fastapi import Body, FastAPIfrom pydantic import BaseModelapp = FastAPI() class Item (BaseModel ): name: str description: str | None = None price: float tax: float | None = None @app.put("/items/{item_id}" async def update_item (item_id: int , item: Annotated[Item, Body(embed=True )] ): results = {"item_id" : item_id, "item" : item} return results
1 2 3 4 5 6 7 8 { "item" : { "name" : "Foo" , "description" : "The pretender" , "price" : 42.0 , "tax" : 3.2 } }
而不是:
1 2 3 4 5 6 { "name" : "Foo" , "description" : "The pretender" , "price" : 42.0 , "tax" : 3.2 }
3 声明请求示例数据和使用额外的数据类型 你可以为应用接收的数据声明示例。
3.1 Pydantic 模型中的额外 JSON Schema 数据 你可以为 Pydantic 模型声明 examples ,它们将被添加到生成的 JSON Schema 中。
1 2 3 4 5 6 7 8 9 10 11 12 13 14 15 16 17 18 19 20 21 22 23 24 25 26 27 28 from fastapi import FastAPI from pydantic import BaseModel app = FastAPI() class Item(BaseModel): name: str description: str | None = None price: float tax: float | None = None model_config = { "json_schema_extra": { "examples": [ { "name": "Foo", "description": "A very nice Item", "price": 35.4, "tax": 3.2, } ] } } @app.put("/items/{item_id}") async def update_item(item_id: int, item: Item): results = {"item_id": item_id, "item": item} return results
这些额外信息将原样添加到该模型的 JSON Schema 输出中,并用于 API 文档。
你可以使用 model_config 属性,它接受一个 dict ,详情请参阅 Pydantic 文档:Configuration 。
你可以设置 "json_schema_extra" ,其中包含一个 dict ,该字典包含你希望在生成的 JSON Schema 中显示的任何额外数据,包括 examples 。
你可以使用相同的技术来扩展 JSON Schema 并添加自定义的额外信息。
例如,你可以用它来添加前端用户界面的元数据等。
OpenAPI 3.1.0(自 FastAPI 0.99.0 起使用)增加了对 examples 的支持,这是 JSON Schema 标准的一部分。
在此之前,它仅支持带有单个示例的 example 关键字。OpenAPI 3.1.0 仍然支持该关键字,但它已被弃用且不属于 JSON Schema 标准。因此,建议将 example 迁移到 examples 。 🤓
你可以在本页末尾阅读更多相关内容。
3.2 Field 的额外参数examples 在 Pydantic 模型中使用 Field() 时,也可以声明额外的 examples
1 2 3 4 5 6 7 8 9 10 11 12 13 14 15 from fastapi import FastAPIfrom pydantic import BaseModel, Fieldapp = FastAPI() class Item (BaseModel ): name: str = Field(examples=["Foo" ]) description: str | None = Field(default=None , examples=["A very nice Item" ]) price: float = Field(examples=[35.4 ]) tax: float | None = Field(default=None , examples=[3.2 ]) @app.put("/items/{item_id}" async def update_item (item_id: int , item: Item ): results = {"item_id" : item_id, "item" : item} return results
3.3 JSON Schema 添加示例数据 当使用以下任何一种方式时:
Path()Query()Header()Cookie()Body()Form()File()
你还可以声明一组带有额外信息的 examples ,这些信息将被添加到 OpenAPI 内的 JSON Schema 中。
3.4 带有 examples 的 Body 这里我们传入包含一个 Body() 预期数据示例的 examples
1 2 3 4 5 6 7 8 9 10 11 12 13 14 15 16 17 18 19 20 21 22 23 24 25 26 27 28 29 30 31 32 from typing import Annotatedfrom fastapi import Body, FastAPIfrom pydantic import BaseModelapp = FastAPI() class Item (BaseModel ): name: str description: str | None = None price: float tax: float | None = None @app.put("/items/{item_id}" async def update_item ( item_id: int , item: Annotated[ Item, Body( examples=[ { "name" : "Foo" , "description" : "A very nice Item" , "price" : 35.4 , "tax" : 3.2 , } ], ), ], results = {"item_id" : item_id, "item" : item} return results
文档 UI 中的示例 使用上述任何一种方法,在 /docs 中显示如下
带有多个 examples 的 Body 当然,你也可以传入多个 examplesJSON Schema 的一部分。JSON Schema 中显示多个数据示例。但请阅读下方的解决方法。
3.5 OpenAPI 特有的 examples 在 JSON Schema 支持 examples 之前,OpenAPI 就已经支持另一个也称为 examples 的字段。OpenAPI 特有的 examples 位于 OpenAPI 规范的另一个部分。它位于 每个路径操作(path operation)的详情 中,而不是在每个 JSON Schema 内部。examples 字段已经支持了一段时间。因此,你可以用它来在 文档 UI 中展示 不同的 示例 。examples 字段的结构是一个包含 多个示例 的 dict (而不是 list ),每个示例都有额外的元数据,这些元数据也会被添加到 OpenAPI 中。路径操作 中。
使用 openapi_examples 参数 你可以在 FastAPI的以下对象中通过 openapi_examples 参数为以下内容声明 OpenAPI 特有的 examples :
Path()Query()Header()Cookie()Body()Form()File()
dict 的键用于标识每个示例,每个值是另一个 dict 。
examples 中每个具体的示例 dict 可以包含:
summary :示例的简短描述。description :可以包含 Markdown 文本的详细描述。value :这是实际显示的示例,例如一个 dict 。externalValue : value 的替代方案,指向示例的 URL。不过,可能不如 value 被那么多工具支持。
你可以这样使用它:
1 2 3 4 5 6 7 8 9 10 11 12 13 14 15 16 17 18 19 20 21 22 23 24 25 26 27 28 29 30 31 32 33 34 35 36 37 38 39 40 41 42 43 44 45 46 47 48 49 50 51 52 from typing import Annotatedfrom fastapi import Body, FastAPIfrom pydantic import BaseModelapp = FastAPI() class Item (BaseModel ): name: str description: str | None = None price: float tax: float | None = None @app.put("/items/{item_id}" async def update_item ( *, item_id: int , item: Annotated[ Item, Body( openapi_examples={ "normal" : { "summary" : "A normal example" , "description" : "A **normal** item works correctly." , "value" : { "name" : "Foo" , "description" : "A very nice Item" , "price" : 35.4 , "tax" : 3.2 , }, }, "converted" : { "summary" : "An example with converted data" , "description" : "FastAPI can convert price \`strings\` to actual \`numbers\` automatically" , "value" : { "name" : "Bar" , "price" : "35.4" , }, }, "invalid" : { "summary" : "Invalid data is rejected with an error" , "value" : { "name" : "Baz" , "price" : "thirty five point four" , }, }, }, ), ], results = {"item_id" : item_id, "item" : item} return results
3.6 额外数据类型
数据类型
Python 类型
请求/响应表现形式
备注 / Schema 特性
UUIDuuid.UUIDstr通用唯一识别码,常用作数据库或系统 ID。
datetime.datetimedatetime.datetimeISO 8601 格式字符串 2008-09-15T15:53:00+05:00)
包含日期和时间的完整时间戳。
datetime.datedatetime.dateISO 8601 格式字符串 2008-09-15)
仅表示日期部分。
datetime.timedatetime.timeISO 8601 格式字符串 14:23:55.003)
仅表示时间部分(可含毫秒)。
datetime.timedeltadatetime.timedelta总秒数的 float
也支持 ISO 8601 时间差编码格式。
frozensetfrozenset请求:list → 自动去重转 set list
JSON Schema 中标记 uniqueItems: true,处理方式与 set 一致。
bytesbytesstrJSON Schema 中指定格式为 binary。
Decimaldecimal.Decimalfloat高精度十进制数,序列化时按浮点数处理。
示例 这是一个使用上述某些类型的参数的 路径操作 示例。
1 2 3 4 5 6 7 8 9 10 11 12 13 14 15 16 17 18 19 20 21 22 23 24 25 26 27 from datetime import datetime, time, timedeltafrom typing import Annotated from uuid import UUID from fastapi import Body , FastAPI app = FastAPI () @app.put ("/items/{item_id}" ) async def read_items ( item_id : UUID , start_datetime : Annotated [datetime, Body ()], end_datetime : Annotated [datetime, Body ()], process_after : Annotated [timedelta, Body ()], repeat_at : Annotated [time | None , Body ()] = None , ): start_process = start_datetime + process_after duration = end_datetime - start_process return { "item_id" : item_id, "start_datetime" : start_datetime, "end_datetime" : end_datetime, "process_after" : process_after, "repeat_at" : repeat_at, "start_process" : start_process, "duration" : duration, }
请注意,函数内部的参数拥有其原生的数据类型,例如,你可以执行正常的日期操作,如
1 2 3 4 5 6 7 8 9 10 11 12 13 14 15 16 17 18 19 20 21 22 23 24 25 26 27 from datetime import datetime, time, timedeltafrom typing import Annotatedfrom uuid import UUIDfrom fastapi import Body, FastAPIapp = FastAPI() @app.put("/items/{item_id}" async def read_items ( item_id: UUID, start_datetime: Annotated[datetime, Body( end_datetime: Annotated[datetime, Body( process_after: Annotated[timedelta, Body( repeat_at: Annotated[time | None , Body(None , start_process = start_datetime + process_after duration = end_datetime - start_process return { "item_id" : item_id, "start_datetime" : start_datetime, "end_datetime" : end_datetime, "process_after" : process_after, "repeat_at" : repeat_at, "start_process" : start_process, "duration" : duration, }
4.1 Cookie参数 定义 Cookie 参数的方式与定义 Query 和 Path 参数相同。
4.1.1 导入 Cookie 首先导入 Cookie
1 2 3 4 5 6 7 8 9 from typing import Annotated from fastapi import Cookie , FastAPI app = FastAPI () @app.get ("/items/" ) async def read_items (ads_id : Annotated [str | None , Cookie ()] = None ): return {"ads_id" : ads_id}
4.1.2 声明 Cookie 参数 你可以定义默认值以及所有额外的验证或注解参数。
1
2
3
4
5
6
7
8
9
from typing import Annotatedfrom fastapi import Cookie, FastAPIapp = FastAPI() @app.get("/items/" async def read_items (ads_id: Annotated[str | None , Cookie(None ): return {"ads_id" : ads_id}
Cookie 是 Path 和 Query 的“姊妹”类。它也继承自同一个通用的 Param 类。
但请记住,当你从 fastapi 导入 Query 、 Path 、 Cookie 等内容时,它们实际上是返回特殊类的函数。
请注意,由于 浏览器处理 cookie 的方式非常特殊且在后台运行,它们 不会 轻易允许 JavaScript 修改 cookie。
如果你访问 /docs 的 API 文档 UI ,将能够看到 路径操作 中关于 cookie 的 文档 。填写了数据 并点击“Execute”,由于文档 UI 是通过 JavaScript 运行的,这些 cookie 也不会被发送。你会看到一条 错误 提示,就好像你没有填写任何值一样。
自 FastAPI 版本 0.115.0 起支持此功能。🤓
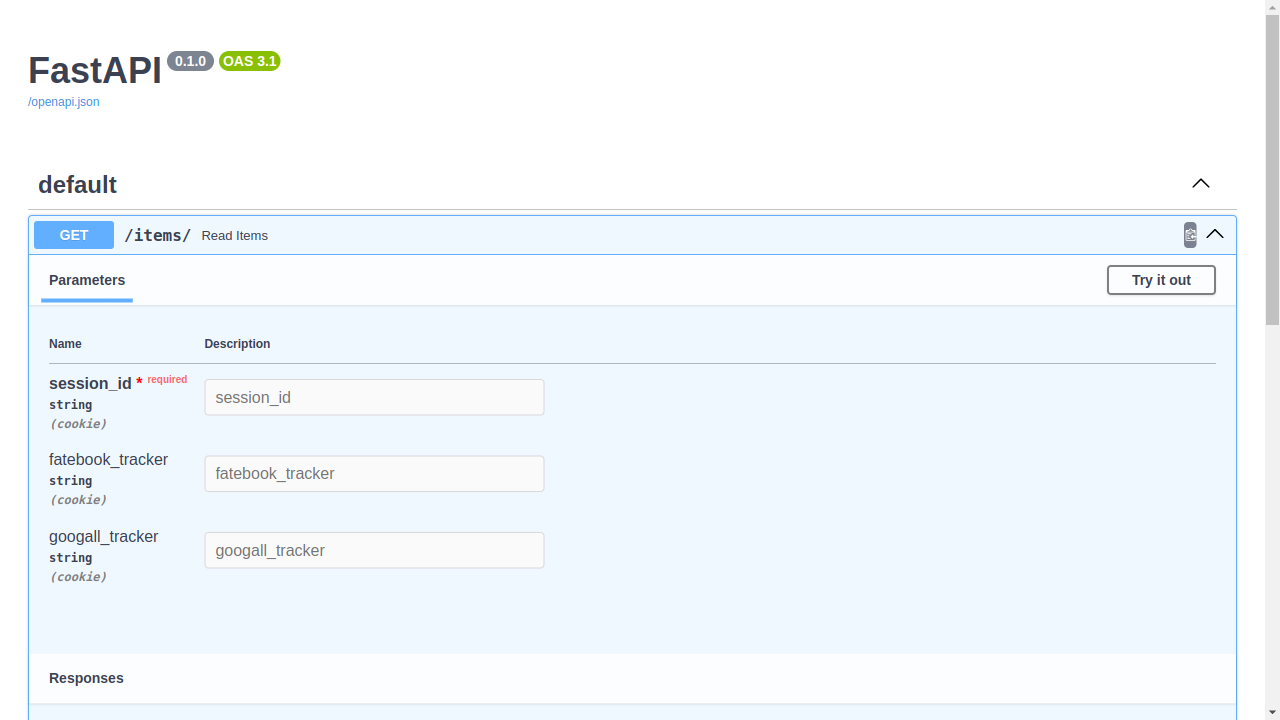
4.1.3 带有 Pydantic 模型的 Cookie 在 Pydantic 模型中声明所需的 cookie 参数,然后将参数声明为 Cookie :
1 2 3 4 5 6 7 8 9 10 11 12 13 14 15 from typing import Annotated from fastapi import Cookie , FastAPI from pydantic import BaseModel app = FastAPI () class Cookies (BaseModel ): session_id : str fatebook_tracker : str | None = None googall_tracker : str | None = None @app.get ("/items/" ) async def read_items (cookies : Annotated [Cookies , Cookie ()]): return cookies
🤓 Other versions and variants
Prefer to use the Annotated version if possible.
1 2 3 4 5 6 7 8 9 10 11 12 13 from fastapi import Cookie , FastAPI from pydantic import BaseModel app = FastAPI () class Cookies (BaseModel ): session_id : str fatebook_tracker : str | None = None googall_tracker : str | None = None @app.get ("/items/" ) async def read_items (cookies : Cookies = Cookie ()): return cookies
FastAPI 将从请求中接收到的 cookie 中 提取 出 每个字段 的数据,并提供您定义的 Pydantic 模型。
查看文档 您可以在文档 UI 的 /docs 中查看定义的 cookie:
请记住,由于 浏览器 以特殊方式 处理 cookie ,并在后台进行操作,因此它们 不会 轻易允许 JavaScript 访问这些 cookie。
如果您访问 /docs 的 API 文档 UI ,您将能够查看您 路径操作 的 cookie 文档 。
但是即使您 填写数据 并点击“执行”,由于文档界面使用 JavaScript ,cookie 将不会被发送。而您会看到一条 错误 消息,就好像您没有输入任何值一样。
4.1.5禁止额外的 Cookie 在某些特殊使用情况下(可能并不常见),您可能希望 限制 您想要接收的 cookie。forbid )任何额外( extra )字段:额外的 cookie ,他们将收到 错误 响应。
例如,如果客户端尝试发送一个值为 good-list-please 的 santa_tracker cookie,客户端将收到一个 错误 响应,告知他们 santa_tracker cookie 是不允许的 :
1 2 3 4 5 6 7 8 9 10 { "detail" : [ { "type" : "extra_forbidden" , "loc" : ["cookie" , "santa_tracker" ], "msg" : "Extra inputs are not permitted" , "input" : "good-list-please" , } ] }
首先,导入 Header :
1 2 3 4 5 6 7 8 9 from typing import Annotated from fastapi import FastAPI , Header app = FastAPI () @app.get ("/items/" ) async def read_items (user_agent : Annotated [str | None , Header ()] = None ): return {"User-Agent" : user_agent}
然后,使用和 Path 、 Query 、 Cookie 一样的结构定义 header 参数。
1 2 3 4 5 6 7 8 9 from typing import Annotated from fastapi import FastAPI , Header app = FastAPI () @app.get ("/items/" ) async def read_items (user_agent : Annotated [str | None , Header ()] = None ): return {"User-Agent" : user_agent}
Header 是 Path 、 Query 、 Cookie 的 兄弟类 ,都继承自共用的 Param 类。
注意,从 fastapi 导入的 Query 、 Path 、 Header 等对象,实际上是返回特殊类的函数。
4.2.2 自动转换 Header 比 Path 、 Query 和 Cookie 提供了更多功能。大部分标准请求头用 连字符 分隔,即 减号 ( - )。但是 user-agent 这样的变量在 Python 中是无效的。因此,默认情况下, Header 把参数名中的字符由下划线( _ )改为连字符( - )来提取并存档请求头 。
同时,HTTP 的请求头不区分大小写,可以使用 Python 标准样式(即 snake_case )进行声明。因此,可以像在 Python 代码中一样使用 user_agent ,无需把首字母大写为 User_Agent 等形式。
如需禁用下划线自动转换为连字符,可以把 Header 的 convert_underscores 参数设置为 False :
1 2 3 4 5 6 7 8 9 10 11 from typing import Annotated from fastapi import FastAPI , Header app = FastAPI () @app.get ("/items/" ) async def read_items ( strange_header : Annotated [str | None , Header (convert_underscores=False )] = None , ): return {"strange_header" : strange_header}
4.2.3 重复的请求头 有时,可能需要接收重复的请求头。即同一个请求头有多个值。类型声明中可以使用 list 定义多个请求头。使用 Python list 可以接收重复请求头所有的值。X-Token 多次出现的请求头,可以写成这样:
1 2 3 4 5 6 7 8 9 from typing import Annotated from fastapi import FastAPI , Header app = FastAPI () @app.get ("/items/" ) async def read_items (x_token : Annotated [list[str] | None , Header ()] = None ): return {"X-Token values" : x_token}
与 路径操作 通信时,以下面的方式发送两个 HTTP 请求头:
1 2 X-Token : foo X-Token : bar
响应结果是:
1 2 3 4 5 6 { "X-Token values" : [ "bar" , "foo" ] }
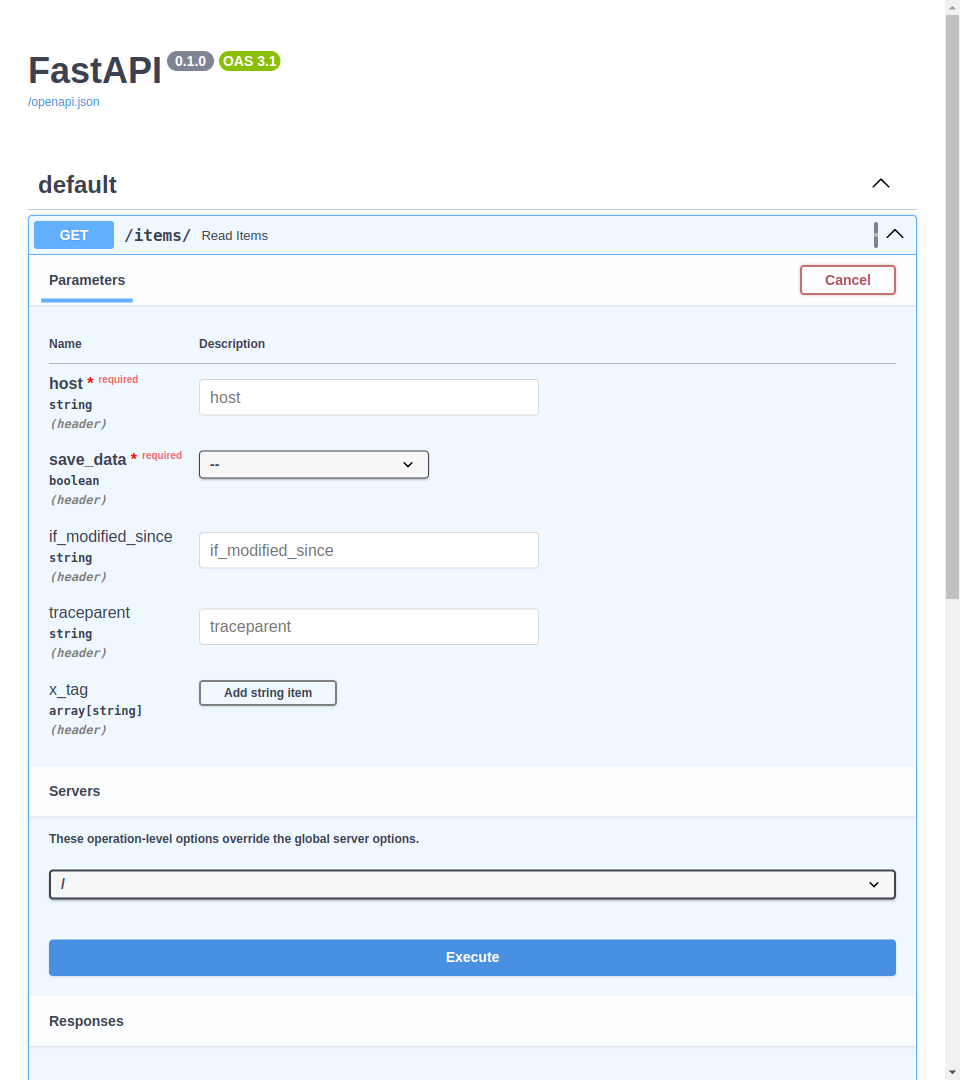
在 Pydantic 模型 中声明所需的 header 参数 ,然后将参数声明为 Header:
1 2 3 4 5 6 7 8 9 10 11 12 13 14 15 16 17 from typing import Annotated from fastapi import FastAPI , Header from pydantic import BaseModel app = FastAPI () class CommonHeaders (BaseModel ): host : str save_data : bool if_modified_since : str | None = None traceparent : str | None = None x_tag : list[str] = [] @app.get ("/items/" ) async def read_items (headers : Annotated [CommonHeaders , Header ()]): return headers
FastAPI 将从请求中接收到的 headers 中 提取 出 每个字段 的数据,并提供您定义的 Pydantic 模型。
查看文档 您可以在文档 UI 的 /docs 中查看所需的 headers:
在某些特殊使用情况下(可能并不常见),您可能希望 限制 您想要接收的 headers。您可以使用 Pydantic 的模型配置来禁止( forbid )任何额外( extra )字段:
1 2 3 4 5 6 7 8 9 10 11 12 13 14 15 16 17 18 19 from typing import Annotated from fastapi import FastAPI , Header from pydantic import BaseModel app = FastAPI () class CommonHeaders (BaseModel ): model_config = {"extra" : "forbid" } host : str save_data : bool if_modified_since : str | None = None traceparent : str | None = None x_tag : list[str] = [] @app.get ("/items/" ) async def read_items (headers : Annotated [CommonHeaders , Header ()]): return headers
如果客户尝试发送一些 额外的 headers ,他们将收到 错误 响应。
例如,如果客户端尝试发送一个值为 plumbus 的 tool header,客户端将收到一个 错误 响应,告知他们 header 参数 tool 是不允许的:
1 2 3 4 5 6 7 8 9 10 { "detail" : [ { "type" : "extra_forbidden" , "loc" : ["header" , "tool" ], "msg" : "Extra inputs are not permitted" , "input" : "plumbus" , } ] }
4.2.6 禁用下划线转换 与常规的 header 参数相同,当参数名中包含下划线时,会 自动转换为连字符 。例如,如果你的代码中有一个名为 save_data 的 header 参数,那么预期的 HTTP 头将是 save-data ,并且在文档中也会以这种形式显示。
如果由于某些原因你需要禁用这种自动转换,你也可以在用于 header 参数的 Pydantic 模型中进行设置。
1 2 3 4 5 6 7 8 9 10 11 12 13 14 15 16 17 18 19 from typing import Annotated from fastapi import FastAPI , Header from pydantic import BaseModel app = FastAPI () class CommonHeaders (BaseModel ): host : str save_data : bool if_modified_since : str | None = None traceparent : str | None = None x_tag : list[str] = [] @app.get ("/items/" ) async def read_items ( headers : Annotated [CommonHeaders , Header (convert_underscores=False )], ): return headers
在将 convert_underscores 设为 False 之前,请注意某些 HTTP 代理和服务器不允许使用带下划线的 headers。
5 response 和 request对象 5.1 请求处理方法返回的类型注解和装饰器中的类型声明 你可以通过为 路径操作函数 的 返回类型 添加注解来声明用于响应的类型。和为输入数据在函数 参数 里做类型注解的方式相同,你可以使用 Pydantic 模型、 list 、 dict 、以及整数、布尔值等标量类型。
1 2 3 4 5 6 7 8 9 10 11 12 13 14 15 16 17 18 19 20 21 22 from fastapi import FastAPI from pydantic import BaseModel app = FastAPI () class Item (BaseModel ): name : str description : str | None = None price : float tax : float | None = None tags : list[str] = [] @app.post ("/items/" ) async def create_item (item : Item ) -> Item : return item @app.get ("/items/" ) async def read_items () -> list[Item ]: return [ Item (name="Portal Gun" , price=42.0 ), Item (name="Plumbus" , price=32.0 ), ]
FastAPI 会使用这个返回类型来:
对返回数据进行 校验 。
如果数据无效(例如缺少某个字段),这意味着你的应用代码有问题,没有返回应有的数据,FastAPI 将返回服务器错误而不是返回错误的数据。这样你和你的客户端都可以确定会收到期望的数据及其结构。
在 OpenAPI 的 路径操作 中为响应添加 JSON Schema 。
它会被 自动文档 使用。
它也会被自动客户端代码生成工具使用。
使用 Pydantic 将返回数据 序列化 为 JSON。Pydantic 使用 Rust 编写,因此会 快很多 。
但更重要的是:
它会将输出数据 限制并过滤 为返回类型中定义的内容。
这对 安全性 尤为重要,下面会进一步介绍。
5.1.2 response_model 参数 在一些情况下,你需要或希望返回的数据与声明的类型不完全一致。例如,你可能希望 返回一个字典 或数据库对象,但 将其声明为一个 Pydantic 模型 。这样 Pydantic 模型就会为你返回的对象(例如字典或数据库对象)完成文档、校验等工作。
如果你添加了返回类型注解,工具和编辑器会(正确地)报错,提示你的函数返回的类型(例如 dict )与声明的类型(例如一个 Pydantic 模型)不同。在这些情况下,你可以使用 路径操作装饰器 参数 response_model ,而不是返回类型。
你可以在任意 路径操作 中使用 response_model 参数:
@app.get()@app.post()@app.put()@app.delete()等等。
1 2 3 4 5 6 7 8 9 10 11 12 13 14 15 16 17 18 19 20 21 22 23 24 from typing import Any from fastapi import FastAPI from pydantic import BaseModel app = FastAPI () class Item (BaseModel ): name : str description : str | None = None price : float tax : float | None = None tags : list[str] = [] @app.post ("/items/" , response_model=Item ) async def create_item (item : Item ) -> Any : return item @app.get ("/items/" , response_model=list[Item ]) async def read_items () -> Any : return [ {"name" : "Portal Gun" , "price" : 42.0 }, {"name" : "Plumbus" , "price" : 32.0 }, ]
注意, response_model 是「装饰器」方法( get 、 post 等)的一个参数。不是你的 路径操作函数 的参数,不像所有查询参数和请求体那样。
response_model 接收的类型与为 Pydantic 模型字段声明的类型相同,因此它可以是一个 Pydantic 模型,也可以是一个由 Pydantic 模型组成的 list ,例如 List[Item] 。
FastAPI 会使用这个 response_model 来完成数据文档、校验等,并且还会将输出数据 转换并过滤 为其类型声明。
如果你的编辑器、mypy 等进行严格类型检查,你可以将函数返回类型声明为 Any 。
这样你告诉编辑器你是有意返回任意类型。但 FastAPI 仍会使用 response_model 做数据文档、校验、过滤等工作。
5.1.3 response_model 的优先级和对返回数据字段的自动过滤 如果你同时声明了返回类型和 response_model , response_model 会具有优先级并由 FastAPI 使用。
这样,即使你返回的类型与响应模型不同,你也可以为函数添加正确的类型注解,供编辑器和 mypy 等工具使用。同时你仍然可以让 FastAPI 使用 response_model 进行数据校验、文档等。
你也可以使用 response_model=None 来禁用该 路径操作 的响应模型生成;当你为一些不是有效 Pydantic 字段的东西添加类型注解时,可能需要这样做,下面的章节会有示例。
返回与输入相同的数据 这里我们声明一个 UserIn 模型,它包含一个明文密码:
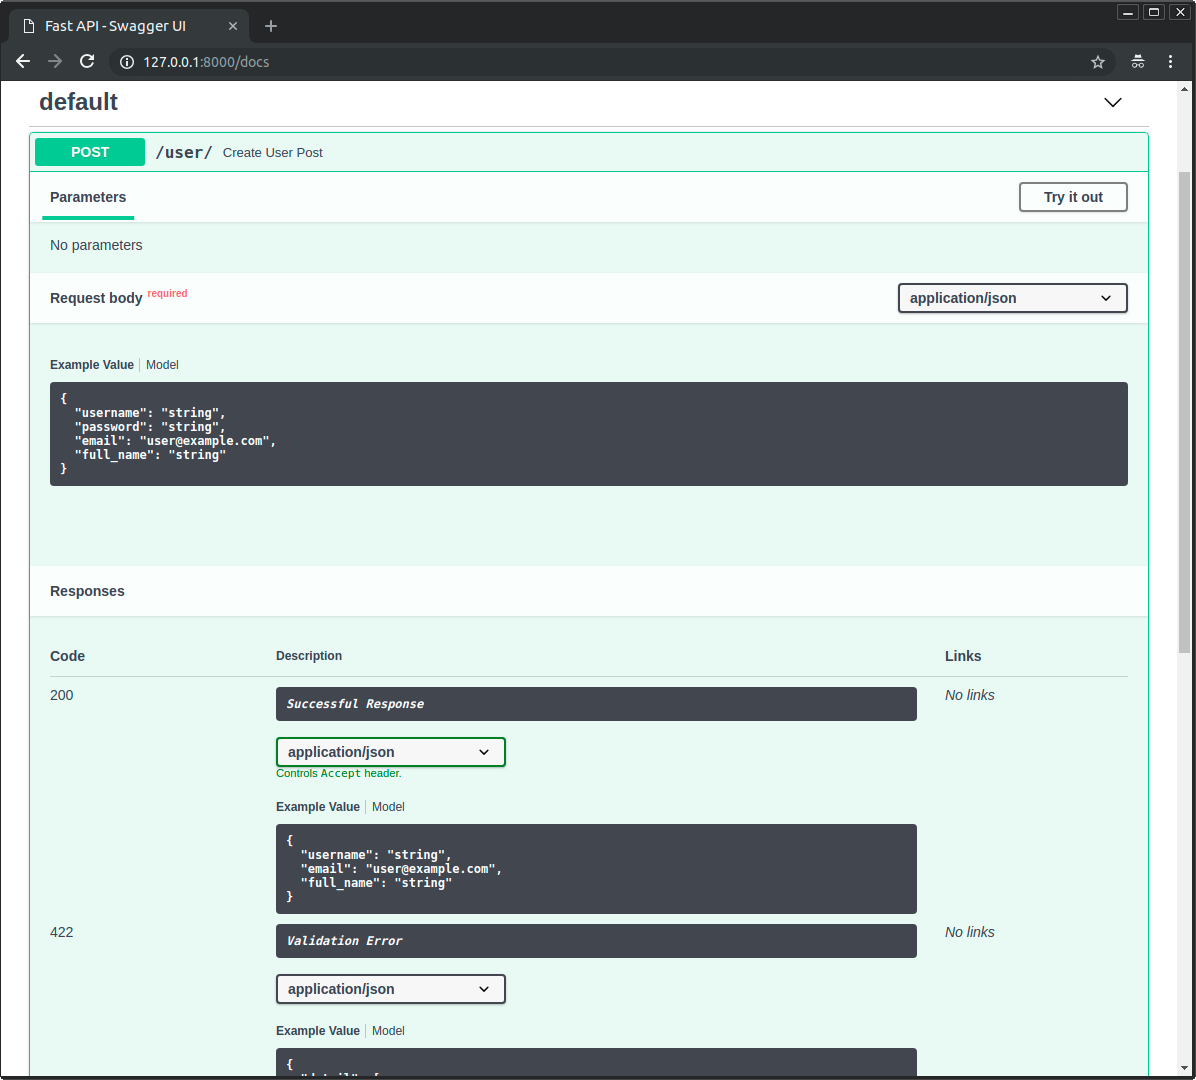
1 2 3 4 5 6 7 8 9 10 11 12 13 14 15 from fastapi import FastAPI from pydantic import BaseModel , EmailStr app = FastAPI () class UserIn (BaseModel ): username : str password : str email : EmailStr full_name : str | None = None # Don 't do this in production! @app.post("/user/") async def create_user(user: UserIn) -> UserIn: return user
请先创建并激活一个 虚拟环境 ,然后安装,例如:
1 $ pip install email-validator
或者:
1 $ pip install "pydantic[email]"
我们使用这个模型来声明输入,同时也用相同的模型来声明输出:
1 2 3 4 5 6 7 8 9 10 11 12 13 14 15 from fastapi import FastAPI from pydantic import BaseModel , EmailStr app = FastAPI () class UserIn (BaseModel ): username : str password : str email : EmailStr full_name : str | None = None # Don 't do this in production! @app.post("/user/") async def create_user(user: UserIn) -> UserIn: return user
现在,每当浏览器使用密码创建用户时,API 会在响应中返回相同的密码。在这个场景下,这可能不算问题,因为发送密码的是同一个用户。但如果我们在其他 路径操作 中使用相同的模型,就可能会把用户的密码发送给每个客户端。
除非你非常清楚所有注意事项并确实知道自己在做什么,否则永远不要存储用户的明文密码,也不要像这样在响应中发送它。
添加输出模型 相反,我们可以创建一个包含明文密码的输入模型和一个不包含它的输出模型:
1 2 3 4 5 6 7 8 9 10 11 12 13 14 15 16 17 18 19 20 21 from typing import Any from fastapi import FastAPI from pydantic import BaseModel , EmailStr app = FastAPI () class UserIn (BaseModel ): username : str password : str email : EmailStr full_name : str | None = None class UserOut (BaseModel ): username : str email : EmailStr full_name : str | None = None @app.post ("/user/" , response_model=UserOut ) async def create_user (user : UserIn ) -> Any : return user
这里,即使我们的 路径操作函数 返回的是包含密码的同一个输入用户:
1 2 3 4 5 6 7 8 9 10 11 12 13 14 15 16 17 18 19 20 21 from typing import Any from fastapi import FastAPI from pydantic import BaseModel , EmailStr app = FastAPI () class UserIn (BaseModel ): username : str password : str email : EmailStr full_name : str | None = None class UserOut (BaseModel ): username : str email : EmailStr full_name : str | None = None @app.post ("/user/" , response_model=UserOut ) async def create_user (user : UserIn ) -> Any : return user
……我们仍将 response_model 声明为不包含密码的 UserOut 模型:
1 2 3 4 5 6 7 8 9 10 11 12 13 14 15 16 17 18 19 20 21 from typing import Any from fastapi import FastAPI from pydantic import BaseModel , EmailStr app = FastAPI () class UserIn (BaseModel ): username : str password : str email : EmailStr full_name : str | None = None class UserOut (BaseModel ): username : str email : EmailStr full_name : str | None = None @app.post ("/user/" , response_model=UserOut ) async def create_user (user : UserIn ) -> Any : return user
因此, FastAPI 会负责过滤掉输出模型中未声明的所有数据(使用 Pydantic)。
5.1.4 返回类型与数据过滤 延续上一个例子。我们希望 用一种类型来注解函数 ,但希望从函数返回的内容实际上可以 包含更多数据 。过滤 数据。这样即使函数返回了更多数据,响应也只会包含响应模型中声明的字段。response_model 参数。但这也意味着我们无法从编辑器和工具处获得对函数返回类型的检查支持。过滤/移除 一部分数据。类型注解 获取更好的编辑器和工具支持,又能获得 FastAPI 的 数据过滤 。
1 2 3 4 5 6 7 8 9 10 11 12 13 14 15 16 from fastapi import FastAPI from pydantic import BaseModel , EmailStr app = FastAPI () class BaseUser (BaseModel ): username : str email : EmailStr full_name : str | None = None class UserIn (BaseUser ): password : str @app.post ("/user/" ) async def create_user (user : UserIn ) -> BaseUser : return user
这样一来,我们既能从编辑器和 mypy 获得工具支持(这段代码在类型上是正确的),也能从 FastAPI 获得数据过滤。
这是如何做到的?我们来看看。🤓
类型注解与工具链 先看看编辑器、mypy 和其他工具会如何看待它。
BaseUser 有基础字段。然后 UserIn 继承自 BaseUser 并新增了 password 字段,因此它包含了两个模型的全部字段。BaseUser ,但实际上返回的是一个 UserIn 实例。UserIn 是 BaseUser 的子类,这意味着当期望 BaseUser 时,返回 UserIn 是 合法 的。
FastAPI 的数据过滤 对于 FastAPI,它会查看返回类型并确保你返回的内容 只 包含该类型中声明的字段。工具支持 的类型注解和 数据过滤 。
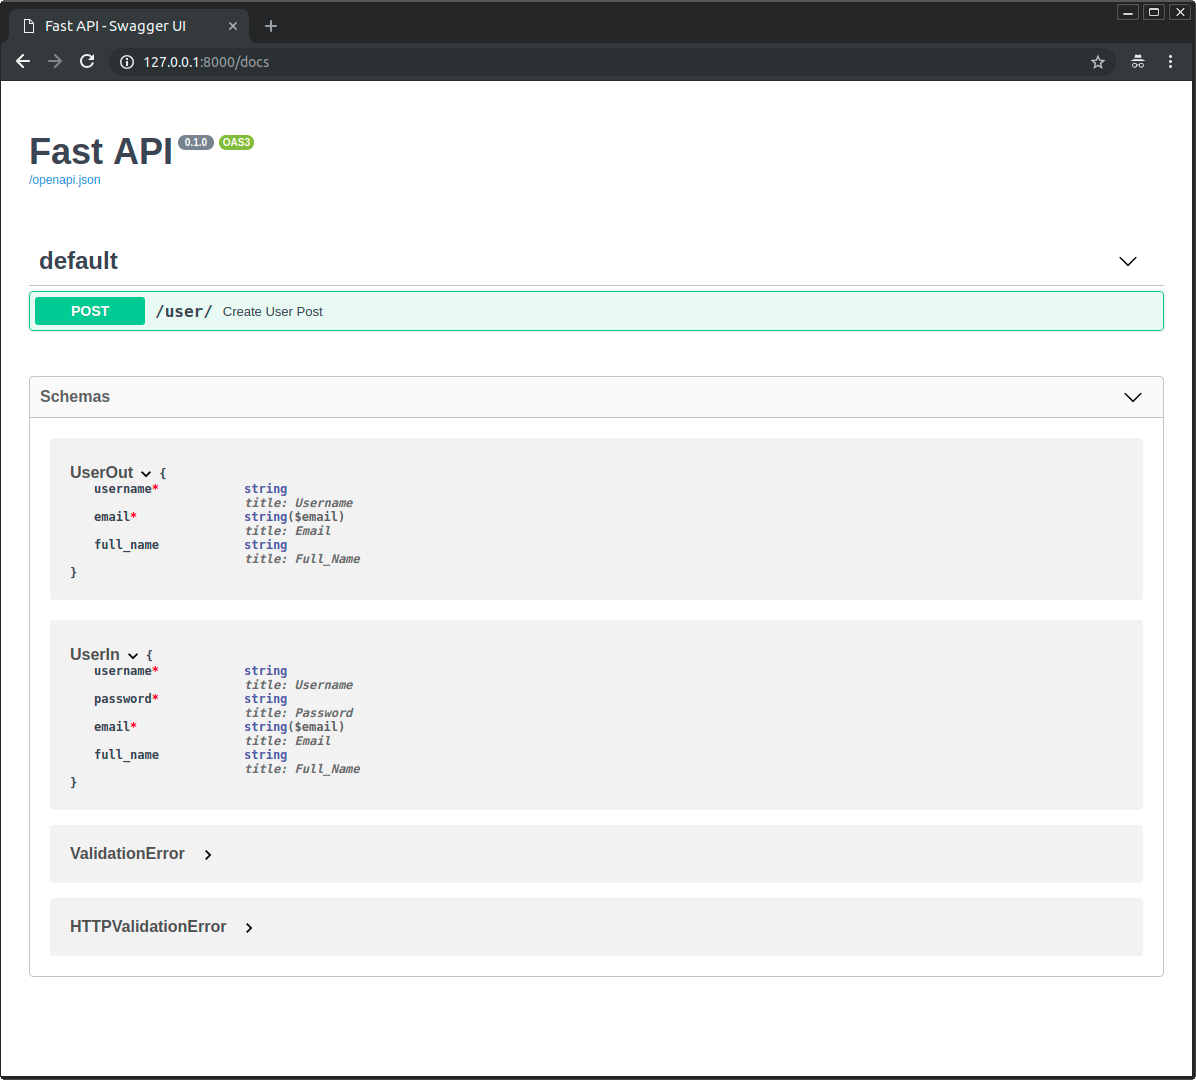
在文档中查看 当你查看自动文档时,你会看到输入模型和输出模型都会有各自的 JSON Schema:
并且两个模型都会用于交互式 API 文档:
有些情况下你会返回一些不是有效 Pydantic 字段的内容,并在函数上做了相应注解,只是为了获得工具链(编辑器、mypy 等)的支持。
5.1.5 禁用响应模型 延续上面的例子,你可能不想要 FastAPI 执行默认的数据校验、文档、过滤等。
但你可能仍然想在函数上保留返回类型注解,以获得编辑器和类型检查器(如 mypy)的支持。
在这种情况下,你可以通过设置 response_model=None 来禁用响应模型生成:
1 2 3 4 5 6 7 8 9 10 from fastapi import FastAPI , Response from fastapi.responses import RedirectResponse app = FastAPI () @app.get ("/portal" , response_model=None ) async def get_portal (teleport : bool = False ) -> Response | dict : if teleport : return RedirectResponse (url="https://www.youtube.com/watch?v=dQw4w9WgXcQ" ) return {"message" : "Here's your interdimensional portal." }
这会让 FastAPI 跳过响应模型的生成,这样你就可以按需使用任意返回类型注解,而不会影响你的 FastAPI 应用。🤓
5.1.6 无效的返回类型注解 但当你返回其他任意对象(如数据库对象)而它不是有效的 Pydantic 类型,并在函数中按此进行了注解时,FastAPI 会尝试基于该类型注解创建一个 Pydantic 响应模型,但会失败。
如果你有一个在多个类型之间的 联合类型 ,其中一个或多个不是有效的 Pydantic 类型,也会发生同样的情况,例如这个会失败 :
1 2 3 4 5 6 7 8 9 10 from fastapi import FastAPI , Response from fastapi.responses import RedirectResponse app = FastAPI () @app.get ("/portal" ) async def get_portal (teleport : bool = False ) -> Response | dict : if teleport : return RedirectResponse (url="https://www.youtube.com/watch?v=dQw4w9WgXcQ" ) return {"message" : "Here's your interdimensional portal." }
……它失败是因为该类型注解不是 Pydantic 类型,也不只是单个 Response 类或其子类,而是 Response 与 dict 的联合类型(任意其一)。但是,可以用response_model指定返回的pydantic类型
响应模型的编码参数 你的响应模型可以具有默认值,例如:
1 2 3 4 5 6 7 8 9 10 11 12 13 14 15 16 17 18 19 20 21 from fastapi import FastAPI from pydantic import BaseModel app = FastAPI () class Item (BaseModel ): name : str description : str | None = None price : float tax : float = 10.5 tags : list[str] = [] items = { "foo" : {"name" : "Foo" , "price" : 50.2 }, "bar" : {"name" : "Bar" , "description" : "The bartenders" , "price" : 62 , "tax" : 20.2 }, "baz" : {"name" : "Baz" , "description" : None , "price" : 50.2 , "tax" : 10.5 , "tags" : []}, } @app.get ("/items/{item_id}" , response_model=Item , response_model_exclude_unset=True ) async def read_item (item_id : str): return items[item_id]
description: Union[str, None] = None (或在 Python 3.10 中的 str | None = None )默认值为 None 。tax: float = 10.5 默认值为 10.5 。tags: List[str] = [] 默认值为一个空列表: [] 。
但如果它们并没有被实际存储,你可能希望在结果中省略这些默认值。例如,当你在 NoSQL 数据库中保存了具有许多可选属性的模型,但又不想发送充满默认值的冗长 JSON 响应。
5.1.7 使用 response_model_exclude_unset 参数 你可以设置 路径操作装饰器 参数 response_model_exclude_unset=True :
1 2 3 4 5 6 7 8 9 10 11 12 13 14 15 16 17 18 19 20 21 from fastapi import FastAPI from pydantic import BaseModel app = FastAPI () class Item (BaseModel ): name : str description : str | None = None price : float tax : float = 10.5 tags : list[str] = [] items = { "foo" : {"name" : "Foo" , "price" : 50.2 }, "bar" : {"name" : "Bar" , "description" : "The bartenders" , "price" : 62 , "tax" : 20.2 }, "baz" : {"name" : "Baz" , "description" : None , "price" : 50.2 , "tax" : 10.5 , "tags" : []}, } @app.get ("/items/{item_id}" , response_model=Item , response_model_exclude_unset=True ) async def read_item (item_id : str): return items[item_id]
这样响应中将不会包含那些默认值,而只包含实际设置的值。因此,如果你向该 路径操作 请求 ID 为 foo 的商品,响应(不包括默认值)将为:
1 2 3 4 { "name" : "Foo" , "price" : 50.2 }
response_model_exclude_defaults=Trueresponse_model_exclude_none=True
详见 Pydantic 文档 中对 exclude_defaults 和 exclude_none 的说明。
默认字段有实际值的数据 但是,如果你的数据在具有默认值的模型字段中有实际的值,例如 ID 为 bar 的项:
响应 1 2 3 4 5 6 { "name" : "Bar" , "description" : "The bartenders" , "price" : 62 , "tax" : 20.2 }
具有与默认值相同值的数据 如果数据具有与默认值相同的值,例如 ID 为 baz 的项:
1 2 3 4 5 6 7 { "name" : "Baz" , "description" : None , "price" : 50.2 , "tax" : 10.5 , "tags" : [] }
FastAPI 足够聪明(实际上是 Pydantic 足够聪明)去认识到,即使 description 、 tax 和 tags 的值与默认值相同,它们也是被显式设置的(而不是取自默认值)。
因此,它们将包含在 JSON 响应中。
请注意默认值可以是任何值,而不仅是 None 。[] )、值为 10.5 的 float ,等等。
response_model_include 和 response_model_exclude 你还可以使用 路径操作装饰器 的 response_model_include 和 response_model_exclude 参数。
它们接收一个由属性名 str 组成的 set ,用于包含(忽略其他)或排除(包含其他)这些属性。
但仍然推荐使用上面的思路,使用多个类,而不是这些参数。
因为即使你使用 response_model_include 或 response_model_exclude 省略了一些属性,你的应用在 OpenAPI(和文档)中生成的 JSON Schema 仍然会是完整模型。
这同样适用于类似的 response_model_by_alias 。
1 2 3 4 5 6 7 8 9 10 11 12 13 14 15 16 17 18 19 20 21 22 23 24 25 26 27 28 29 30 31 32 33 34 35 from fastapi import FastAPI from pydantic import BaseModel app = FastAPI () class Item (BaseModel ): name : str description : str | None = None price : float tax : float = 10.5 items = { "foo" : {"name" : "Foo" , "price" : 50.2 }, "bar" : {"name" : "Bar" , "description" : "The Bar fighters" , "price" : 62 , "tax" : 20.2 }, "baz" : { "name" : "Baz" , "description" : "There goes my baz" , "price" : 50.2 , "tax" : 10.5 , }, } @app.get ( "/items/{item_id}/name" , response_model=Item , response_model_include={"name" , "description" }, 或者可以使用 response_model_include['name' , 'description' ] 底层都是转化为set ) async def read_item_name (item_id : str): return items[item_id] @app.get ("/items/{item_id}/public" , response_model=Item , response_model_exclude={"tax" }) async def read_item_public_data (item_id : str): return items[item_id]
5.1.8 注解中声明响应状态码
状态码范围
类别
说明
常见示例与备注
100 - 199 信息 (Informational)
用于返回“信息”。这类状态码很少直接使用。注意 :具有这些状态码的响应不能包含响应体。
-
200 - 299 成功 (Success)
用于表示“成功”。这些是最常用的状态码。
- 200 OK : 默认状态码,表示一切正常。- 201 Created : 表示“已创建”,通常在数据库创建新记录后使用。- 204 No Content : 特殊状态码,表示“无内容”,响应中不包含响应体。
300 - 399 重定向 (Redirection)
用于“重定向”。注意 :响应不一定包含响应体,但 304 例外(不得包含)。
- 304 Not Modified : “未修改”,该响应不得包含响应体。
400 - 499 客户端错误 (Client Error)
用于表示“客户端错误”。通常是第二常用的类型。
- 400 Bad Request : 用于来自客户端的一般错误。- 404 Not Found : 用于“未找到”资源。
500 - 599 服务器错误 (Server Error)
用于表示服务器端错误。注意 :几乎不会直接使用,通常由应用代码或服务器问题自动触发。
-
与指定响应模型的方式相同,在以下任意 路径操作 中,可以使用 status_code 参数声明用于响应的 HTTP 状态码:
@app.get()@app.post()@app.put()@app.delete()等…
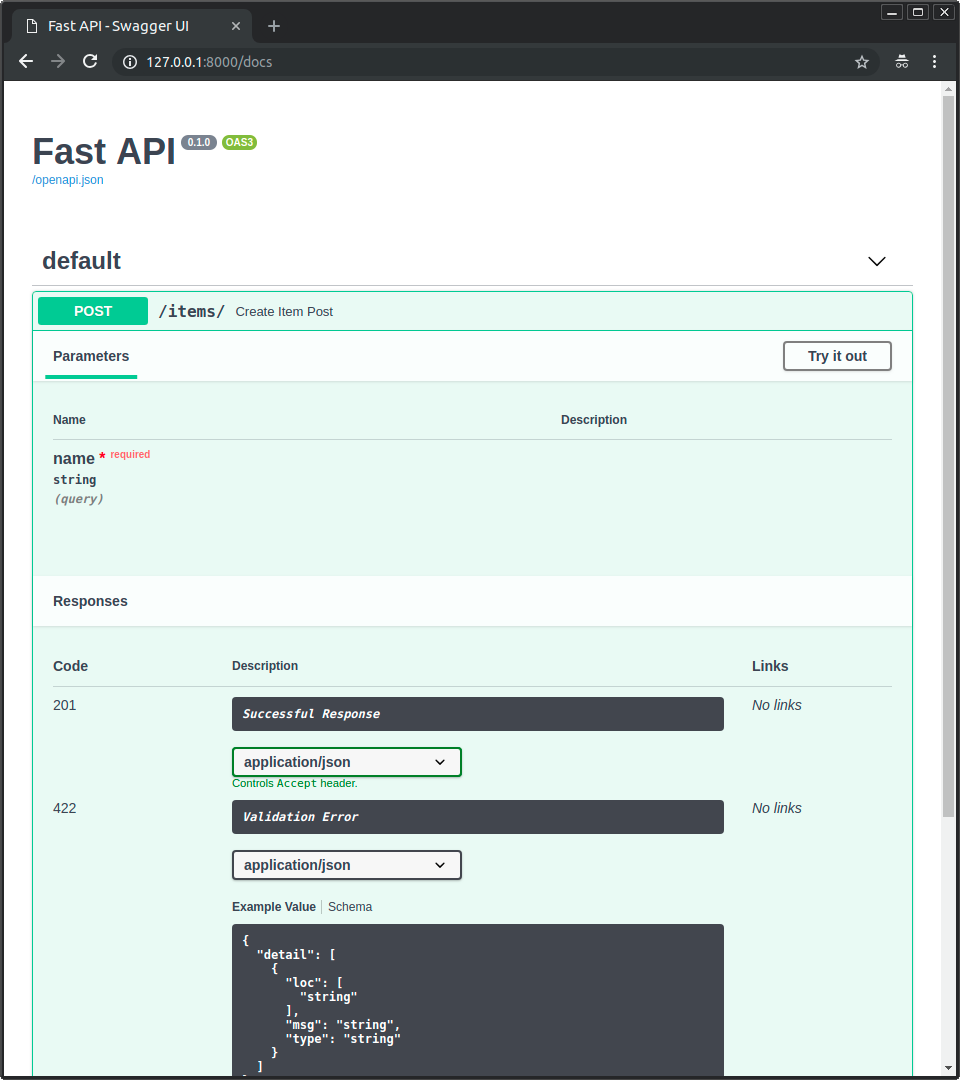
1 2 3 4 5 6 7 from fastapi import FastAPI app = FastAPI () @app.post ("/items/" , status_code=201 ) async def create_item (name : str): return {"name" : name}
注意, status_code 是( get 、 post 等) 装饰器 方法中的参数。与之前的参数和请求体不同,不是 路径操作函数 的参数。
status_code 参数接收表示 HTTP 状态码的数字。
它可以:
在响应中返回状态码
在 OpenAPI 概图(及用户界面)中存档:
FastAPI 可以进行识别,并生成表明无响应体的 OpenAPI 文档。
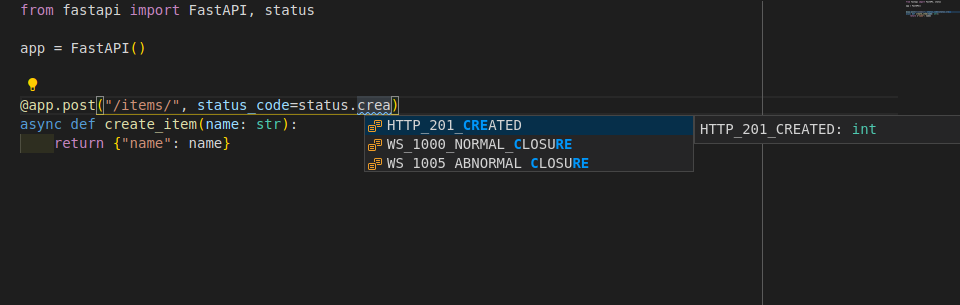
状态码名称快捷方式 1 2 3 4 5 6 7 from fastapi import FastAPI , statusapp = FastAPI () @app.post ("/items/" , status_code=status.HTTP_201_CREATED ) async def create_item (name : str): return {"name" : name}
这只是一种快捷方式,具有相同的数字代码,但它可以使用编辑器的自动补全功能:
也可以使用 from starlette import status 。
为了让开发者更方便, FastAPI 提供了与 starlette.status 完全相同的 fastapi.status 。但它直接来自于 Starlette。
5.2 返回Response 对象 5.2.1 直接返回 Response和其子类 最常见的情况是 直接返回 Response,详见进阶文档 。
1 2 3 4 5 6 7 8 9 10 11 12 13 14 15 16 17 18 from fastapi import FastAPI , Response from fastapi.responses import JSON Response, RedirectResponse app = FastAPI () @app.get ("/portal" ) async def get_portal (teleport : bool = False ) -> Response : if teleport : return RedirectResponse (url="https://www.youtube.com/watch?v=dQw4w9WgXcQ" ) return JSON Response(content={"message" : "Here's your interdimensional portal." }) from fastapi import FastAPI from fastapi.responses import RedirectResponse app = FastAPI () @app.get ("/teleport" ) async def get_teleport () -> RedirectResponse : return RedirectResponse (url="https://www.youtube.com/watch?v=dQw4w9WgXcQ" )
这个简单场景 FastAPI 会自动处理,因为返回类型注解是 Response (或其子类)。工具也会满意,因为 RedirectResponse 和 JSONResponse 都是 Response 的子类,所以类型注解是正确的。
使用jsonable_encoder 转化dict到JsonResponse 当你创建一个 FastAPI 路径操作 时,你可以正常返回以下任意一种数据: dict , list ,Pydantic 模型,数据库模型等等。
如果你声明了 响应模型 ,FastAPI 会使用它通过 Pydantic 将数据序列化为 JSON。FastAPI 会使用在 JSON 兼容编码器 中阐述的 jsonable_encoder 。 然后, FastAPI 会在后台将这些兼容 JSON 的数据(比如字典)放到一个 JSONResponse 中,该 JSONResponse 会用来发送响应给客户端。路径操作 中直接返回一个 JSONResponse 。
让我们假设你有一个数据库名为 fake_db ,它只能接收与JSON兼容的数据。datetime 这类的对象,因为这些对象与JSON不兼容。因此, datetime 对象必须转换为包含 ISO 格式 的 str 类型对象。dict 。对此你可以使用 jsonable_encoder 。它接收一个对象,比如Pydantic模型,并会返回一个JSON兼容的版本:dict ,并将 datetime 转换为 str 。调用它的结果后就可以使用Python标准编码中的 json.dumps()
title 1 2 3 4 5 6 7 8 9 10 11 12 13 14 15 16 17 18 19 > from datetime import datetime from fastapi import FastAPIfrom fastapi.encoders import jsonable_encoderfrom pydantic import BaseModelfake_db = {} class Item (BaseModel ): title: str timestamp: datetime description: str | None = None app = FastAPI() @app.put("/items/{id}" def update_item (id : str , item: Item json_compatible_item_data = jsonable_encoder(item) fake_db[id ] = json_compatible_item_data
jsonable_encoder 实际上是 FastAPI 内部用来转换数据的。但是它在许多其他场景中也很有用。
通常使用 响应模型 会比直接返回 JSONResponse 拥有更好的性能,因为它会在 Rust 中使用 Pydantic 序列化数据。
你也可以使用 from starlette.responses import JSONResponse 。
出于方便, FastAPI 会提供与 starlette.responses 相同的 fastapi.responses 给开发者。但是大多数可用的响应都直接来自 Starlette。
返回自定义 Response 上面的例子展示了需要的所有部分,但还不够实用,因为你本可以只是直接返回 item ,而 FastAPI 默认帮你把这个 item 放到 JSONResponse 中,又默认将其转换成了 dict 等等。
现在,让我们看看你如何才能返回一个自定义的响应。假设你想要返回一个 XML 响应。Response 中,然后返回:
1 2 3 4 5 6 7 8 9 10 11 12 13 14 15 16 17 from fastapi import FastAPI , Response app = FastAPI () @app.get ("/legacy/" ) def get_legacy_data (): data = "" "<?xml version=" 1.0 "?> <shampoo> <Header> Apply shampoo here. </Header> <Body> You'll have to use soap here. </Body> </shampoo> " "" return Response (content=data, media_type="application/xml" )
额外的状态码 FastAPI 默认使用 JSONResponse 返回一个响应,将你的 路径操作 中的返回内容放到该 JSONResponse 中。FastAPI 会自动使用默认的状态码或者使用你在 路径操作 中设置的状态码。
如果你想要返回主要状态码之外的状态码,你可以通过直接返回一个 Response 来实现,比如 JSONResponse ,然后直接设置额外的状态码。
例如,假设你想有一个 路径操作 能够更新条目,并且更新成功时返回 200 「成功」 的 HTTP 状态码。但是你也希望它能够接受新的条目。并且当这些条目不存在时,会自动创建并返回 201 「创建」的 HTTP 状态码。JSONResponse ,然后在其中直接返回你的内容,并将 status_code 设置为你要的值。
1
2
3
4
5
6
7
8
9
10
11
12
13
14
15
16
17
18
19
20
21
22
23
24
from typing import Annotated from fastapi import Body , FastAPI , statusfrom fastapi.responses import JSON Responseapp = FastAPI () items = {"foo" : {"name" : "Fighters" , "size" : 6 }, "bar" : {"name" : "Tenders" , "size" : 3 }} @app.put ("/items/{item_id}" ) async def upsert_item ( item_id : str, name : Annotated [str | None , Body ()] = None , size : Annotated [int | None , Body ()] = None , ): if item_id in items : item = items[item_id] item["name" ] = name item["size" ] = size return item else : item = {"name" : name, "size" : size} items[item_id] = item return JSON Response(status_code=status.HTTP_201_CREATED , content=item)
当你直接返回一个像上面例子中的 Response 对象时,它会直接返回。
它不会用模型等进行序列化。
确保其中有你想要的数据,且返回的值为合法的 JSON(如果你使用 JSONResponse 的话)。
你也可以使用 from starlette.responses import JSONResponse 。
出于方便, FastAPI 为开发者提供同 starlette.responses 一样的 fastapi.responses 。但是大多数可用的响应都是直接来自 Starlette。 status 也是一样。
如果你直接返回额外的状态码和响应,它们不会包含在 OpenAPI 方案(API 文档)中,因为 FastAPI 没办法预先知道你要返回什么。
但是你可以使用 额外的响应 在代码中记录这些内容。
5.2.2 响应模型如何工作 当你在路径操作中声明一个 响应模型 - 返回类型 时, FastAPI 会使用它通过 Pydantic 将数据序列化为 JSON。
1 2 3 4 5 6 7 8 9 10 11 12 13 14 15 16 17 18 19 20 21 22 from fastapi import FastAPI from pydantic import BaseModel app = FastAPI () class Item (BaseModel ): name : str description : str | None = None price : float tax : float | None = None tags : list[str] = [] @app.post ("/items/" ) async def create_item (item : Item ) -> Item : return item @app.get ("/items/" ) async def read_items () -> list[Item ]: return [ Item (name="Portal Gun" , price=42.0 ), Item (name="Plumbus" , price=32.0 ), ]
由于这些工作会在 Rust 侧完成,性能将比在常规 Python 中配合 JSONResponse 类完成要好得多。
当使用 response_model 或返回类型时,FastAPI 不会使用 jsonable_encoder 来转换数据(那样会更慢),也不会使用 JSONResponse 类。
相反,它会采用使用该响应模型(或返回类型)由 Pydantic 生成的 JSON 字节,并直接返回一个具有正确 JSON 媒体类型( application/json )的 Response 。
5.3 捕获response 对象来修改/获取response 的参数 5.3.1 附加response中
如果你刚开始使用 FastAPI ,可能暂时用不到。
你可以声明附加响应,包括额外的状态码、媒体类型、描述等。
这些附加响应会被包含在 OpenAPI 模式中,因此它们也会出现在 API 文档中。
但是对于这些附加响应,你必须确保直接返回一个 Response (例如 JSONResponse ),并携带你的状态码和内容。
带有 model 的附加响应 你可以向你的 路径操作装饰器 传入参数 responses 。
它接收一个 dict :键是每个响应的状态码(例如 200 ),值是包含该响应信息的另一个 dict 。
这些响应的每个 dict 都可以有一个键 model ,包含一个 Pydantic 模型,就像 response_model 一样。
FastAPI 会获取该模型,生成它的 JSON Schema,并将其放在 OpenAPI 中的正确位置。
例如,要声明另一个状态码为 404 且具有 Pydantic 模型 Message 的响应,你可以这样写:
1 2 3 4 5 6 7 8 9 10 11 12 13 14 15 16 17 18 from fastapi import FastAPI from fastapi.responses import JSON Responsefrom pydantic import BaseModel class Item (BaseModel ): id : str value : str class Message (BaseModel ): message : str app = FastAPI () @app.get ("/items/{item_id}" , response_model=Item , responses={404 : {"model" : Message }}) async def read_item (item_id : str): if item_id == "foo" : return {"id" : "foo" , "value" : "there goes my hero" } return JSON Response(status_code=404 , content={"message" : "Item not found" })
FastAPI 会从这里获取 Pydantic 模型,生成 JSON Schema,并把它放到正确的位置。
正确的位置是:
在键 content 中,它的值是另一个 JSON 对象( dict ),该对象包含:
一个媒体类型作为键,例如 application/json ,它的值是另一个 JSON 对象,该对象包含:
一个键 schema ,它的值是来自该模型的 JSON Schema,这里就是正确的位置。
FastAPI 会在这里添加一个引用,指向你 OpenAPI 中另一个位置的全局 JSON Schemas,而不是直接内联。这样,其他应用和客户端可以直接使用这些 JSON Schemas,提供更好的代码生成工具等。
为该 路径操作 在 OpenAPI 中生成的响应将是:
1 2 3 4 5 6 7 8 9 10 11 12 13 14 15 16 17 18 19 20 21 22 23 24 25 26 27 28 29 30 31 32 33 34 { "responses" : { "404" : { "description" : "Additional Response" , "content" : { "application/json" : { "schema" : { "$ref" : "#/components/schemas/Message" } } } }, "200" : { "description" : "Successful Response" , "content" : { "application/json" : { "schema" : { "$ref" : "#/components/schemas/Item" } } } }, "422" : { "description" : "Validation Error" , "content" : { "application/json" : { "schema" : { "$ref" : "#/components/schemas/HTTPValidationError" } } } } } }
这些模式在 OpenAPI 模式中被引用到另一个位置:
1 2 3 4 5 6 7 8 9 10 11 12 13 14 15 16 17 18 19 20 21 22 23 24 25 26 27 28 29 30 31 32 33 34 35 36 37 38 39 40 41 42 43 44 45 46 47 48 49 50 51 52 53 54 55 56 57 58 59 60 61 62 63 64 65 66 67 68 69 70 71 72 73 74 75 76 { "components" : { "schemas" : { "Message" : { "title" : "Message" , "required" : [ "message" ], "type" : "object" , "properties" : { "message" : { "title" : "Message" , "type" : "string" } } }, "Item" : { "title" : "Item" , "required" : [ "id" , "value" ], "type" : "object" , "properties" : { "id" : { "title" : "Id" , "type" : "string" }, "value" : { "title" : "Value" , "type" : "string" } } }, "ValidationError" : { "title" : "ValidationError" , "required" : [ "loc" , "msg" , "type" ], "type" : "object" , "properties" : { "loc" : { "title" : "Location" , "type" : "array" , "items" : { "type" : "string" } }, "msg" : { "title" : "Message" , "type" : "string" }, "type" : { "title" : "Error Type" , "type" : "string" } } }, "HTTPValidationError" : { "title" : "HTTPValidationError" , "type" : "object" , "properties" : { "detail" : { "title" : "Detail" , "type" : "array" , "items" : { "$ref" : "#/components/schemas/ValidationError" } } } } } } }
主响应的其他媒体类型 你可以使用同一个 responses 参数为同一个主响应添加不同的媒体类型。
例如,你可以添加一个额外的媒体类型 image/png ,声明你的 路径操作 可以返回 JSON 对象(媒体类型为 application/json )或 PNG 图片:
1 2 3 4 5 6 7 8 9 10 11 12 13 14 15 16 17 18 19 20 21 22 23 24 25 from fastapi import FastAPI from fastapi.responses import FileResponse from pydantic import BaseModel class Item (BaseModel ): id : str value : str app = FastAPI () @app.get ( "/items/{item_id}" , response_model=Item , responses={ 200 : { "content" : {"image/png" : {}}, "description" : "Return the JSON item or an image." , } }, ) async def read_item (item_id : str, img : bool | None = None ): if img : return FileResponse ("image.png" , media_type="image/png" ) else : return {"id" : "foo" , "value" : "there goes my hero" }
请注意,你必须直接使用 FileResponse 返回图片。
除非你在 responses 参数中明确指定不同的媒体类型,否则 FastAPI 会假设响应与主响应类具有相同的媒体类型(默认是 application/json )。
但是如果你指定了一个媒体类型为 None 的自定义响应类,FastAPI 会对任何具有关联模型的附加响应使用 application/json 。
组合信息 你也可以把来自多个位置的响应信息组合在一起,包括 response_model 、 status_code 和 responses 参数。
你可以声明一个 response_model ,使用默认状态码 200 (或根据需要使用自定义状态码),然后在 responses 中直接在 OpenAPI 模式里为同一个响应声明附加信息。
FastAPI 会保留来自 responses 的附加信息,并把它与你的模型生成的 JSON Schema 合并。
例如,你可以声明一个状态码为 404 的响应,它使用一个 Pydantic 模型并带有自定义的 description 。
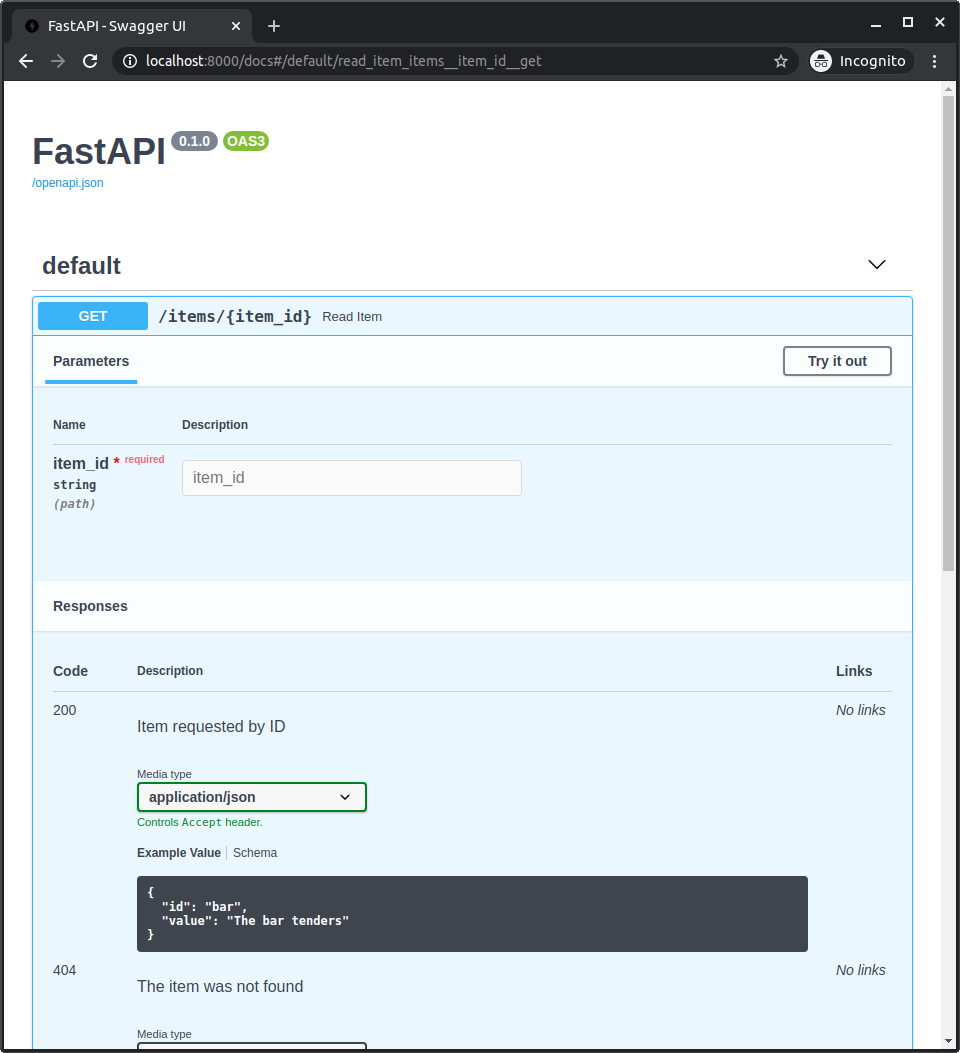
以及一个状态码为 200 的响应,它使用你的 response_model ,但包含自定义的 example :
1 2 3 4 5 6 7 8 9 10 11 12 13 14 15 16 17 18 19 20 21 22 23 24 25 26 27 28 29 30 31 32 33 from fastapi import FastAPI from fastapi.responses import JSON Responsefrom pydantic import BaseModel class Item (BaseModel ): id : str value : str class Message (BaseModel ): message : str app = FastAPI () @app.get ( "/items/{item_id}" , response_model=Item , responses={ 404 : {"model" : Message , "description" : "The item was not found" }, 200 : { "description" : "Item requested by ID" , "content" : { "application/json" : { "example" : {"id" : "bar" , "value" : "The bar tenders" } } }, }, }, ) async def read_item (item_id : str): if item_id == "foo" : return {"id" : "foo" , "value" : "there goes my hero" } else : return JSON Response(status_code=404 , content={"message" : "Item not found" })
所有这些都会被合并并包含到你的 OpenAPI 中,并显示在 API 文档里:
组合预定义响应和自定义响应 你可能希望有一些适用于许多 路径操作 的预定义响应,但同时又想把它们与每个 路径操作 所需的自定义响应组合在一起。
在这些情况下,你可以使用 Python 的“解包” dict 的技巧 **dict_to_unpack :
1 2 3 4 5 6 7 8 9 10 11 12 13 14 15 16 17 18 19 20 21 22 23 24 25 26 from fastapi import FastAPI from fastapi.responses import FileResponse from pydantic import BaseModel class Item (BaseModel ): id : str value : str responses = { 404 : {"description" : "Item not found" }, 302 : {"description" : "The item was moved" }, 403 : {"description" : "Not enough privileges" }, } app = FastAPI () @app.get ( "/items/{item_id}" , response_model=Item , responses={**responses, 200 : {"content" : {"image/png" : {}}}}, ) async def read_item (item_id : str, img : bool | None = None ): if img : return FileResponse ("image.png" , media_type="image/png" ) else : return {"id" : "foo" , "value" : "there goes my hero" }
要查看响应中究竟可以包含什么,你可以查看 OpenAPI 规范中的以下部分:
你可以使用 File 来定义由客户端上传的文件。
确保你创建了 虚拟环境 ,激活它,然后进行安装,例如:
1 $ pip install python-multipart
这是因为上传的文件是以“表单数据”的形式发送的。
导入 File 从 fastapi 导入 File 和 UploadFile
1 2 3 4 5 6 7 8 9 10 11 12 13 from typing import Annotated from fastapi import FastAPI , File , UploadFile app = FastAPI () @app.post ("/files/" ) async def create_file (file : Annotated [bytes, File ()]): return {"file_size" : len (file)} @app.post ("/uploadfile/" ) async def create_upload_file (file : UploadFile ): return {"filename" : file.filename }
🤓 其他版本和变体
1 2 3 4 5 6 7 8 9 10 11 from fastapi import FastAPI , File , UploadFile app = FastAPI () @app.post ("/files/" ) async def create_file (file : bytes = File ()): return {"file_size" : len (file)} @app.post ("/uploadfile/" ) async def create_upload_file (file : UploadFile ): return {"filename" : file.filename }
定义 File 参数 创建文件参数的方式与 Body 或 Form 相同。
1 2 3 4 5 6 7 8 9 10 11 12 13 from typing import Annotated from fastapi import FastAPI , File , UploadFile app = FastAPI () @app.post ("/files/" ) async def create_file (file : Annotated [bytes, File ()]): return {"file_size" : len (file)} @app.post ("/uploadfile/" ) async def create_upload_file (file : UploadFile ): return {"filename" : file.filename }
🤓 其他版本和变体
1 2 3 4 5 6 7 8 9 10 11 from fastapi import FastAPI , File , UploadFile app = FastAPI () @app.post ("/files/" ) async def create_file (file : bytes = File ()): return {"file_size" : len (file)} @app.post ("/uploadfile/" ) async def create_upload_file (file : UploadFile ): return {"filename" : file.filename }
但请记住,当你从 fastapi 导入 Query 、 Path 、 File 等对象时,它们实际上是返回特殊类的函数。
必须使用 File 来声明文件主体,否则参数会被解释为查询参数或主体(JSON)参数。
这些文件将作为“表单数据”上传。
如果你将 路径操作函数 参数的类型声明为 bytes , FastAPI 将为你读取文件,你将以 bytes 形式接收内容。
请记住,这意味着所有内容都将存储在内存中。这对于小文件非常适用。
但在某些情况下,使用 UploadFile 会更有优势。
使用 UploadFile 的文件参数 定义一个类型为 UploadFile 的文件参数。
1 2 3 4 5 6 7 8 9 10 11 12 13 from typing import Annotated from fastapi import FastAPI , File , UploadFile app = FastAPI () @app.post ("/files/" ) async def create_file (file : Annotated [bytes, File ()]): return {"file_size" : len (file)} @app.post ("/uploadfile/" ) async def create_upload_file (file : UploadFile ): return {"filename" : file.filename }
与 bytes 相比,使用 UploadFile 有几个优点:
你不需要在参数的默认值中使用 File() 。
它使用“假脱机 (spooled)”文件。
文件存储在内存中,直到达到最大限制,超过该限制后将存储在磁盘上。
这意味着它非常适合处理大型文件,如图像、视频、大型二进制文件等,而不会耗尽所有内存。
你可以获取上传文件的元数据。
它具有 类文件 (file-like) 的 async 接口。
它暴露了一个实际的 Python SpooledTemporaryFile
UploadFile UploadFile 具有以下属性:
filename :包含上传文件原始名称的 str (例如 myimage.jpg )。content_type :包含内容类型(MIME 类型 / 媒体类型)的 str (例如 image/jpeg )。file :一个 SpooledTemporaryFile类文件 对象)。这是实际的 Python 文件对象,你可以将其直接传递给其他需要“类文件”对象的函数或库。
UploadFile 具有以下 async 方法。它们在底层(使用内部的 SpooledTemporaryFile )调用相应的文件方法。
write(data) :将 data ( str 或 bytes )写入文件。read(size) :读取文件的 size ( int )字节/字符。seek(offset) :跳转到文件中的字节位置 offset ( int )。
例如, await myfile.seek(0) 将跳转到文件开头。
如果你已经运行过 await myfile.read() 但还需要再次读取内容,这特别有用。
close() :关闭文件。
由于所有这些方法都是 async 方法,你需要使用 “await” 来调用它们。
例如,在 async 路径操作函数 内部,你可以通过以下方式获取内容:
1 contents = await myfile.read ()
如果你在普通的 def 路径操作函数 中,则可以直接访问 UploadFile.file ,例如:
1 contents = myfile.file .read ()
当你使用 async 方法时, FastAPI 会在线程池中运行文件方法并等待它们完成。
FastAPI 的 UploadFile 直接继承自 Starlette 的 UploadFile ,但添加了一些必要的部分,使其与 Pydantic 及 FastAPI 的其他部分兼容。
什么是“表单数据” HTML 表单 (<form></form>) 向服务器发送数据的方式通常使用一种“特殊”的编码,它与 JSON 不同。
FastAPI 会确保从正确的地方读取数据,而不是从 JSON 中读取。
当表单不包含文件时,数据通常使用媒体类型 application/x-www-form-urlencoded 进行编码。
但当表单包含文件时,它会被编码为 multipart/form-data 。如果你使用 File , FastAPI 会知道必须从主体的正确部分获取文件。
如果你想了解更多关于这些编码和表单字段的信息,请查阅 MDN 关于 POST 的 Web 文档 。
你可以在 路径操作 中声明多个 File 和 Form 参数,但不能同时声明你期望作为 JSON 接收的 Body 字段,因为请求主体将使用 multipart/form-data 而不是 application/json 进行编码。
这不是 FastAPI 的限制,它是 HTTP 协议的一部分。
可选的文件上传 你可以通过使用标准类型注解并设置默认值为 None ,使文件变为可选。
1 2 3 4 5 6 7 8 9 10 11 12 13 14 15 16 17 18 19 from typing import Annotated from fastapi import FastAPI , File , UploadFile app = FastAPI () @app.post ("/files/" ) async def create_file (file : Annotated [bytes | None , File ()] = None ): if not file : return {"message" : "No file sent" } else : return {"file_size" : len (file)} @app.post ("/uploadfile/" ) async def create_upload_file (file : UploadFile | None = None ): if not file : return {"message" : "No upload file sent" } else : return {"filename" : file.filename }
🤓 其他版本和变体
1 2 3 4 5 6 7 8 9 10 11 12 13 14 15 16 17 from fastapi import FastAPI , File , UploadFile app = FastAPI () @app.post ("/files/" ) async def create_file (file : bytes | None = File (default =None )): if not file : return {"message" : "No file sent" } else : return {"file_size" : len (file)} @app.post ("/uploadfile/" ) async def create_upload_file (file : UploadFile | None = None ): if not file : return {"message" : "No upload file sent" } else : return {"filename" : file.filename }
带有额外元数据的 UploadFile 你也可以将 File() 与 UploadFile 一起使用,例如,设置额外的元数据。
1 2 3 4 5 6 7 8 9 10 11 12 13 14 15 from typing import Annotated from fastapi import FastAPI , File , UploadFile app = FastAPI () @app.post ("/files/" ) async def create_file (file : Annotated [bytes, File (description="A file read as bytes" )]): return {"file_size" : len (file)} @app.post ("/uploadfile/" ) async def create_upload_file ( file : Annotated [UploadFile , File (description="A file read as UploadFile" )], ): return {"filename" : file.filename }
🤓 其他版本和变体
1 2 3 4 5 6 7 8 9 10 11 12 13 from fastapi import FastAPI , File , UploadFile app = FastAPI () @app.post ("/files/" ) async def create_file (file : bytes = File (description="A file read as bytes" )): return {"file_size" : len (file)} @app.post ("/uploadfile/" ) async def create_upload_file ( file : UploadFile = File (description="A file read as UploadFile" ), ): return {"filename" : file.filename }
多文件上传 可以同时上传多个文件。
它们将关联到使用“表单数据”发送的同一个“表单字段”中。
要使用此功能,请声明一个 bytes 或 UploadFile 的列表。
1 2 3 4 5 6 7 8 9 10 11 12 13 14 15 16 17 18 19 20 21 22 23 24 25 26 27 28 29 30 from typing import Annotated from fastapi import FastAPI , File , UploadFile from fastapi.responses import HTMLResponse app = FastAPI () @app.post ("/files/" ) async def create_files (files : Annotated [list[bytes], File ()]): return {"file_sizes" : [len (file) for file in files]} @app.post ("/uploadfiles/" ) async def create_upload_files (files : list[UploadFile ]): return {"filenames" : [file.filename for file in files]} @app.get ("/" ) async def main (): content = "" " <body> <form action=" /files/" enctype=" multipart/form-data" method=" post"> <input name=" files" type=" file" multiple> <input type=" submit"> </form> <form action=" /uploadfiles/" enctype=" multipart/form-data" method=" post"> <input name=" files" type=" file" multiple> <input type=" submit"> </form> </body> " "" return HTMLResponse (content=content)
🤓 其他版本和变体
1 2 3 4 5 6 7 8 9 10 11 12 13 14 15 16 17 18 19 20 21 22 23 24 25 26 27 28 from fastapi import FastAPI , File , UploadFile from fastapi.responses import HTMLResponse app = FastAPI () @app.post ("/files/" ) async def create_files (files : list[bytes] = File ()): return {"file_sizes" : [len (file) for file in files]} @app.post ("/uploadfiles/" ) async def create_upload_files (files : list[UploadFile ]): return {"filenames" : [file.filename for file in files]} @app.get ("/" ) async def main (): content = "" " <body> <form action=" /files/" enctype=" multipart/form-data" method=" post"> <input name=" files" type=" file" multiple> <input type=" submit"> </form> <form action=" /uploadfiles/" enctype=" multipart/form-data" method=" post"> <input name=" files" type=" file" multiple> <input type=" submit"> </form> </body> " "" return HTMLResponse (content=content)
你将按照声明接收到一个 bytes 或 UploadFile 的 list 。
你也可以使用 from starlette.responses import HTMLResponse 。
FastAPI 提供与 fastapi.responses 相同的 starlette.responses 只是为了方便开发者。但大多数可用的响应直接来自 Starlette。
带有额外元数据的多文件上传 与之前一样,你可以使用 File() 来设置额外参数,即使是对于 UploadFile 也是如此。
1 2 3 4 5 6 7 8 9 10 11 12 13 14 15 16 17 18 19 20 21 22 23 24 25 26 27 28 29 30 31 32 33 34 35 36 from typing import Annotated from fastapi import FastAPI , File , UploadFile from fastapi.responses import HTMLResponse app = FastAPI () @app.post ("/files/" ) async def create_files ( files : Annotated [list[bytes], File (description="Multiple files as bytes" )], ): return {"file_sizes" : [len (file) for file in files]} @app.post ("/uploadfiles/" ) async def create_upload_files ( files : Annotated [ list[UploadFile ], File (description="Multiple files as UploadFile" ) ], ): return {"filenames" : [file.filename for file in files]} @app.get ("/" ) async def main (): content = "" " <body> <form action=" /files/" enctype=" multipart/form-data" method=" post"> <input name=" files" type=" file" multiple> <input type=" submit"> </form> <form action=" /uploadfiles/" enctype=" multipart/form-data" method=" post"> <input name=" files" type=" file" multiple> <input type=" submit"> </form> </body> " "" return HTMLResponse (content=content)
🤓 其他版本和变体
1 2 3 4 5 6 7 8 9 10 11 12 13 14 15 16 17 18 19 20 21 22 23 24 25 26 27 28 29 30 31 32 from fastapi import FastAPI , File , UploadFile from fastapi.responses import HTMLResponse app = FastAPI () @app.post ("/files/" ) async def create_files ( files : list[bytes] = File (description="Multiple files as bytes" ), ): return {"file_sizes" : [len (file) for file in files]} @app.post ("/uploadfiles/" ) async def create_upload_files ( files : list[UploadFile ] = File (description="Multiple files as UploadFile" ), ): return {"filenames" : [file.filename for file in files]} @app.get ("/" ) async def main (): content = "" " <body> <form action=" /files/" enctype=" multipart/form-data" method=" post"> <input name=" files" type=" file" multiple> <input type=" submit"> </form> <form action=" /uploadfiles/" enctype=" multipart/form-data" method=" post"> <input name=" files" type=" file" multiple> <input type=" submit"> </form> </body> " "" return HTMLResponse (content=content)
总结 使用 File 、 bytes 和 UploadFile 来声明请求中要上传的文件(以表单数据形式发送)。